Global Machinery Company SPJ2HM User Manual
Page 8
8
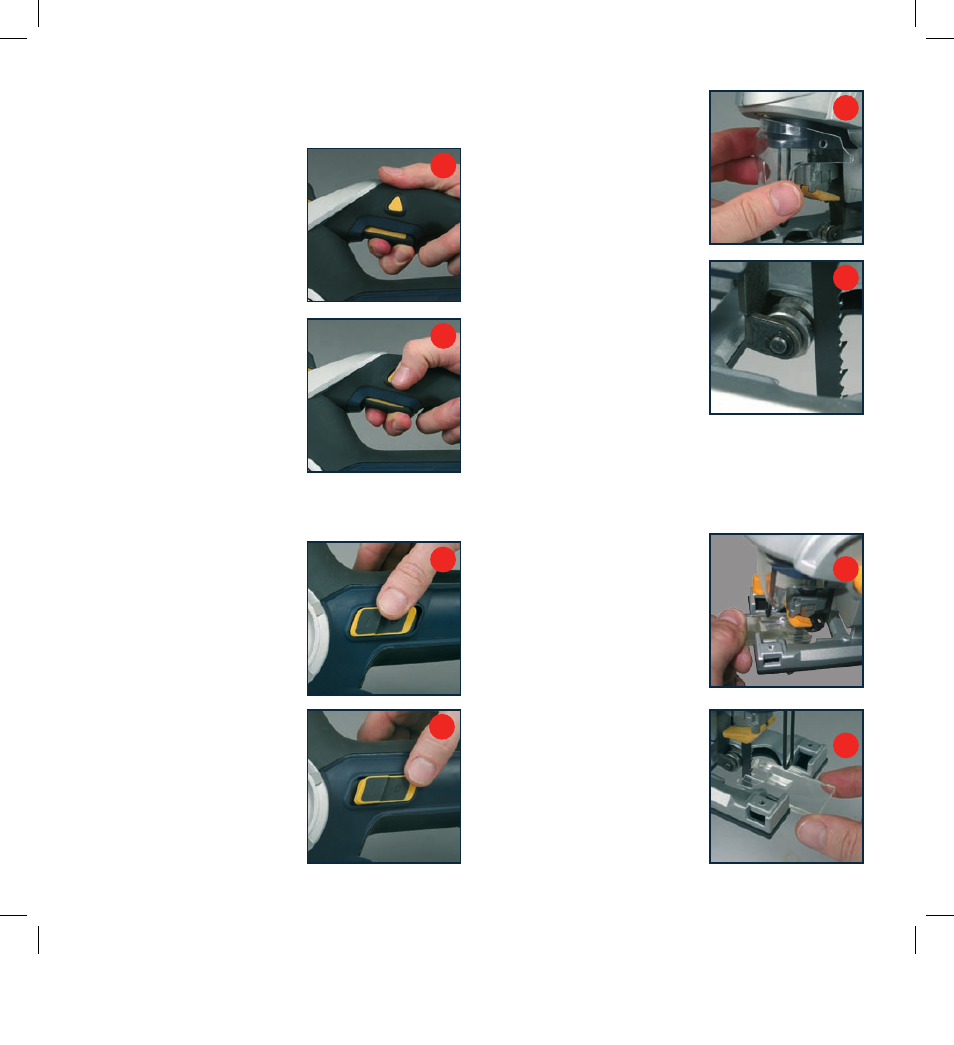
Trigger switch
Note.
The trigger switch is only used in the conventional
jigsaw mode, when the
removable handle is fitted.
Pull up on the trigger switch (1)
to turn the jigsaw on. To turn
off the tool, release the trigger
switch (fig A).
CAUTION. Allow the blade
to come to a complete standstill
before setting the jigsaw down.
Lock-on button
Note.
The lock-on button
eliminates the need to hold
the trigger switch (1) on during
prolonged operation.
With the trigger engaged in the
“on” position, push in the lock-
on button (3) to lock the trigger
switch “ON” (fig B).
To release the lock-on, engage and release trigger switch (1).
On/off switch
Note.
The on/off switch (2) is
used only in the barrel saw
mode, when the removable
handle (9) has been taken off
the jigsaw.
Push the on/off switch (2) forward
and up over the latching ramp to
lock the switch on (fig C).
To turn off the tool, press the
back of the switch and lift it over
the latching ramp (fig D).
CAUTION.
Allow the blade to
come to a complete standstill
before setting the jigsaw down.
Blade guard
The blade guard (6) should
always be in position when
operating the jigsaw. It can be
removed to allow easier access
when changing blades (fig E).
Blade guide
The grooved disc blade guide
(7) is spring loaded so that it can
accomodate varying jigsaw blade
widths. It supports the back edge
of the blade, keeping it running
straight and helping to prevent
the blade from bending which
improves the accuracy of the cut
and reduces the chance of blade
breakage (fig F).
Note.
Depending on the position of the pendulum lever, the
blade guide remains stationary (non-pendulum) or oscillates
backwards and forwards, causing the blade to cut with a
pendulum action.
Anti splintering insert
Because jigsaws cut on the up
stroke, the top layer of wood,
particularly plywood, tends to
tear and splinter thus obscuring
the line of the cut and causing a
rough edge. The splinter insert
supports the wood fibres on the
top layer of the workpiece and
greatly reduces the splintering
effect.
1. With the power off, slide the
anti splinter insert (23) up to
the jigsaw blade (fig Ga & Gb).
Ensure the jigsaw’s pendulum
lever (5) is switched to zero
(ie. Position 1).
A
B
C
D
E
F
Ga
Gb