Fisher & Paykel DD36S User Manual
Page 5
5
5
1
2
4
1
2
3
4
4
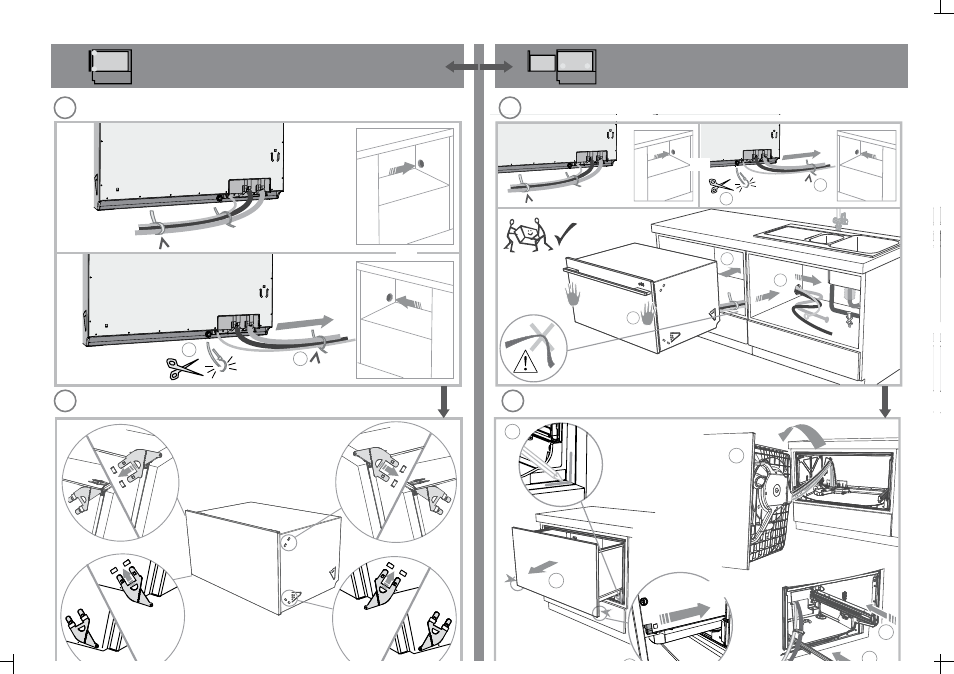
ROUTE HOSES & POWER CORD
ROUTE HOSES & POWER CORD & MOVE INTO CAVITY
ATTACH SIDE MOUNTING BRACKETS
REMOVE DRAWER
7
8
8
1
2
Ensure the drawer
is removed and
then rotated
counter-clockwise
to prevent kinked
hoses.
RECOMMENDED METHOD - SECURE WITHOUT
DRAWER REMOVAL (FRAMELESS CABINETRY ONLY)
ALTERNATIVE METHOD -
SECURE BY DRAWER REMOVAL
Tie together to avoid kinking
.
Clip all four side mounting
brackets into their slots,
using a flat-bladed
screwdriver. Ensure they’re
securely fitted before
sliding product into cavity.
The mounting slots are in pairs, one
on each side diagonally across the
product. ‘A’ bracket must match ‘A’
l
d ‘B’ b
k
h ‘B’ l
‘B’
‘B’
‘B’
‘B’
‘B’
‘A’
‘A’
‘A’
‘A’
‘A’
‘A’
‘B’
OR
7
Tie together to avoid kinking
.
OR
Ensure hoses and cord
are not kinked or twisted.
Push back the dra
wer clips
on both sides 13⁄16”(30
mm)
Mark the placement in
case the chassis moves.
(1,1) -2- 599796A DD36S installA2 USCA.indd 19/2/10 11:33:29 AM
(1,1) -2- 599796A DD36S installA2 USCA.indd 19/2/10 11:33:29 AM