Quick guide, 1 overview – Sprolink NeoLIVE R2 Plus Video Switcher User Manual
Page 3
1. Quick Guide
1.1 Overview
NeoLive R2 Plus is a professional live streaming switcher. It supports 4 x HDMI
multi-resolution inputs and 2 x external audio inputs. The output supports 2 x HDMI PGM
outputs, and transmits the real-time audio and video signals to the computer for live
streaming through the TypeC interface, user can also fill in the RTMP code for network
streaming directly.
When using the TypeC interface, Neolive R2Plus will be recognized by the computer as a
high-definition web camera, which can adaptively support MJPEG and YUY2 formats (the
default format is MJPEG under USB2.0, while it is YUY2 default under USB3.0, YUY2
format supports better image quality, higher-quality performance and more efficient
decoding performance, YUY2 format is better for use). It has a built-in 5.5-inch LCD
display, which can realize real-time monitoring of input and output and online operation. At
the same time, it has more convenient functions, such as PTZ camera control, scene
preset, chroma /luma key, special transition effects, mixed audio and monitoring and
recording etc. R2Plus can also deal with various live broadcasting needs which is a
professional product in live streaming.
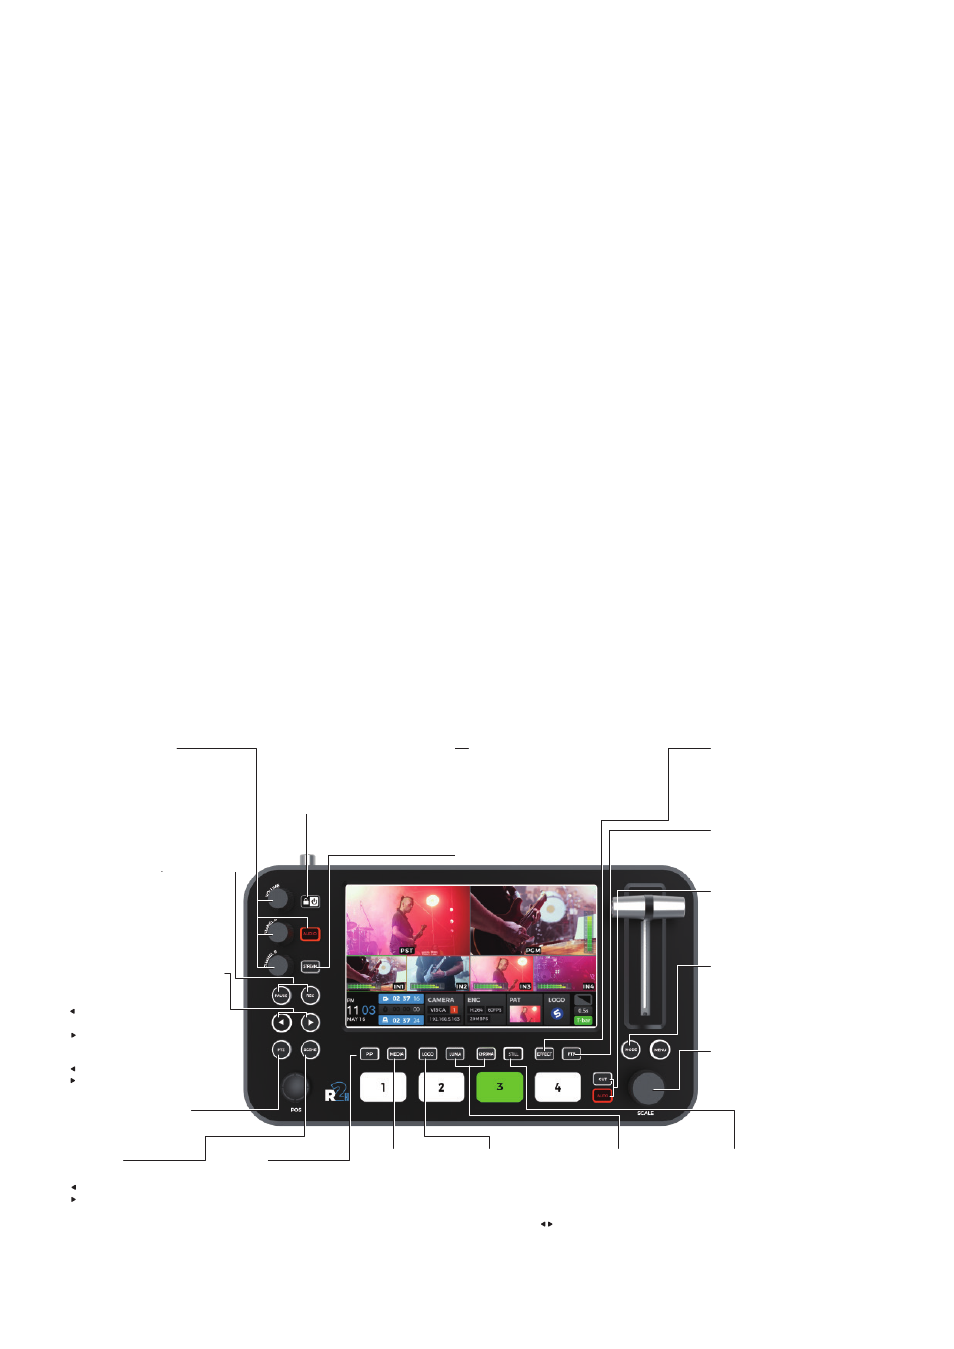
Switch & Lock Button
Press to power on
Short press and return to the main scene
Press and hold for 3s to lock and unlock
Press and hold for 5s to switch off
REC & Pause
Press the REC button to start
recording for PGM
Press again to stop recording
and generate MP4 files
Press PAUSE to stop recording
or continue recording
Auxiliary Operation Area
Under PTZ control
It is for logo switching when the logo
button is flashing
+Scale knob is for layer vertical
adjustment
+Scale knob is for layer horizontal
adjustment
After pressing Scene
for Save page the scene,
for Load page for scene
It is for zoom in or out
SCENE
Press to activate the scene
for Save page the scene,
for Load page for scene
Select the number button to save
and load the scene
PIP
Press to enable PIP
Press again to select the PIP
sub-layer
When the button is flashing,
and the sub-layer can be
edited and closed
MEDIA
Load picture
Select image as
signal source when
editing layers
LOGO
Press to display the logo
Press again to edit the logo
Adjust the logo position by
joystick
Switch the logo by button
LUMA &
CHROMA KEY
STILL
Press to chroma key for the
current input source
Press STILL to freeze the
PGM screen
EFFECT
Press STILL to freeze the current
PGM screen
Knob
It is for the menu operation when
the menu is activated
Layer zoom adjustment in the scene
FTB
Press to fade to black in PGM output
CUT & AUTO
Press CUT to switch between PST & PGM
Press AUTO to realize the transition effect
between PST & PGM
MODE
For layer operation modes
T-bar mode is for PST layer operation
EAZY mode is for PGM layer switching
STREAM Button
Press STREAM button to start the
RTMP stream. The button is on when
the stream is normal
Audio Operation
Press Audio to enter the audio setting interface
The volume knob is for the PGM output volume
adjustment
Press to mute and restore
The Channel A knob is for the volume
adjustment of PIP
The Channel B knob is for the volume
adjustment of the background