Water connection, Installing the water tank, Preparation – InSinkErator F-C1100 Cold Only Faucet User Manual
Page 3
a
3
WATER CONNECTION
Brass Nut
Ferrule
Brass Insert
Brass Nut
Ferrule
Plastic
tube
1
4
Inlet
Outlet
White Tape
From filter or
water supply
To chilled water
tank “Inlet”
To hot water
dispenser
To remove tube(s) or plug from quick-connector,
depress the release ring and gently pull away.
Follow these steps for installing chilled water tank with instant hot/cool water dispenser.
Property Damage: All tubes must be cut
squarely with no burrs.
2
Attach supplied quick connect elbow
to end of supplied white 1/4" tube.
Attach quick connect elbow to water
Inlet on front of chilled water tank.
Measure distance from water inlet
on chilled water tank to water supply
valve. Carefully trim white 1/4" tube,
allowing ample slack in tubing.
INSTALLING THE WATER TANK
Attach supplied quick connect elbow
to end of supplied blue 1/4" tube.
Attach quick connect elbow with
blue tube to water Outlet on front of
chilled water tank.
Measure distance from the chilled
water tank outlet to water supply line
on faucet. Carefully trim blue tube to
correct length.
Using quick connect elbow, connect
remaining end of blue tube to unmarked
copper tube coming from faucet.
White Tape
Brass Nut
Ferrule
Brass Insert
Brass Nut
Ferrule
Plastic
tube
1
4
Inlet
Outlet
White Tape
Property Damage: Do not pinch or break tubing.
Do not distort the last 1" of tubing.
Pull on connection to ensure fully engaged.
Remove existing “Y” quick-connect
fitting and discard.
Connect white 3/8" tube from
the filter or water supply into the
supplied “Y” quick-connect fitting
until it stops.
Insert 1/4" white tube from
tank inlet into the 3/8" to 1/4"
quick-connect fitting.
Identify copper HOT water tube,
which is marked with white tape.
Install that tube into the 3/8" to 1/4"
quick-connect fitting.
Property Damage: Do not place objects
on top of chilled water tank which
could obstruct the fan.
PREPARATION
Unplug instant hot water tank and
hold handle in open position until
cool water flows from spout.
Turn off water supply.
Identify the undersink location for the
chilled water tank.
For best performance, allow for a
minimum 2" space around the sides
and top of the chilled water tank.
The chilled water tank will require
a minimum footprint of 15" wide
by 11" deep.
Ensure that there is a minimum
of 18" vertical clearance for the
chilled water tank.
1
a
< 18"
< 11"
< 15"
Brass Nut
Ferrule
Brass Insert
Brass Nut
Ferrule
Plastic
tube
1
4
Inlet
Outlet
White Tape
Follow these steps for installing chilled water tank with instant hot/cool water dispenser.
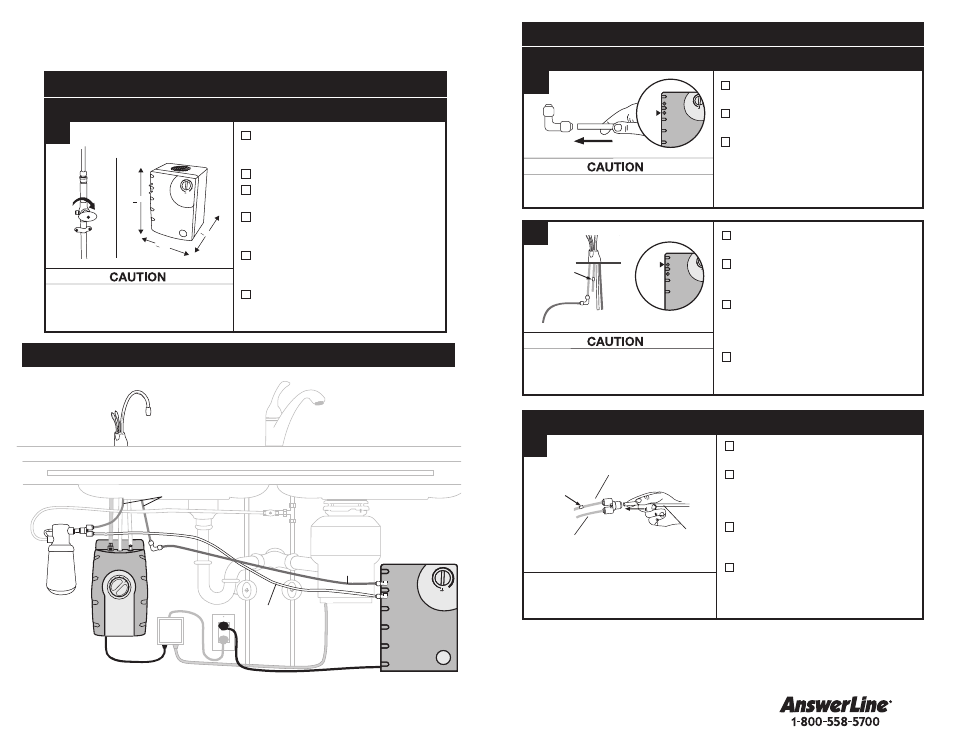
Filter
Copper Tubing
Blue Tubing
Blue Tubing
White Tubing
White Tubing
Cold Only Faucet
Instant Hot/Cool
Water Dispenser Faucet
Filter
Instant
Hot Water
Tank
Food
Waste
Disposer
Food
Waste
Disposer
Chilled
Water
Tank
Air-Activated
SinkTop Switch
™
Air-Activated
SinkTop Switch
™
Chilled
Water
Tank
Copper Tubing
Shown with optional filtration
OVERVIEW OF A TYPICAL INSTALLATION with Instant Hot Water Dispenser
These instructions assume instant hot/cool water dispenser faucet, tank
and/or filter has already been installed. Refer to Installation, Care & Use
manual included with hot/cool water dispenser.
5
4
Note: Chilled water tank must be plugged
directly into open wall outlet.
Brass Nut
Ferrule
Brass Insert
Brass Nut
Ferrule
Plastic
tube
1
4
Inlet
Outlet
White Tape
b
a