Rubbermaid FG750112 User Manual
Tc autofoam touch-free dispenser, 12 2a 2b
TC AutoFoam Touch-Free Dispenser
Installation Instructions
Battery Installation
Mounting Dispenser
1
2
3
4
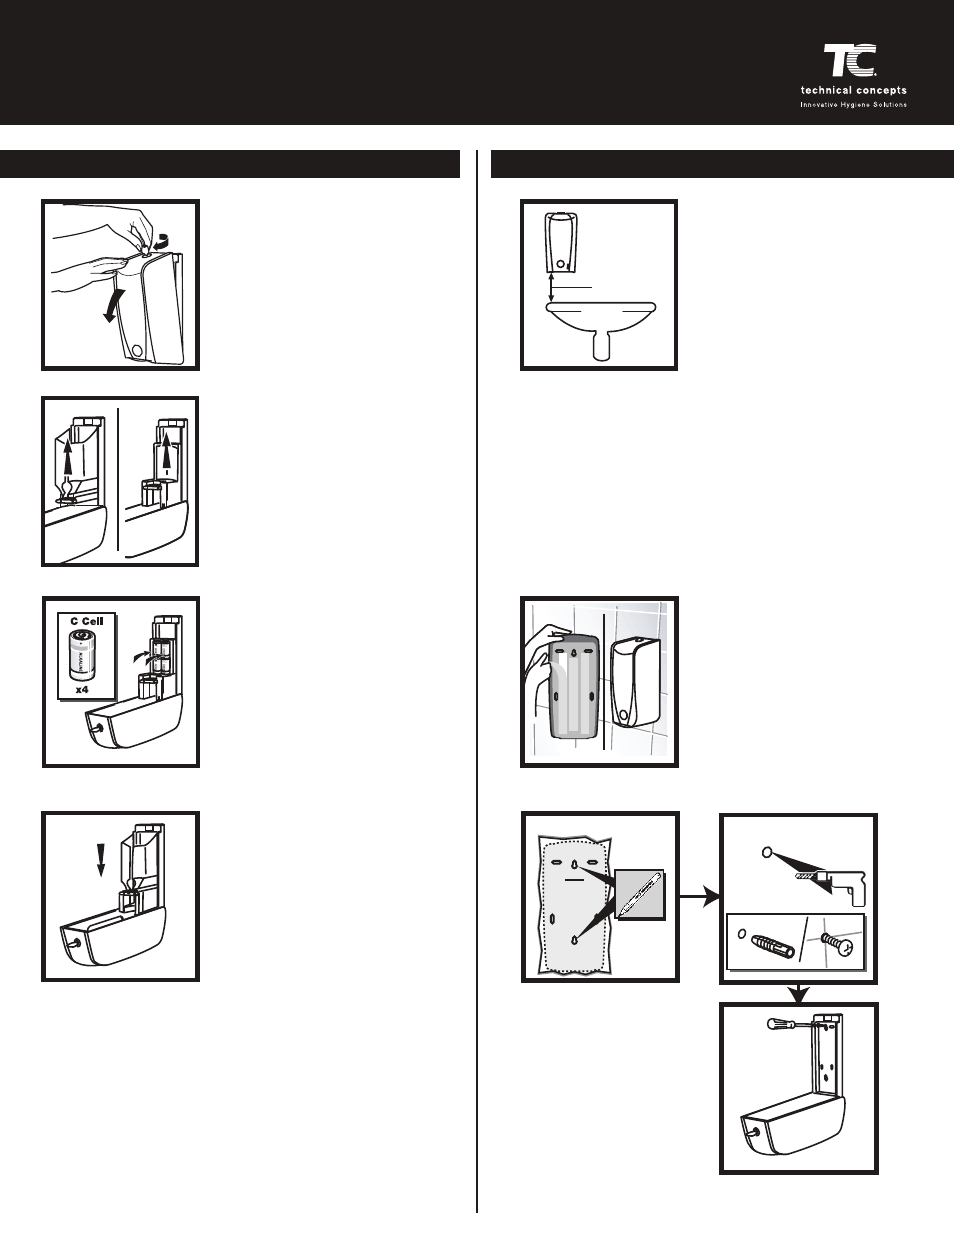
Use the dispenser cabinet key to
open the front cover. Insert the key
into the holes located at the top of
the dispenser, twisting the key, and
pulling the cover towards you. The
cover is hinged at the bottom of the
dispenser.
Remove the soap refill pouch holder by
pulling it straight up.
Insert four C-cell alkaline batteries
(not included) making sure to place
batteries in the compartment in the
proper orientation as shown by the
diagram in the battery compartment.
Replace the soap refill pouch holder.
The dispenser will turn “on” automati-
cally once batteries are installed.* You
will hear a long beep signifying the unit
is activated.
* If the dispenser appears
non-functional, remove batteries, wait
4 minutes and re-insert them.
1
2
2a
2b
The dispenser should be mounted
12.5 inches (31.75 cm) above the
counter-top, sink or other surface.
If an object remains in the sensing
range for more then 10 seconds,
the green LED will flash and no
soap will be dispensed after the
initial dose. Remove object and
unit will operate normally
NOTE: Insure that proper mounting hardware is used for
your particular wall composition.
Once the batteries have been installed, without a refill installed in
dispenser, close dispenser cover. The setup sequence will be
initiated. During this period, the sensor will automatically detect if
the dispenser is too close to a surface below by sounding a
beeping tone every half-second and the green indicator light will
flash once each second. As you are positioning the dispenser, you
can verify the proper mounting distance by moving the dispenser
away from the surface below the sensor until the tone and the
green indicator light cease. The dispenser can be mounted to
either a mirror or a tile surface using the double-sided tape
provided (2a) or mounting the dispenser to the wall (2b).
Using the template from the
dispenser carton, drill holes
into wall with a 1/4" or 6mm
drill bit where dispenser is to
be mounted. Remove template
and align holes in backplate of
dispenser with the pre-drilled
holes. Screws and anchors
have been provided to mount
the dispenser to the wall.
Use the alcohol wipe provided to
thoroughly clean any surface that will
have adhesive tape attached. Pull off
the protective backing off the
adhesive tape and mount the
dispenser to the wall holding it in
place for 10-15 seconds allowing
the tape to adhere to the mounting
surface. Remove the batteries from
the dispenser. Let the dispenser
set up for 24 hours before
installing the batteries and refill.
MIN
12.5 in
31.75 cm
.236 in
06 mm
DRILLING TEMPLATE
Drilling Template
From Side of
Dispenser Carton
CAUTION
PLEASE USE
DRILLING TEMPLATE
Wall Mount