5 • installing the canopy and canopy trim ring – Hunter Fan 42639-01 User Manual
Page 8
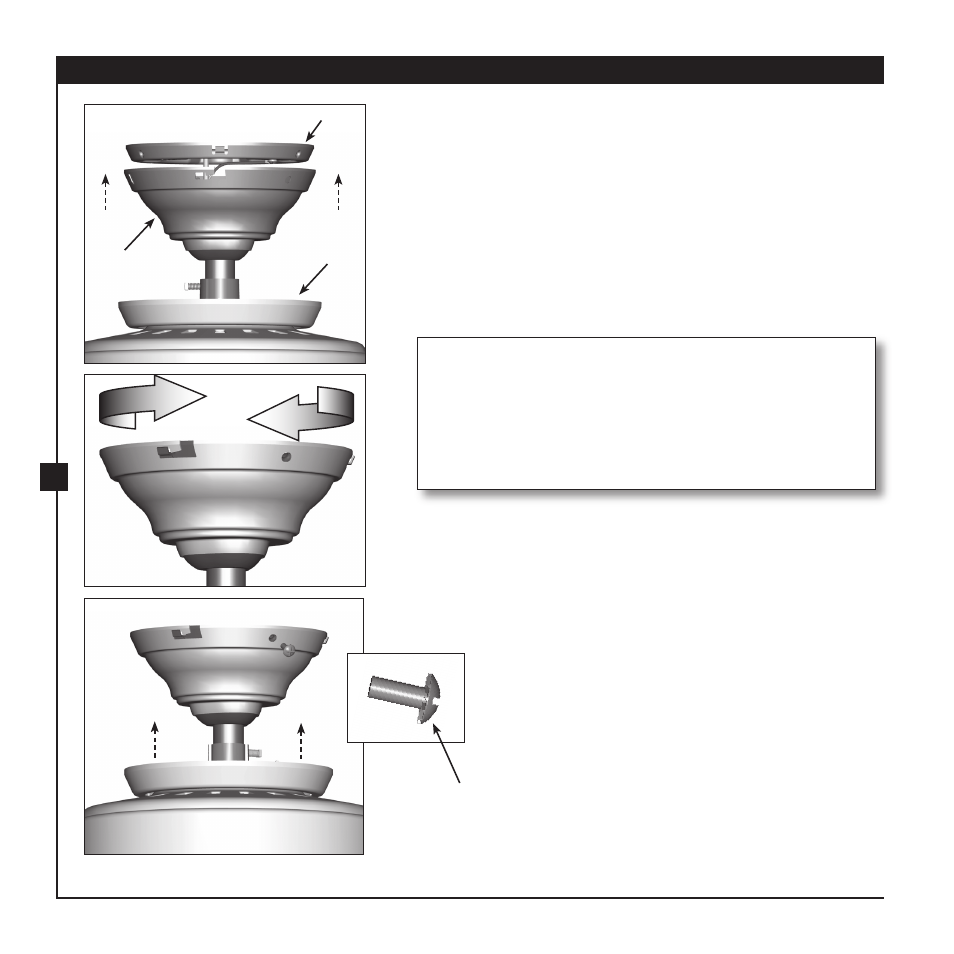
5 • Installing the Canopy and Canopy Trim Ring
Step 5-2
Canopy Trim
Ring
Canopy
Ceiling Plate
Canopy
Screw
Steps 5-4 – 5-5
Should you need to remove the canopy trim ring, follow
these steps:
1. Locate the tab indicators, small bumps on top of tabs.
2. Press firmly on opposite sides of the ring towards the
canopy. The tabs will flex out releasing the trim ring from
the canopy.
5-1. Holding the canopy, raise the fan off the hook.
5-2. Align the slots in the canopy with the tabs on the ceiling plate.
5-3. Raise the canopy over the ceiling plate. Rotate the canopy
clockwise until the tabs on the ceiling plate totally engage with
the slots in the canopy.
5-4. Partially install the three canopy screws into the canopy one at a
time. Once all three screws are in, tighten them.
5-5. Using both hands, push the canopy trim ring up to the top of the
canopy. The canopy trim ring will snap and lock into place.
Step 5-3
Hunter Fan Company
42639-01 • 4/5/07
- 21422 (2 pages)
- Hunter Ceiling Fans Type (12 pages)
- Type (13 pages)
- Type (16 pages)
- Type (18 pages)
- TypeG (17 pages)
- 21100 (2 pages)
- 28665 28642 (2 pages)
- 81004 (32 pages)
- 21325 (2 pages)
- fan parts 2.84453E+19 (4 pages)
- 20182 (2 pages)
- HUNTER Ceiling Fans (14 pages)
- Saturn 90054 (40 pages)
- 21337 (2 pages)
- 43041-01 (65 pages)
- Ceiling Fans (12 pages)
- 20178 (2 pages)
- 21562 (2 pages)
- Grandview 23923 (14 pages)
- 23963 (2 pages)
- 21317 (2 pages)
- 28528 (2 pages)
- 28039 (2 pages)
- Ceiling Fan Parts 23933 (2 pages)
- LA STRADA 82022 (63 pages)
- 42501-01 (15 pages)
- 82005 (28 pages)
- 21620 (4 pages)
- 25745 (2 pages)
- Hunter 21201 (2 pages)
- 21425 (2 pages)
- 83001 (40 pages)
- 21321 (2 pages)
- Fan Parts & Hardware 20806 (2 pages)
- VENTURA BATH VENTILATOR FAN WITH LIGHT 81004 (32 pages)
- Ceiling Fan Parts 28609A (2 pages)
- HUNTER CEILING FAN TYPE (15 pages)
- 23909 (2 pages)
- 82003 (28 pages)
- 20531A (2 pages)
- Fan Parts 25860 (1 page)
- ELLIPSE 90064 (40 pages)
- 23488 23489 (2 pages)
- 28665 (2 pages)