Warning – Hitachi CB 13F User Manual
Page 6
—
—
6
IN THE EVENT OF A MALFUNCTION OR BREAKDOWN,
grounding provides a path of least resistance for electric
current and reduces the risk of electric shock. T his tool is
equipped with an electric cord that has an equipm ent-
grounding conductor and a grounding plug. T he plug
M U S T be plugged into a m atching receptacle that is
properly installed and grounded in accordance with A LL
local codes and ordinances.
DO NOT MODIFY THE PLUG PROVIDED. If it will not fit the
receptacle, have the proper receptacle installed by a
qualified electrician.
IMPROPER CONNECTION of the equipment-grounding
conductor can result in risk of electric shock. T he
conductor with green insulation (with or without yellow
stripes) is the equipm ent-grounding conductor. If repair or
replacem ent of the electric cord or plug is necessary, DO
N OT connect the equipm ent-grounding conductor to a live
term inal.
CHECK with a qualified electrician or service person if you
do not com pletely understand the grounding instructions,
or if you are not sure the tool is properly grounded.
USE ONLY 3-wire extension cords that have 3-prong
grounding plugs and 3-pole receptacles that accept the
tool's plug. Repair or replace damaged or worn cord
immediately.
U se a separate electrical circuit for your tools. T his circuit
m ust not be less than # 12 wire and should be protected
with a 15 A m p tim e delay fuse. B efore connecting the
m otor to the power line, m ake sure the switch is in the
OFF position and the electric current is rated the sam e as
the current stam ped on the m otor nam eplate. R unning at
a lower voltage will dam age the m otor.
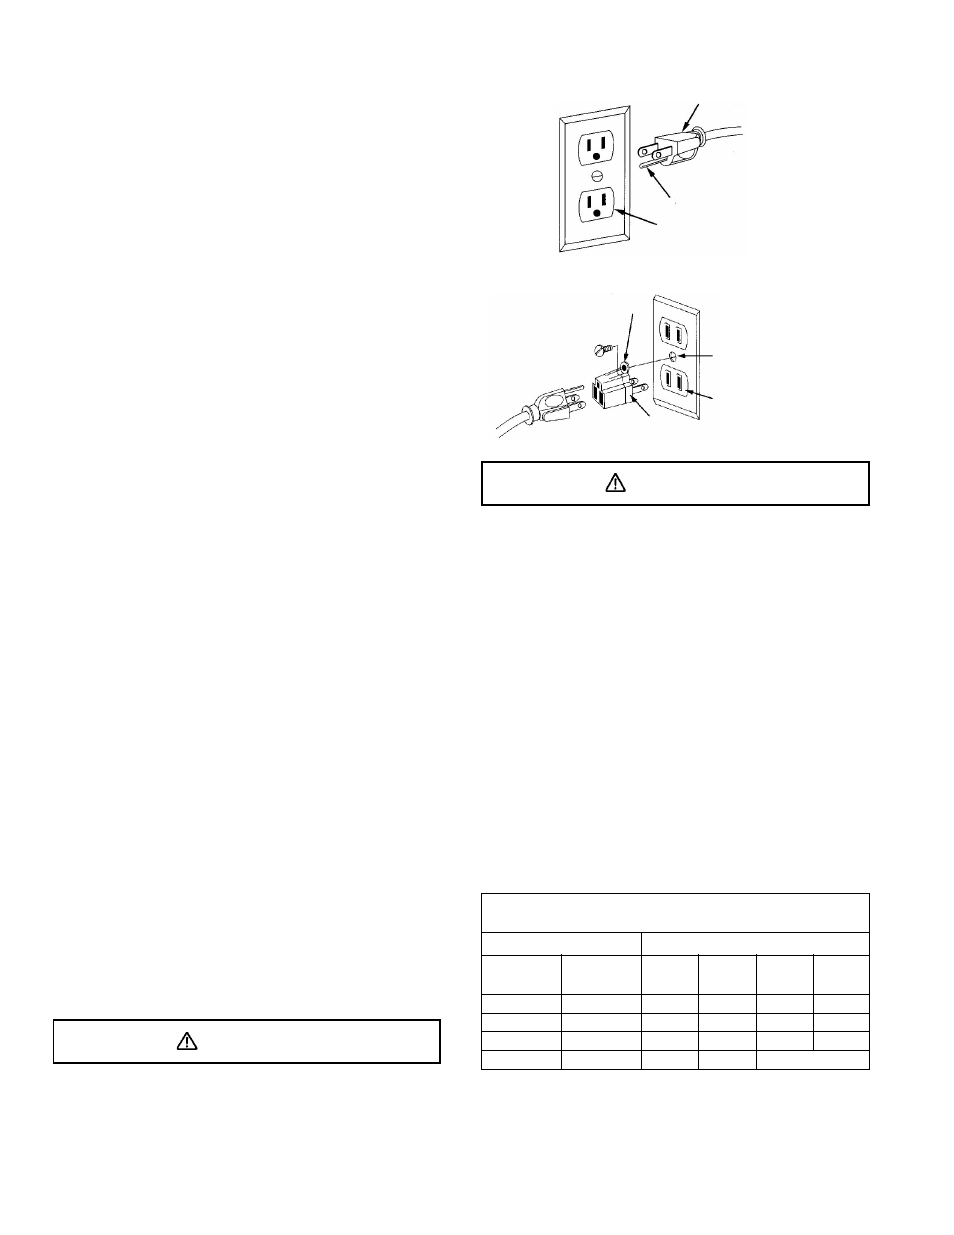
T his tool is intended for use on a circuit that has a
receptacle like the one illustrated in Figure A .
shows a 3-prong electrical plug and receptacle that has a
grounding conductor. If a properly grounded receptacle is
not available, an adapter (Figure B ) can be used to
tem porarily connect this plug to a 2-contact ungrounded
receptacle. T he adapter (Figure B ) has a rigid lug extending
from it that M U S T be connected to a perm anent earth
ground, such as a properly grounded receptacle box.
T HE T E N POR A R Y A DA PT E R S HOU LD B E U S E D ON LY
U N T IL A PR OPE R G R OU N DE D PU T LE T CA N B E
IN S T A LLE D B Y A QU A LIFIE D E LE CT R ICIA N . T he Canadian
E lectrical Code prohibits the use of adapters.
CAUTION: In all cases, make certain the receptacle is
properly grounded. If you are not sure, have a qualified
electrician check the receptacle.
WARNING
T his tool is for indoor use only. Do not expose to rain or
use in dam p locations.
Fig. A
3-Prong Plug
G rounding Prong
Properly G rounded
3-Prong R eceptacle
Fig. B
2-Prong
R eceptacle
A dapter
G rounding Lug
M ake S ure T his
is Connected to a
K nown G round
WARNING
T his band saw is for indoor use only. Do not expose to
rain or use in dam p locations
GUIDELINES FOR EXTENSION CORDS
USE PROPER EXTENSION CORD. M ake sure your
extension cord is in good condition. W hen using an
extension cord, be sure to use one heavy enough to carry
the current your product will draw. A n undersized cord
will cause a drop in line voltage, resulting in loss of power
and cause overheating. T he table below shows the correct
size to use depending on cord length and nam eplate
am pere rating. If in doubt, use the next heavier gauge.
T he sm aller the gauge num ber the heavier the cord.
Be sure your extension cord is properly wired and in good
condition. A lways replace a dam aged extension cord or
have it repaired by a qualified person before using it.
Protect your extension cords from sharp objects,
excessive heat and dam p or wet areas.
MINIMUM GAUGE FOR EXTENSION CORDS (AWG)
(When using 120 Volt only)
A m pere R ating
T otal length in feet
N ot
M ore T han M ore T han
25'
50'
100'
150'
0
6
18
16
16
14
6
10
18
16
14
12
10
12
16
16
14
12
12
16
14
12 N ot A pplicable