Almacenamiento – Husqvarna 532 41 44-89 User Manual
Page 8
8
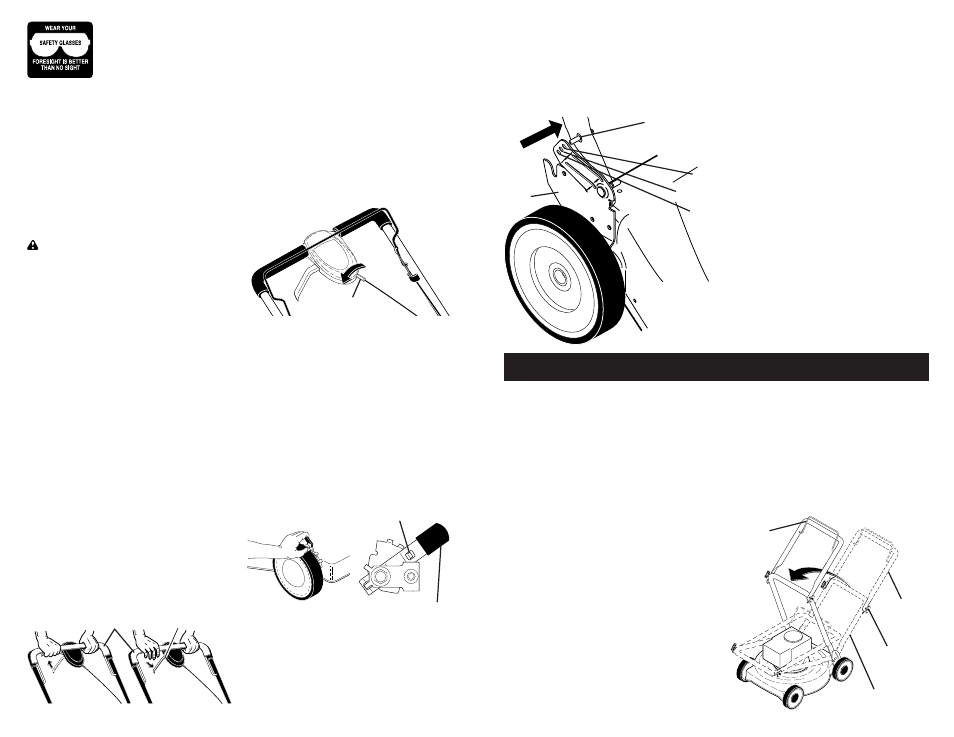
DRIVE CONTROL ADJUSTMENT
Over time, the drive control system may
become “loose”, resulting in decreased
speed. There is a turnbuckle on the drive
control housing to increase tension on the
drive cable. Pro ceed as follows:
1. Turn unit off and disconnect spark plug
wire from spark plug.
2. Rotate turnbuckle on drive control to
increase drive speed.
3. Operate mower to test drive speed.
Readjust as required.
4. If condition fails to improve after the
above steps (forward speed remains
the same), your drive belt is worn and
should be re placed.
The operation of any lawn
mower can result in foreign
objects thrown into the eyes,
which can result in severe
eye damage. Always wear
safety glasses or eye shields while oper-
ating your lawn mower or performing any
ad just ments or repairs. We recommend a
standard safety glasses or wide vision safety
mask worn over spectacles.
HOW TO USE YOUR LAWN MOWER
ENGINE SPEED
The engine speed was set at the factory
for optimum performance. Speed is not
adjustable.
ENGINE ZONE CONTROL
CAUTION: Federal regulations re quire
an engine control to be installed on this
lawn mower in order to minimize the
risk of blade contact injury. Do not un der
any circumstances attempt to de feat the
func tion of the operator con trol. The blade
turns when the engine is running.
• Your lawn mower is equipped with an
operator pres ence control bar which
requires the operator to be positioned
behind the lawn mower handle to start
and operate the lawn mower.
DRIVE CONTROL
• Self-propelling is controlled by hold-
ing the operator presence control bar
down to the handle and pulling the drive
control lever rearward to the handle.
The farther toward the handle the lever
is pulled, the faster the unit will travel.
• Forward motion will stop when either
the operator presence control bar or
drive control lever are released. To stop
forward motion without stop ping engine,
re lease the drive control lever only. Hold
op er a tor presence control bar down
against handle to con tin ue mowing
without self-propelling.
NOTE: If after releasing the drive control
the mower will not roll backwards, push
the mower forward slightly to disengage
drive wheels.
Adjustment
turnbuckle
TO
ENGAGE
DRIVE
CONTROL
Drive control
lever
DRIVE
CONTROL
DISENGAGED
Operator presence control bar
TO ADJUST CUTTING HEIGHT
Raise wheels for low cut and lower wheels
for high cut, adjust cutting height to suit
your requirements. Me di um position is
best for most lawns.
• To change cutting height, squeeze ad-
juster lever to ward wheel. Move wheel
up or down to suit your re quire ments.
Be sure all wheels are in the same set-
ting.
NOTE: Adjuster is properly positioned
when plate tab inserts into hole in lever.
Also, 9-position adjusters (if so equipped)
allow lever to be positioned between the
plate tabs.
LEVER BACKWARD
TO LOWER MOWER
LEVER FORWARD TO RAISE MOWER
Plate tab
Lever
TO ATTACH GRASS CATCH ER
1. Lift the rear door of the lawn mower
and place the grass catcher frame side
hooks onto the door pivot pins.
2. The grass catcher is secured to the
lawn mower housing when the rear
door is lowered onto the grass catch er
frame.
33
PARA AJUSTAR EL MANGO
El mango de su segadora cuenta con tres (3)
posiciones de altura – ajústelo a la altura que le
acomode.
• Presione las extremidades inferiores del
mando inferior una en contra una de la otra
hasta que la pinza del mango pueda ser
insertada en uno de los tres agujeros del
control de la altura.
Puntal
del
mango
Pinza del mango
Alta
Mediana
Baja
APRIETE
ALMACENAMIENTO
Inmediatamente prepare su segadora para el
almacenamiento al fi nal de cada temporada o si
la unidad no se va a usar por 30 días o más.
SEGADORA
Cuando se va a guardar la segadora por cierto
período de tiempo, límpiela cuidadosamente,
remueva toda la mugre, la grasa, las hojas, etc.
Guárdela en un área limpia y seca.
1. Limpie toda la segadora (Vea “LIMPIEZA”
en la sección de Mantenimento de este
manual).
2. Lubríquela según se muestra en la sección
de Mantenimento de este manual.
3. Asegúrese de que todas las tuercas y
clavijas y todos los pernos y tornillos estén
apretados en foma segura. Inspeccione
las partes que se mueven para verifi car si
están dañadas, quebradas o desgastadas.
Cámbielas si es necesario.
4. Retoque todas las superfi cies que estén
oxidadas o con la pintura picada; use una
lija antes de pintar.
MANGO
Puede doblar el mango de su segadora para el
almacenamiento.
1. Suelte las dos (2) manillas del mango en
cada lado del mango superior y permita que
el mango se doble hacia detras.
POSICIÓN
PARA
SEGAR
Barra de control
que exige la
presencia del
operador
DOBLAR
HACIA
ADELANTE
PARA
ALMACENAR
Mango
superior
Mango inferior
Manilla del
mango
MOTOR
VELOCIDAD DEL MOTOR
La velocidad del motor ha sido ajustada en
la fábrica. No trate de aumentar la velocidad
del motor pues se pueden producir lesiones
personales. Si cree que el motor está funciona-
ndo demasiado rápido o demasiado lento, lleve
su segadora a mas con su centro de servicio
Husqvarna o con un otro centro de servicio
cualifi cado.
CARBURADOR
Su carburador tiene un chorro principal fi jo no
ajustable para controlar la mezcla. Si su motor
no está funcionando en forma adecuada debido
a problemas que se sospecha vienen del
carburador, lleve su segadora a contacto con
su centro de servicio Husqvarna o con un otro
centro de servicio cualifi cado para repararla y/o
ajustarla.
IMPORTANTE: Nunca manipule el regulador
del motor, el que ha sido ajustado en la fábrica
para la velocidad del motor adecuada. Puede
ser peligroso hacer funcionar el motor a una
velocidad por sobre el ajuste de alta velocidad
de la fábrica. Si cree que la velocidad alta
regulada del motor necesita ajuste,contacto con
su centro de servicio Husqvarna o con un otro
centro de servicio cualifi cado, el que cuenta
con el equipo adecuado y la experiencia para
hacer los ajustes necesarios.
2. Apriete los extremos inferiores del mango
inferior entre sí hasta que el mango inferior
quede separado del puntal del mango,
luego muévalo hacia adelante.
• Cuando prepare su mango a partir de la
posición de almacenamiento, el mango infe-
rior nesecitara cerrarlo manualmente para la
posición de sega.
IMPORTANTE: Cuando doble el mango para el
almacenamiento o el transporte, asegúrese que
lo doble según se muestra o purde dañar los
cables de control.