Agitator brush roll replacement, Thermal protector, Lubrication – Hoover WindTunnel Wind Tunnel Canister Cleaner with Powered Nozzle User Manual
Page 10: Service, Edge groomer replacement
10
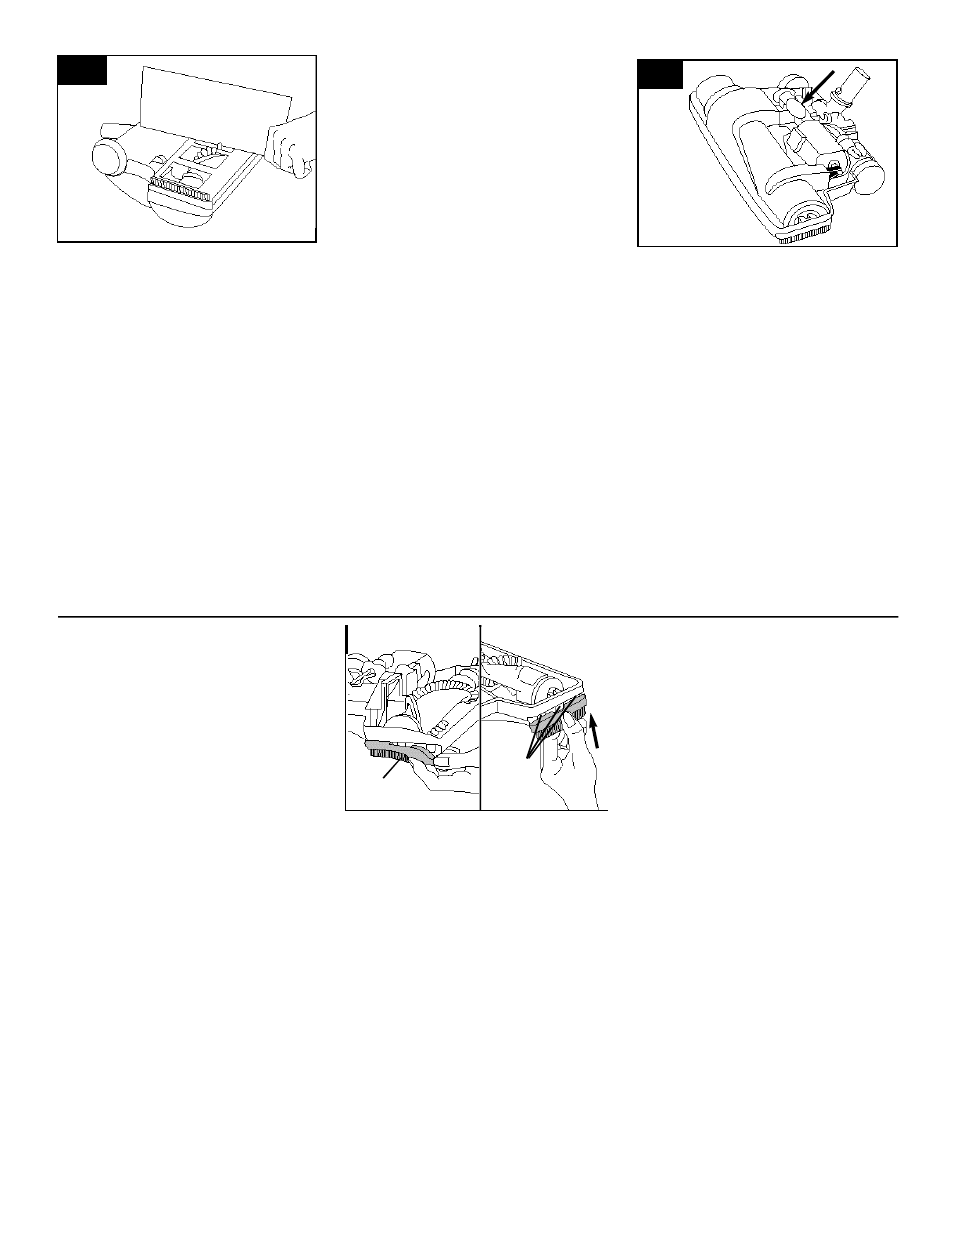
3 - 1 8
3 - 1 9
Agitator brush roll
replacement
When to replace
Disconnect cleaner from electrical
outlet.
When agitator brush roll brushes are
w o rn, the brush roll should be re p l a c e d .
To check condition of brushes, move
edge of a card across bottom plate while
t u rning brush roll. To maintain cleaning
e ffectiveness, replace brush roll if bru s h-
es do not touch card .
What to buy
When purchasing a new agitator brush ro l l ,
ask for HOOVER
p a rt n o . 4 8 4 1 4 - 0 7 1 .
How to replace
Disconnect cleaner from electrical out-
let.
1. Remove hood, duct cover, belt and
b rush roll as shown in Figs. 3-9 to
3 - 1 4 .
2. Discard old brush ro l l .
3. Replace new brush roll and belt as
shown in Figs. 3-15 to 3-17.
2. Push old bulb into socket and twist to
remove. Push new bulb into socket and
twist into place.
3. Replace hood.
Thermal protector
An internal thermal protector has been
used in your cleaner to prevent over-
heating if a large item or clog gets
caught in the nozzle or at the opening of
the bag.
When the blockage is not removed,
the thermal protector will trip and
cleaner will stop running.
If this happens, turn cleaner OFF and
disconnect cleaner from electrical out-
let.
Then disconnect nozzle and remove
obstruction. Within 15 minutes the ther-
mal protector will cool and automatically
reset and cleaning may resume.
If cleaner does not operate, allow addi-
tional time for thermal protector to reset
.
2. Pull off both old edge groomers (G).
3.Push each new groomer onto the 3
tabs (H), starting with one of the end
tabs. Then push the groomer onto the
middle and remaining end tab.
4. Replace brush roll cover and hood as
shown in Figs. 3-16 and 3-17.
Lubrication
The motor is equipped with two bear-
ings that contain sufficient lubrication for
the life of the motor. The addition of
lubricant could cause damage.
Therefore, do not add lubricant to
either motor bearing.
The agitator brush roll is equipped with
two ball bearings that should be lubri-
cated periodically by a Hoover Factory
Service Center or an authorized Hoover
Warranty Service Dealer (Depot).
Service
To obtain approved HOOVER service and
genuine HOOVER parts, locate the near-
est
Hoover Factory Service Center or
Authorized Hoover Warranty Service
Dealer (Depot)
by:
• checking the Yellow Pages
under “Vacuum Cleaners -
Household” OR -
• checking the list of Factory
S e rvice Centers provided
with this cleaner OR -
• calling
1 - 8 0 0 - 9 4 4 - 9 2 0 0
for an
automated re f e rral of authorized
s e rvice outlet locations (U.S. only)
O R -
• checking the Service section of The
Hoover Company online at
w w w. h o ov e rc o m p a ny. c o m
Please do not send your cleaner to The
Hoover Company in North Canton for ser-
vice, this will only result in delay.
If further assistance is needed, contact
The Hoover Company Consumer
Response Center, North Canton, Ohio
44720, Phone: 330-499-9499.
In Canada, contact Hoover Canada,
Burlington, Ontario L7R 4A8, Phone:
1-800-263-6376.
Always identify your cleaner by the
com-
plete
model number when requesting
information or ordering parts. (The model
number appears on the bottom of the
cleaner.)
3 - 2 0
Edge groomer
replacement
When to replace
The edge groomers, located on both
sides of the nozzle, should be re p l a c e d
when they no longer extend past the sur-
face of the bottom plate.
What to buy
When purchasing edge groomers, ask for
Hoover
p a rt n o . 3 9 5 1 1 0 0 4 .
How to replace
Disconnect cleaner from electrical
outlet.
1. Remove hood and b rush ro l l cover as
shown in Figs. 3-9 to 3-12.
Headlight re p l a c e-
m e n t
The headlight, located on top of the
power nozzle, operates when the clean-
er is turned on. Use only HOOVER
part no. 27317-307
, which is a fused
bulb, when replacing the headlight.
How to replace
Disconnect cleaner from electrical
outlet and disconnect power nozzle
from extension wands.
1. Remove the hood as shown in Figs.
3-9 and 3-10.
H
G