Caution, Installing ceiling hardware, Exploded view installed view – Hunter 23702 52 Hotel Original User Manual
Page 6
Hunter Fan Company
42704-01 • 01/29/07
6
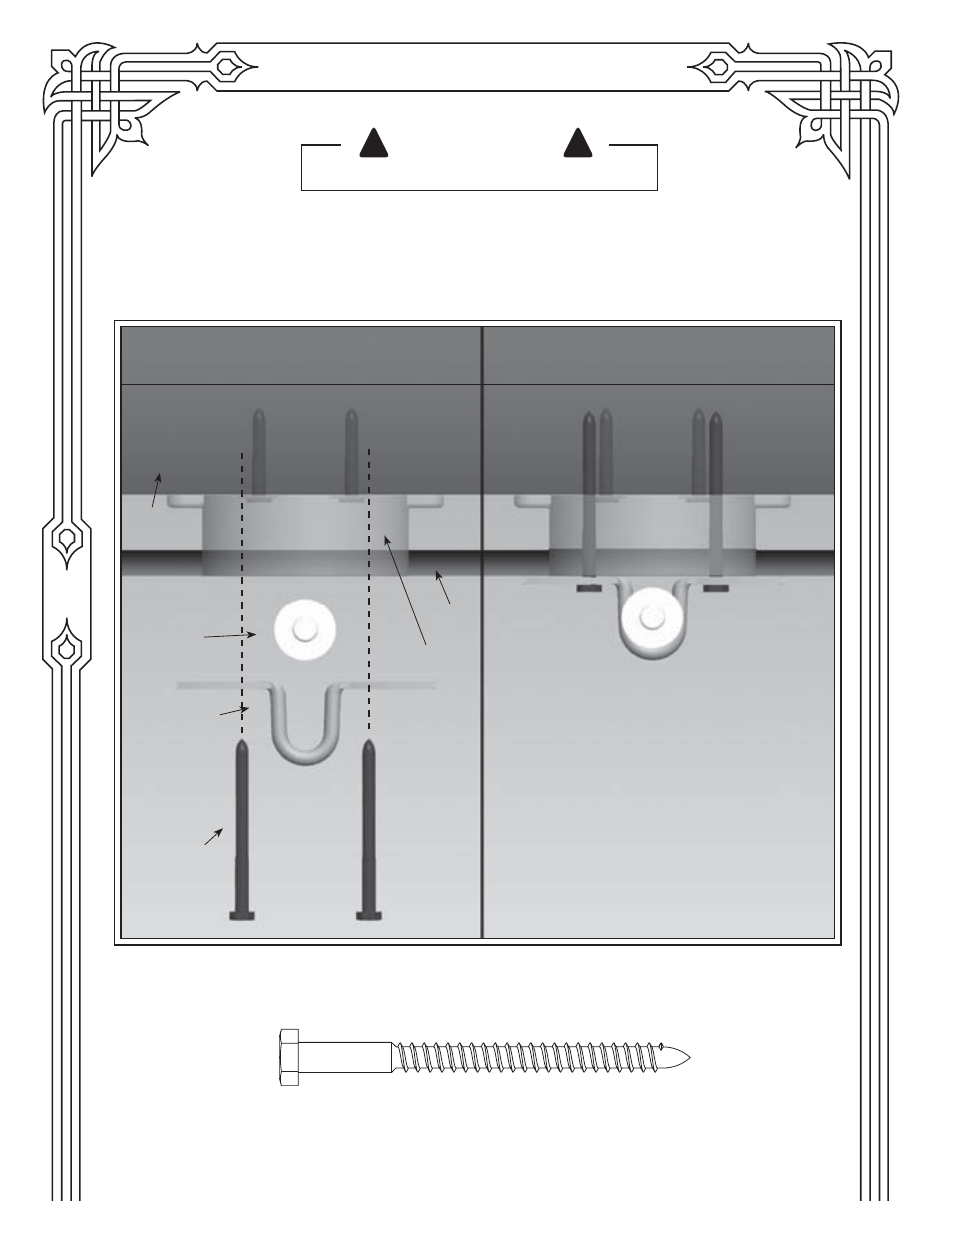
Installing Ceiling Hardware
Fig. 2
3 1/2” Lag Bolt
CAUTION
DO NOT USE LUBRICANT ON SCREWS
!
!
1. Drill (2) 11/64” diameter holes through the outermost holes in the box 2” deep into the cross brace.
Th
ese holes are for the U-bracket bolts. Install rubber bushing and pin into the u-bracket. Use a
3/8” wrench to install the (2) 3 1/2” lag bolts to secure the U-bracket to the joist (see Fig. 2).
Lag Bolt
U-Bracket
Rubber
Bushing
and Pin
Exploded View
Installed View
Cross
Brace
Ceiling
Outlet
Box
See also other documents in the category Hunter Fans:
- 28786 54 Crown Park (15 pages)
- 54015 54 Crown Park (17 pages)
- 53094 54 Cortland (18 pages)
- 22720 54 Cortland (13 pages)
- 28787 54 Claymore (17 pages)
- 54014 54 Claymore (17 pages)
- 54097 54 Bayview (16 pages)
- 28795 54 Barrington (16 pages)
- 53265 54 Anfield (17 pages)
- 21978 54 1912 Mission Manual (17 pages)
- Preparing the Fan Site (1 page)
- 53255 56 Markley (17 pages)
- 53038 52 Millington (2 pages)
- 53038 52 Millington (16 pages)
- 54072 56 Greenwich (16 pages)
- 54061 60 Valerian (17 pages)
- 54017 60 Royal Oak (17 pages)
- 54156 60 Rockledge (17 pages)
- 18865 60 1886 Limited Edition (12 pages)
- 21215 61 Fellini (16 pages)
- 28789 64 Torrence (16 pages)
- 55045 64 Torrence (20 pages)
- 55046 64 Headley (16 pages)
- 55049 70 Fernwood (20 pages)
- 55043 70 Castleton (17 pages)
- 59032 52 Rayburn (17 pages)
- 55048 70 Brayden (17 pages)
- 28743 96 Industrial Fan (16 pages)
- 59133 96 HFC-96 (19 pages)
- 21575 52 Auberge (16 pages)
- 52010 52 Atherton (14 pages)
- 53253 52 Ashmont (14 pages)
- 59035 52 Arvada (20 pages)
- 26406 52 Architect Series Plus (13 pages)
- 59015 52 Altitude (18 pages)
- 53169 52 Allendale (17 pages)
- 59009 52 Allegheny Low Profile (15 pages)
- 59006 52 Adirondack (17 pages)
- 59039 54 Windemere (18 pages)
- 54016 54 Willowcrest (17 pages)
- 28793 54 Teague (16 pages)
- 59135 54 Key Biscayne (20 pages)
- 53214 54 Granville (21 pages)
- 53258 54 Fallston (19 pages)
- 59054 54 Eurus (17 pages)