Heart rate, Program profiles, Pulse grips – Horizon Fitness RC-30 User Manual
Page 11: P1: manual, P2: intervals 1, P3: intervals 2, P4: rolling 1, P: rolling 2
BEFORE
YOU
BEGIN
20
INTRODUCTION
IMPORT
ANT
PRECAUTIONS
ASSEMBL
Y
BEFORE
YOU
BEGIN
BIKE
OPERA
TION
LIMITED
W
ARRANTY
TROUBLESHOOTING
&
MAINTENANCE
CONDITIONING
GUIDELINES
ASSEMBL
Y
BIKE
OPERA
TION
BEFORE YOU
BEGIN
ASSEMBL
Y
21
INTRODUCTION
IMPORT
ANT
PRECAUTIONS
BIKE
OPERA
TION
CONDITIONING GUIDELINES
TROUBLESHOOTING &
MAINTENANCE
LIMITED WARRANTY
BIKE
OPERA
TION
ASSEMBL
Y
1) Plug in and turn ON/OFF SWITCH to the “ON” position located on the back of the console.
2)
Start Bike by pedaling or pressing any button.
3)
Press START button and begin exercising.
4)
Program will automatically default to MANUAL (P1), the time will count up from 0:00, and the resistance
will default to level 1.
)
The resistance level can be adjusted during the workout.
1) Use the ARROW KEYS to scroll through programs.
2) Press ENTER to select a program.
3) Use the ARROW KEYS to set TIME, LEVEL, and WEIGHT.
4) Press ENTER to select each program setting.
) Press the START button to begin program.
QUICK START
SELECTING PROGRAMS
RC-40 CONSOLE OPERATION
RC-40 CONSOLE DISPLAY
S T A R T
P A U S E
S T O P
H O L D T O R E S E T
S E L E C T / A D J U S T P R O G R A M
L E V E L
1
2
3
4
5
6
7
8
9
10
ENTER
CHANGE DISPLAY
To Select PROGRAM
Use: UP and DOWN Arrow Keys.
To Advance press ENTER.
I N S T R U C T I O N S
To Adjust PROGRAM SETTINGS
Use: UP and DOWN Arrow Keys.
To Advance press ENTER.
2
Press START to begin program.
3
1
CALORIES
SPEED
INCLINE
LEVEL
SET
WATTS
PACE
A
H
G
I
J
K
K
C
E
B
F
D
L
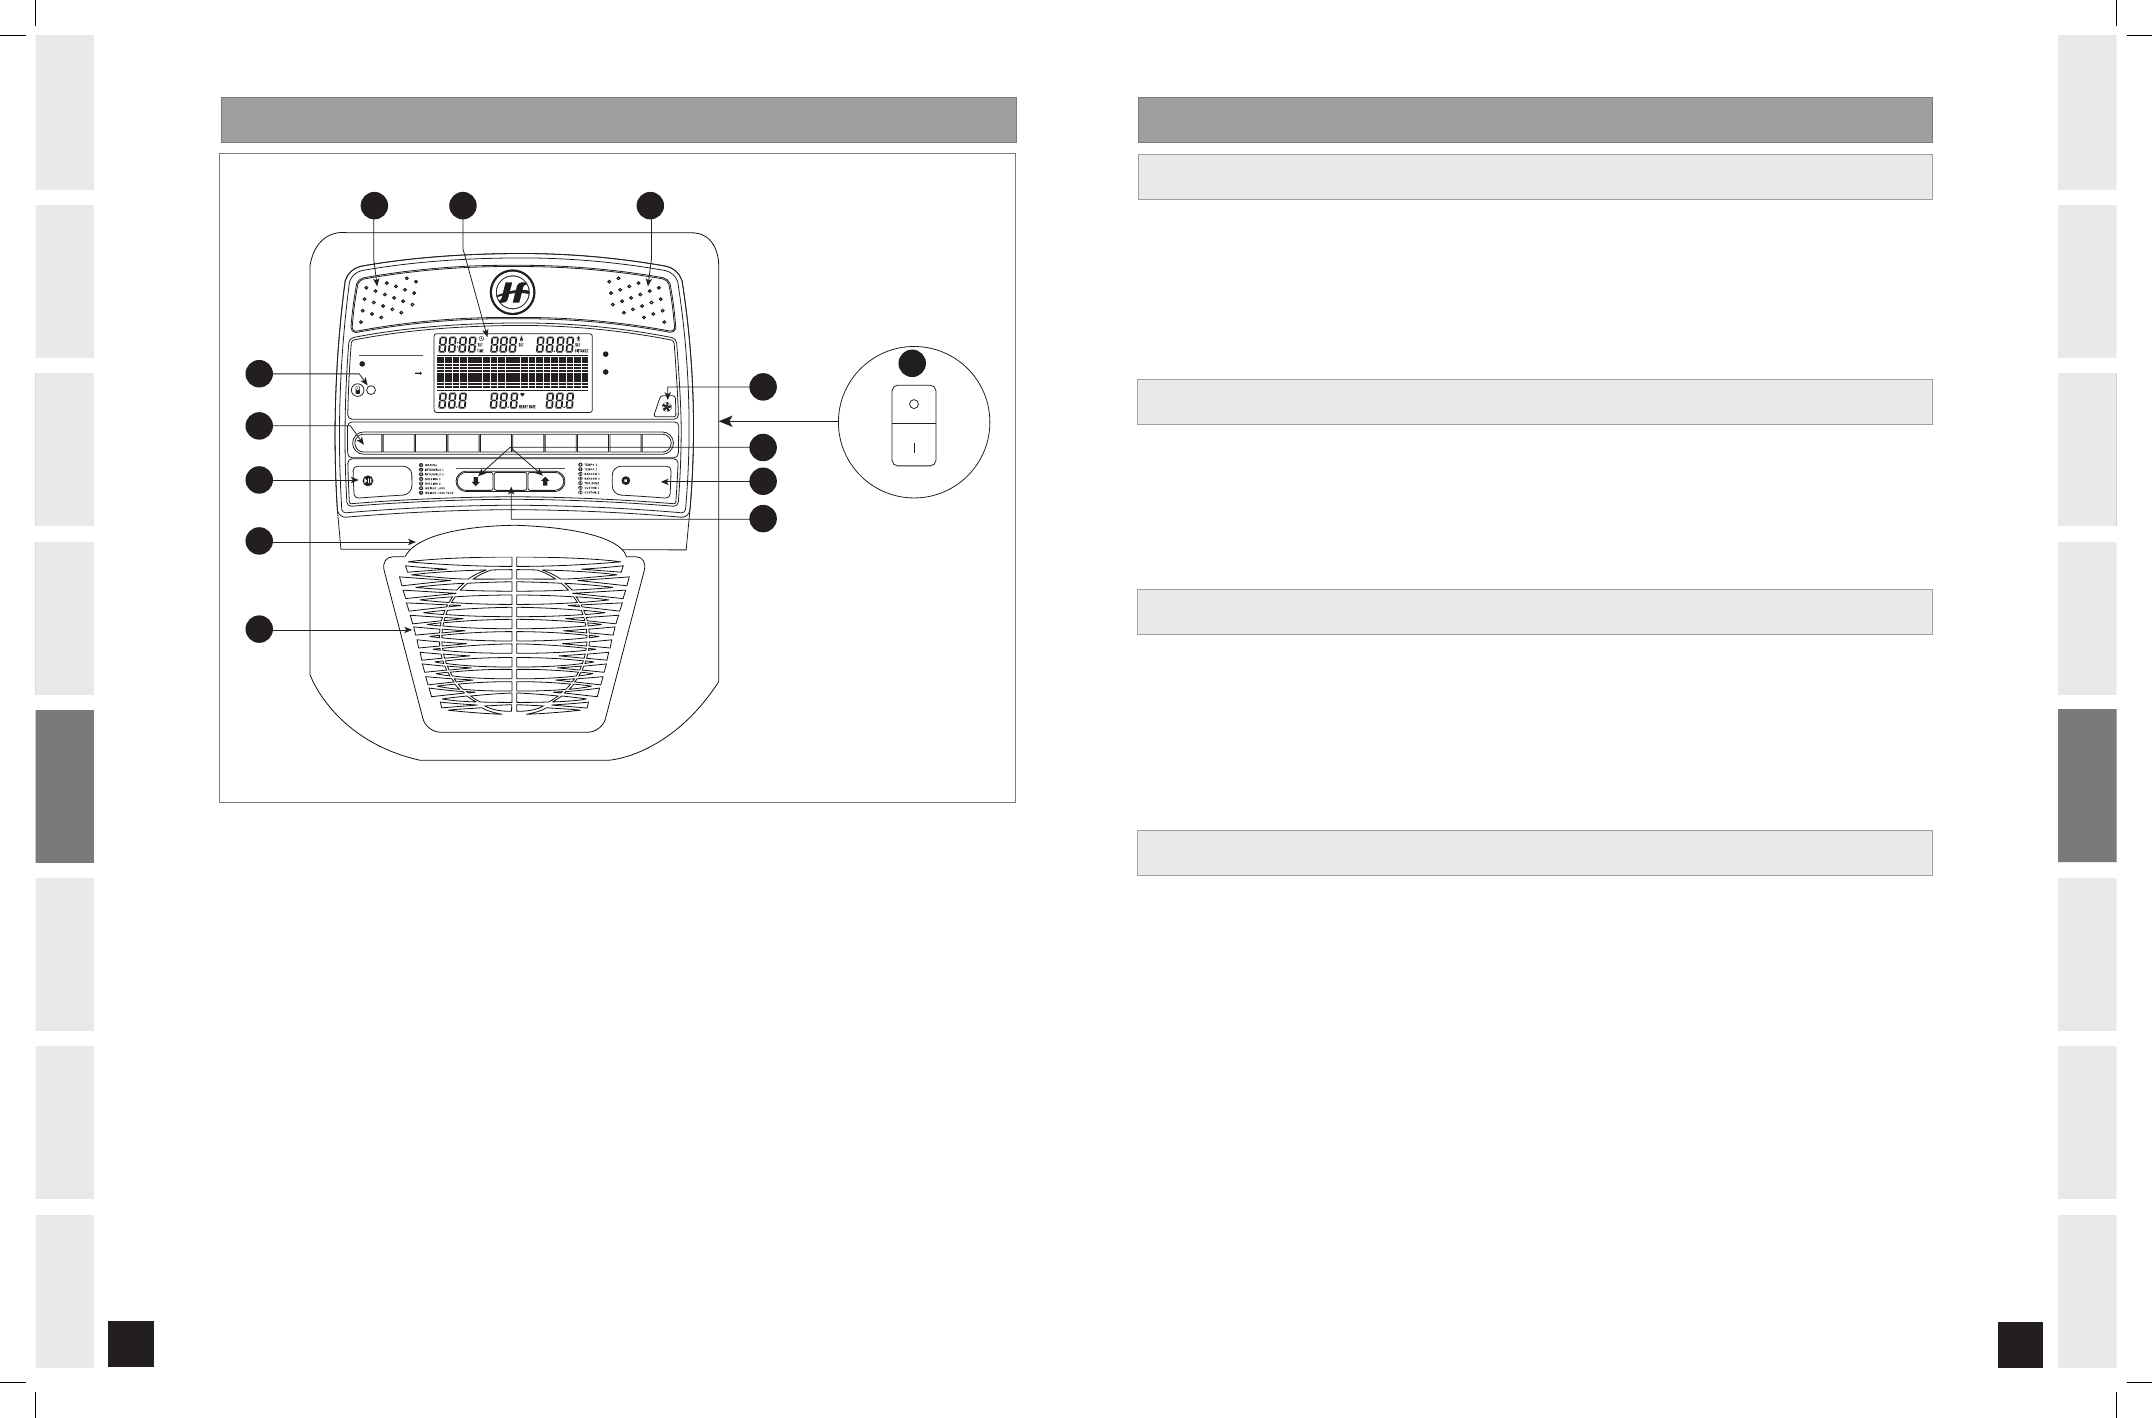
Note: There is a thin protective sheet of clear plastic on the overlay of the console and should be removed.
A) MONITOR DISPLAY: Time, Level, Heart Rate, Distance, Calories, Speed, Program Profiles.
B) START/PAUSE: Press to start/pause your workout.
C) STOP: Press to end/pause your workout. (Hold for 3 seconds to reset the bike).
D) ENTER: Used to set your program and change program / display settings.
E) UP/DOWN ARROW KEYS: Used to select / adjust your program and program settings.
F) RESISTANCE KEYS: Used to reach desired resistance more quickly.
G) FAN BUTTON: Used to adjust fan to 3 speed levels.
H) AUDIO IN: Plug your personal music player into the console using the included adaptor wire.
I) READING RACK/MUSIC PLAYER HOLDER: Holds reading material or music player.
J) FAN: Personal workout fan.
K) SPEAKERS: Music plays through speakers when your personal music player is connected to console.
L) ON/OFF SWITCH: Located on back of console.
PULSE GRIPS
Place the palm of your hands directly on the grip pulse handlebars. Both hands must grip the bars for your heart
rate to register. It takes 5 consecutive heart beats (15-20 seconds) for your heart rate to register. When gripping
the pulse handlebars, do not grip tightly. Holding the grips tightly may elevate your blood pressure. Keep a loose,
cupping hold. You may experience an erratic readout if consistently holding the grip pulse handlebars. Make sure
to clean the pulse sensors to ensure proper contact can be maintained.
HEART RATE
P1: MANUAL
Allows you to adjust the resistance level to your preference, without a preset program.
P2: INTERVALS 1
Improves your strength, speed and endurance by raising and lowering the resistance levels throughout your
workout to involve your heart and other muscles.
P3: INTERVALS 2
Improves your strength, speed and endurance by raising and lowering the resistance levels throughout
your workout to involve your heart and other muscles. Interval segments vary from Intervals 1 for workout
variation.
P4: ROLLING 1
Creates the feeling of moving up and down hills by gradually increasing and decreasing the resistance.
P: ROLLING 2
Creates the feeling of moving up and down hills by gradually increasing and decreasing the resistance.
Longer intensity levels than Rolling 1.
PROGRAM PROFILES
RC-30_RC-40_Rev.1.3.indd 20-21
7/11/07 1:34:48 PM