Wallplate installation – Honeywell PRO TH2110D User Manual
Page 5
PRO TH3110D Non-programmable Digital Thermostat
3
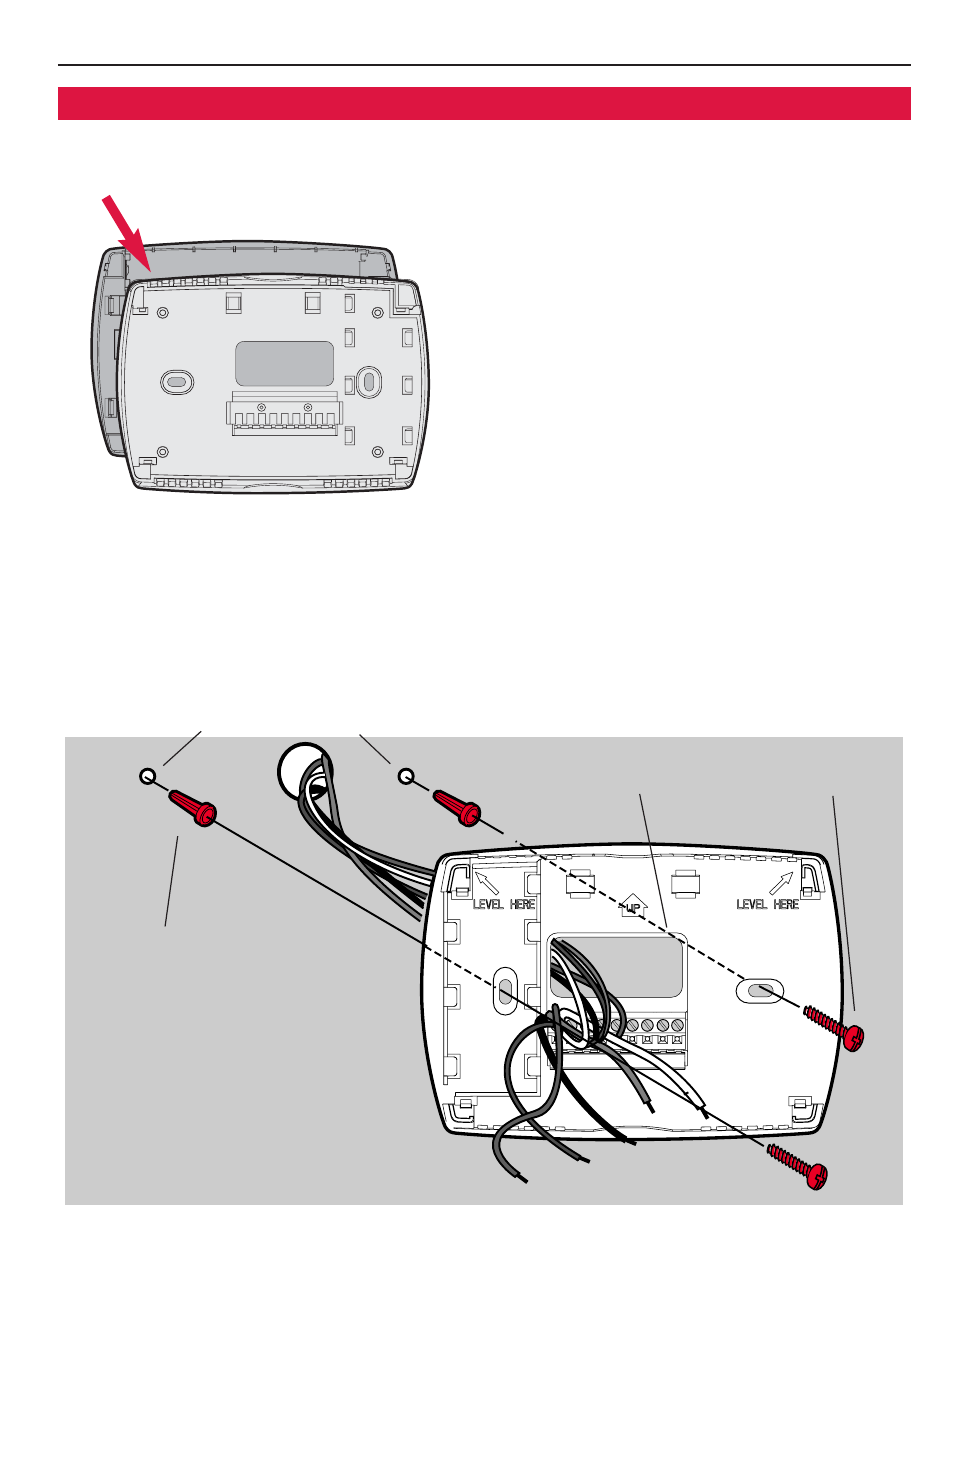
Remove the wallplate from the ther-
mostat as shown at left, then follow
directions below for mounting.
1
Pull wires through wire hole.
2
Position wallplate on wall, level and
mark hole positions with pencil.
3
Drill holes at marked positions as
shown below, then tap in
supplied wall anchors.
4
Place wallplate over anchors, insert
and tighten mounting screws.
Grasp top and bottom of wallplate
and pull to remove from thermostat.
Drill 3/16” holes for drywall.
Drill 7/32” holes for plaster.
Wall anchors
Mounting screws
Wire hole
Wallplate installation
See also other documents in the category Honeywell Control panel:
- FocusPRO TH5000 Series (24 pages)
- FocusPRO TH5000 Series (1 page)
- FocusPRO TH6000 Series (80 pages)
- VisionPRO TH8000 Series (2 pages)
- VisionPRO TH8000 Series (96 pages)
- CHRONOTHERM III T8611R (8 pages)
- CHRONOTHERM III T8611M (32 pages)
- FocusPRO TH6000 Series (2 pages)
- CT70 (24 pages)
- ELECTRONIC THERMOSTATS T8401C (8 pages)
- T6169 (2 pages)
- CM 507 A (2 pages)
- Q674A-G (12 pages)
- PCR-100 (16 pages)
- CM907 (18 pages)
- CT3650 (24 pages)
- ZIO TR71 (24 pages)
- CT70A (6 pages)
- T6380 (6 pages)
- T4398A (8 pages)
- Chronotherm IV T8611G (12 pages)
- T694D (1 page)
- PROGRAMMABLE THERMOSTAT 8160 (4 pages)
- PRO 2000 Series (22 pages)
- T4800A (4 pages)
- EN2Z-0906GE51 R0708 (160 pages)
- Q539G (12 pages)
- RTH110B (4 pages)
- RTH7600 (60 pages)
- RLV310 (2 pages)
- 7300 (4 pages)
- T4098A (8 pages)
- RF CM61NG (2 pages)
- H8908C Dehumidistat (4 pages)
- CT3400 (20 pages)
- MINI-ZONE 69-1361 (2 pages)
- MICRONIK 200 R7426B (20 pages)
- CT50A (8 pages)
- CT3600 (24 pages)
- CTL500 (20 pages)
- 191108AJ (28 pages)
- CT1802 (8 pages)
- MULTISTAGETHERMOSTATSAND Q674C (8 pages)
- CT3500 (2 pages)
- MAGIC STAT MS3000 (15 pages)