Installation – Electrolux ERCE90AS User Manual
Page 5
electrolux e:line rangehood installation 3
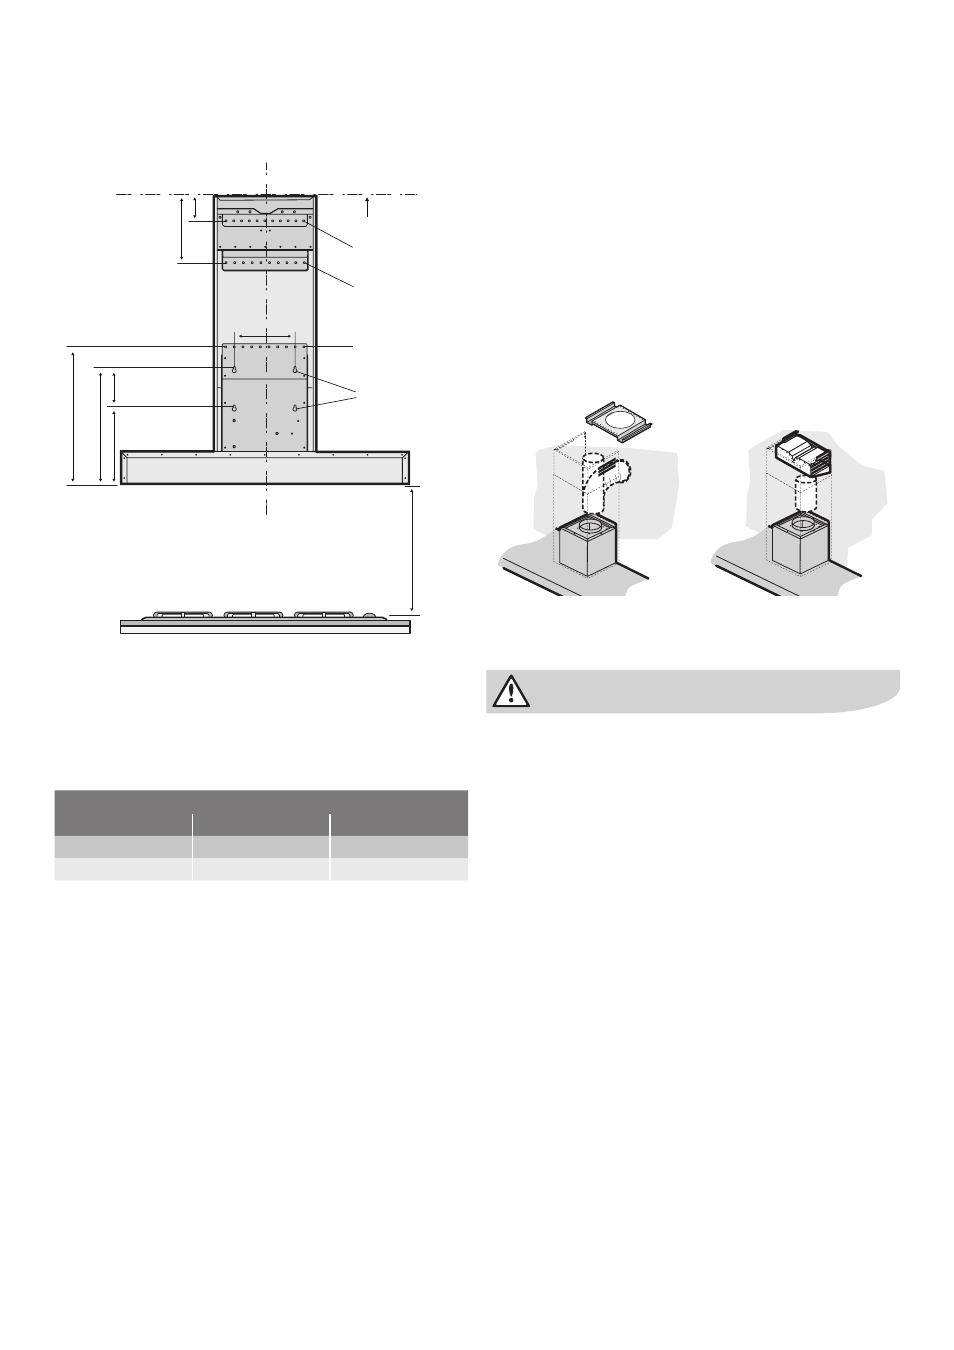
Mounting the hood body
1. Using a spirit level mark a vertical centre line on the wall
where the hood is to be positioned, and a horizontal line
at the hood base position (refer Mounting the hood body).
NOTE: The height of the underside of the hood body must
be a minimum of 600mm above an electric cooktop &
650mm above a gas cook top and a maximum height of
800mm (refer to table below).
Distance from hood base to top of hob
hob type
minimum*
maximum
gas
650mm
800mm
electric
600mm
800mm
* If the instructions of the hob specify a greater distance than the
minimum above, this shall be the minimum height for installation
2. Mark the location for the four (4) key-hole fixings points,
two at 243mm, and two at 363mm above the marked
position of the hood base (refer Mounting the hood body).
3. Fix four (4) suitable screws (to support a total weight of
40kg) into the wall at the positions marked in step 2 to
allow the body of the hood to be hung on the wall. Leave a
3-4mm gap between the face of the screw and the surface
of the wall.
NOTE: Screw head must be between 7mm and 11mm
diameter, with screw thread diameter to be less than
5.5mm to suit key-hole slots.Total hood weight is 40kg.
4. Hang the body of the hood on the wall using the screws
attached in step 3. To secure the hood body, use two
(2) suitable screws and fix the top-edge of the motor
housing to the wall.
Depending on the preferred installation/ducting mode,
follow step 5a or 5b below:
5. a) Recirculating Mode: Using the centre line, secure the
flue fixing bracket to the wall with suitable screws, so
that the location of the fixing holes are 63mm from
the ceiling. Attach the recirculating T-piece to the flue
fixing bracket using two M5x12mm screws (supplied).
Secure bottom of T-piece assembly to wall using
suitable screws.
OR
5. b) Ducted Mode: Continue the centre line to the ceiling.
Mark a line on the ceiling 14mm away from the wall.
Locate the back edge of the flue cover mounting
bracket on this line and centre. Screw the bracket to
the ceiling using suitable screws.
NOTE: Flue pipe shown is not included - must be
purchased separately.
important
In recirculating mode, you must use carbon filters to
eliminate cooking smells (Carbon filter model no. EFF72).
NOTE: To ensure best performance of the rangehood use of
straight ducting is recommended. The use of bends should
be avoided. Rigid flexible ducting is suitable, although loose
flexible ducting is unacceptable.
All ducting must be fire retardant.
6. Connect an internal flue pipe (not included) between the
fan outlet to the inlet of the T-piece/flue cover mounting
bracket (depending on ducting mode).
NOTE: Before installing outer flue cover, ensure the power
cord is connected to a suitable powerpoint.
Installation
ø
150mm
ø
150mm
190mm
63mm
170mm
243mm
363m
m
428m
m
120mm
ceiling
top flue fixing holes
for recirculating mode
bottom fixing holes for
T-piece assembly
top edge of
motor housing
hood
base
top
of hob
key hole fixings
for wall mounting