GE 400 Series 30 Inch Freestanding Electric Range Installation Instructions User Manual
Page 4
INSTALLATION INSTRUCTION
31-2001194 Rev. 1 09-23 GEA
8
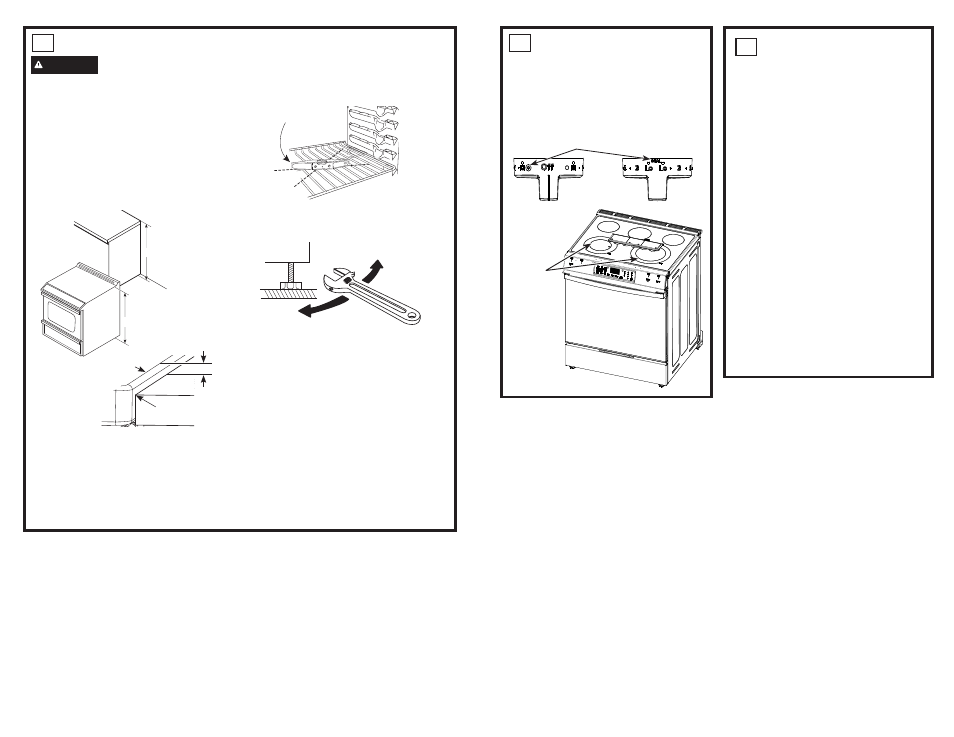
LEVEL THE RANGE
WARNING
Never completely remove the
leveling leg as the range will not be secured to
the anti-tip device properly.
A. Plug in the unit and remove the drawer.
Refer to your owner’s manual for
instructions.
B. Measure the height of your countertop at the
rear of the opening (X).
C. Adjust two rear leveling legs so that the rear
of cooktop is higher than or equal to the
counter (Y).
D. Slide unit into place taking care to engage
the leveling legs in the anti-tip device.
E. Look under the unit and verify that the rear
leg is fully engaged with the anti-tip device.
If not, remove the unit and adjust the height
of the rear leg so that it is properly engaged.
F. Install racks in the oven.
G. Check for levelness by placing a spirit
level on one of the oven shelves. Take two
readings—with the level placed diagonally
first in one direction and then the other.
H. Use an adjustable wrench to adjust the front
leveling legs until the range is level.
I. Position cord so that it does not interfere
with drawer.
J. Reinstall the drawer. Refer to your owner’s
manual for instructions.
X
Y
Cooktop
0" or Greater
Counter
Spirit level
9
INSTALL KNOBS
■ Remove all knobs from packaging.
■ Install the knobs onto the cooktop element
switch shafts.
IMPORTANT:
The dual zone knobs should
be matched to the dual zone cooktop element
switch shafts.
Dual Zone Markings
Dual Zone
Cooktop
Elements
10
FINAL INSTALLATION
CHECKLIST
■ Check to make sure the circuit breaker is
closed (RESET) or the circuit fuses are
replaced.
■ Be sure power is in service to the
building.
■ Check that all packing materials and
tape have been removed. This will
include tape on metal panel under
control knobs (if applicable), adhesive
tape, wire ties, cardboard and protective
plastic. Failure to remove these materials
could result in damage to the appliance
once the appliance has been turned on
and surfaces have heated.
■ Check that the door and drawer are
parallel to each other and that both
operate smoothly. If they do not, see the
owner’s manual for proper replacement.
■ Check that the oven control operates
properly. If the oven control does not
operate properly, recheck the wiring
connections.
■ Make sure all controls are left in the off
position.
Raise
Range
Lower
Range
- 600 Series 30 Inch Slide-In Electric Smart Range Installation Instructions 600 Series 30 Inch Freestanding Electric Smart Range Installation Instructions 500 Series 30 Inch Freestanding Electric Range Installation Instructions 400 Series 30 Inch Freestanding Electric Smart Range Installation Instructions 500 Series 30 Inch Slide-In Electric Range Installation Instructions