Eurotech Appliances EDW194E User Manual
Page 8
8
FASTENING THE DISHWASHER TO THE CABINET
It’s necessary to fasten the dishwasher to the cabinet so it won’t tilt when the door is opened or if something
heavy is placed on the door. Use only the screws provided with the machine. The dishwasher can be
fastened to the cabinet on the top, at the sides, or both, depending on the type of installation.
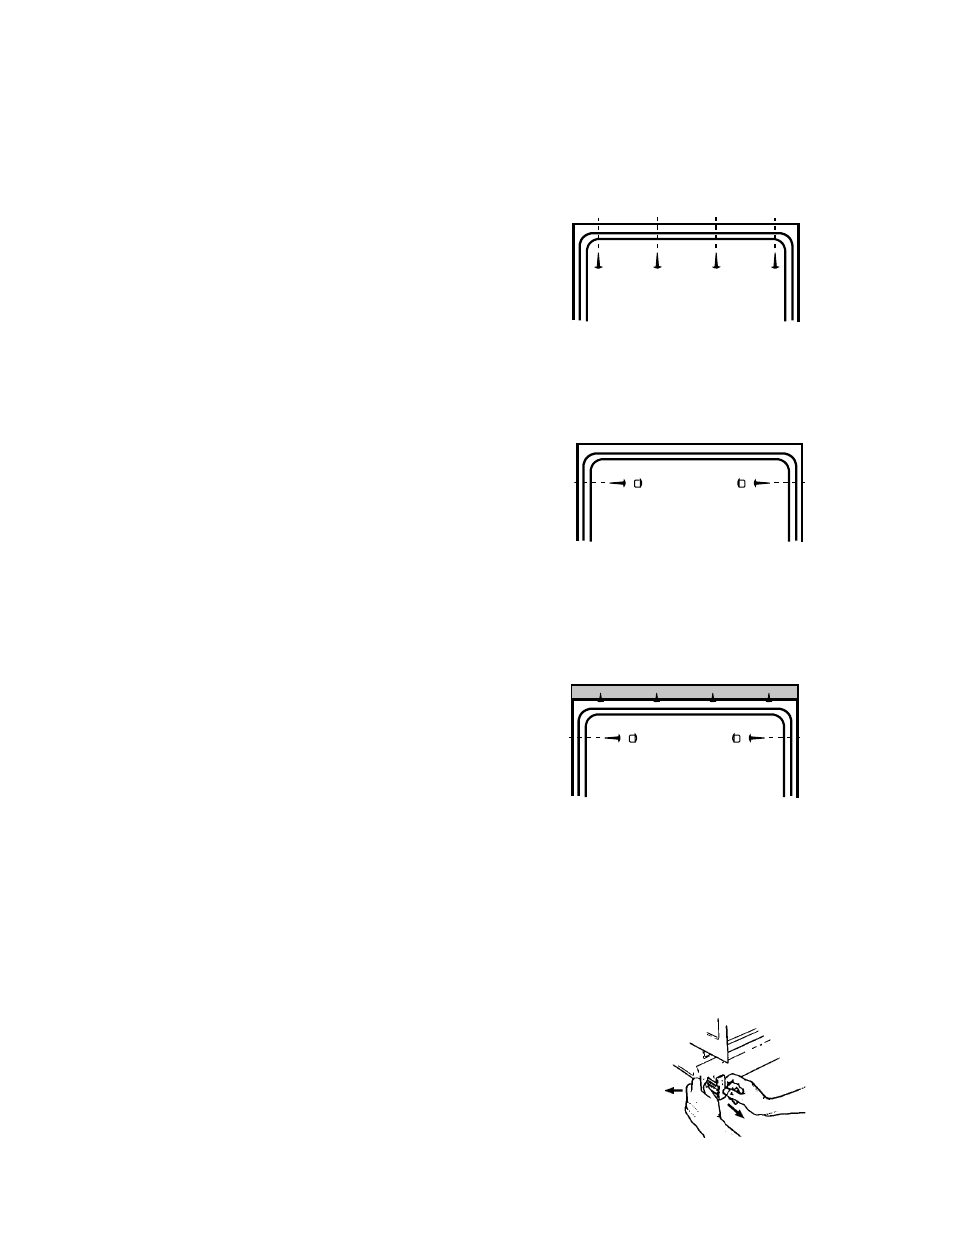
STANDARD CABINET INSTALLATIONS
For a standard cabinet and ADA installations, you should mount the
dishwasher at the top. To do this, follow the instructions below:
1. Use the four 3/4” screws provided with the unit to mount the
dishwasher to underneath the cabinet top.
2. Insert the screws through the four holes on the top installation lip
and tighten securely.
3. When the machine is properly attached, check that the feet are
tight against the floor and the machine is level.
SOLID SURFACE COUNTER TOP INSTALLATIONS
If you have a solid surface countertop that will not accommodate screws, mount the dishwasher to the
cabinet using the side mount holes. To do this, follow the instructions below:
1. Remove the white plugs from the side holes and use a “center
punch” to assist in starting the screws.
2. Insert the two mounting screws with sleeves provided with the
unit into the side holes and tighten the screw securely.
3. Cover the screw heads with the plastic plugs provided with the
machine.
4. When the machine is properly attached, check that the feet are
tight against the floor and that the machine is level.
EDW194E WITH A TOP FILL STRIP INSTALLATIONS
Model EDW194E installations with a top fill strip should be mounted to the cabinet on the sides for all
installations, except ADA height installations, which should be mounted at the top.
NOTE: Do not fasten the dishwasher to the cabinet until after you have installed the custom door panel.
To do this installation, follow the steps below:
1. Install the fill strip as explained on page 6.
2. Remove the white plugs from the side holes and use a “center
punch” to assist in starting the screws.
3. Insert the two mounting screws with sleeves provided with the
unit into the side holes and tighten securely.
NOTE:
Failure to use the sleeves could cause the unit
to warp, which could cause it to leak.
4. Cover the screw heads with the plastic plugs provided with the
machine.
5. When the machine is properly attached, check that the feet are tight against the floor and that the
machine is level.
This method is for standard
installations only.
Use this method only for solid surface
counter tops, such as marble.
Side Fastening
This method is for EDW194E
installations with a top fill strip.
Top Fastening
INSTALLING THE TOE KICK
You will have to adjust the toe kick bracket depth to allow for the thickness of the toe kick. To do this, first measure
the thickness of the toe kick. Then press the spring tab on the sides of the base pan toward the outside of the
machine and carefully pull or push the bracket to the required depth less the thickness of the toe kick.
Make sure the toe kick bracket is securely inside the guides on the base pan.
Once you have adjusted the toe kick bracket to the desired depth, you can install
the toe kick, as follows:
1. If you have not done so, remove the toe kick from inside or on top of the unit.
2. Positioning the toe kick at the edge of the access panel, slide the toe kick up
behind the access panel then let it slide to the floor.
3. Screw the toe kick to the toe kick brackets.
Side Fastening
Model EDW194E
Top fill strip