Installation instructions, 24” drawer microwave measurements, Anti-tip block – Cafe 24 Inch Built In Microwave Drawer Oven Installation Guide User Manual
Page 3: Important, Figure 1, Figure 2, Figure 3
31-7000166 Rev.0
3
Installation Instructions
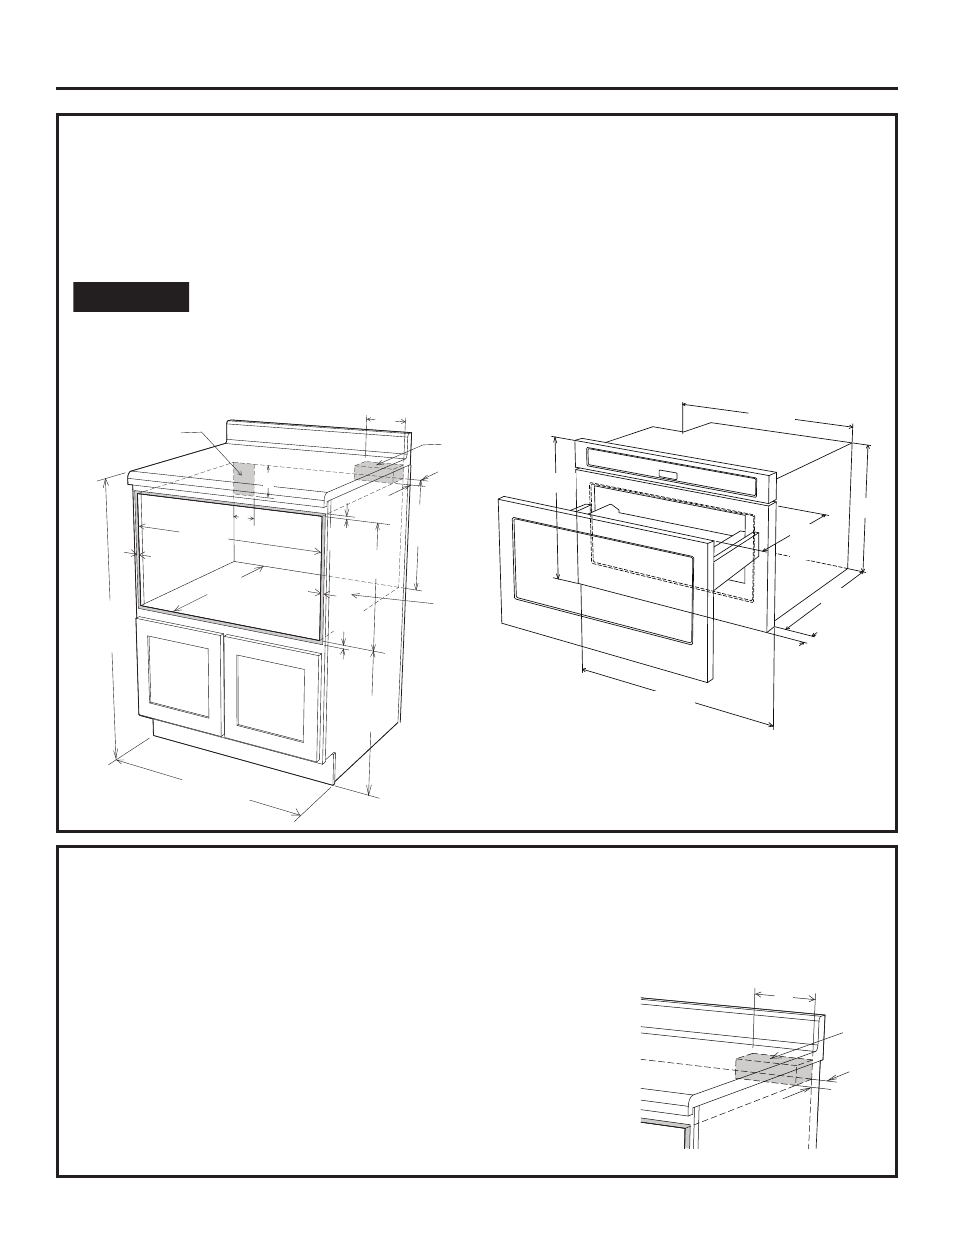
24” DRAWER MICROWAVE MEASUREMENTS
•
Figures 1 and 2 contain many drawer microwave measurements for reference when planning the drawer location.
• This drawer microwave can be installed below any electric or gas wall oven or under selected cook
top models.
• Can also be installed using an electrical outlet in an adjacent cabinet within the areas where the provided electrical
cord can reach. Power cord access hole in cabinet should be a minimum of 1 1/2” diameter hole and deburred of
all sharp edges.
IMPORTANT
• Always allow sufficient power cord length to the electrical outlet to prevent tension.
• Always check electrical codes for requirements.
Preferred electrical
outlet location*
6”
5”
4”
22 1/8”
7/8”
overlap
7/8”
overlap
231/2”
min
Anti-Tip
Block
31/2”
14 13/16” to
bottom of
anti-tip
block
36”
countertop
height
24”
cabinet min.
18 1/2” to
top of floor
Floor
must
support
100 lbs
1/16”
overlap
11/16”
overlap
14 13/16”
Figure 1
21 5/8”
15 15/16”
23 7/8”
1419/32”
21 5/8”
1 5/8” door
thickness
15” auto
drawer
opening
Figure 2
ANTI-TIP BLOCK
NORMAL INSTALLATION STEPS
Anti -Tip BLOCK Installation Instructions
To reduce the risk of tipping of the drawer, the Anti-Tip block must be properly
installed located 14 13/16-inches above the floor on which the Drawer
Microwave will sit. The anti-tip block must be provided and pre-installed by the
purchaser of the product or builder before install can be done. The anti-tip block
is not provided by installer. See Figures 1 and 2. The Anti-Tip block prevents
serious injury that might result from spilled
hot liquids.
If the Drawer Microwave is ever moved to a different location, the Anti-Tip block
must also be moved and installed. When installed to the wall, make sure that
the screws completely penetrate the dry wall and are secured in wood or metal
so that the block is totally stable. When fastening, be sure that the screws do
not penetrate electrical wiring or plumbing.
3 1/2”
6”
Anti-Tip
block
Figure 3