Telescope maintenance – Celestron CPC Deluxe 1100 HD Computerized Telescope User Manual
Page 32
30
>>
www
.celestron
.com
>>
Collimation
The optical performance of your CPC telescope is directly related to its
collimation, that is the alignment of its optical system . Your CPC was
collimated at the factory after it was completely assembled . However,
if the telescope is dropped or jarred severely during transport, it may
have to be collimated . The only optical element that may need to be
adjusted, or is possible, is the tilt of the secondary mirror.
To check the collimation of your telescope you will need a light source .
A bright star near the zenith is ideal since there is a minimal amount of
atmospheric distortion . Make sure that tracking is on so that you won’t
have to manually track the star. Or, if you do not want to power up your
telescope, you can use Polaris. Its position relative to the celestial pole
means that it moves very little thus eliminating the need to manually
track it .
Before you begin the collimation process, be sure that your telescope is
in thermal equilibrium with the surroundings . Allow 45 minutes for the
telescope to reach equilibrium if you move it between large
temperature extremes .
To verify collimation, view a star near the zenith . Use a medium to high
power ocular – 1 mm to 6 mm focal length. It is important to center a
star in the center of the field to judge collimation. Slowly cross in and
out of focus and judge the symmetry of the star. If you see a systematic
skewing of the star to one side, then re-collimation is needed .
TELESCOPE MAINTENANCE
While your CPC telescope requires little maintenance, there are a few
things to remember that will ensure your telescope performs at its best .
>>
Care and Cleaning of the Optics
Occasionally, dust and/or moisture may build up on the corrector plate
of your telescope . Special care should be taken when cleaning any
instrument so as not to damage the optics .
If dust has built up on the corrector plate, remove it with a brush (made
of camel’s hair) or a can of pressurized air . Spray at an angle to the lens
for approximately two to four seconds . Then, use an optical cleaning
solution and white tissue paper to remove any remaining debris . Apply
the solution to the tissue and then apply the tissue paper to the lens .
Low pressure strokes should go from the center of the corrector to the
outer portion. Do NOT rub in circles!
You can use a commercially made lens cleaner or mix your own . A good
cleaning solution is isopropyl alcohol mixed with distilled water . The
solution should be 60% isopropyl alcohol and 40% distilled water.
Or, liquid dish soap diluted with water (a couple of drops per one
quart of water) can be used .
Occasionally, you may experience dew build-up on the corrector plate
of your telescope during an observing session. If you want to continue
observing, the dew must be removed, either with a hair dryer (on low
setting) or by pointing the telescope at the ground until the dew
has evaporated .
If moisture condenses on the inside of the corrector, remove the
accessories from the rear cell of the telescope . Place the telescope
in a dust-free environment and point it down . This will remove the
moisture from the telescope tube .
To minimize the need to clean your telescope, replace all lens covers
once you have finished using it. Since the rear cell is NOT sealed, the
cover should be placed over the opening when not in use . This will
prevent contaminants from entering the optical tube .
Internal adjustments and cleaning should be done only by the Celestron
repair department. If your telescope is in need of internal cleaning, please
call the factory for a return authorization number and price quote .
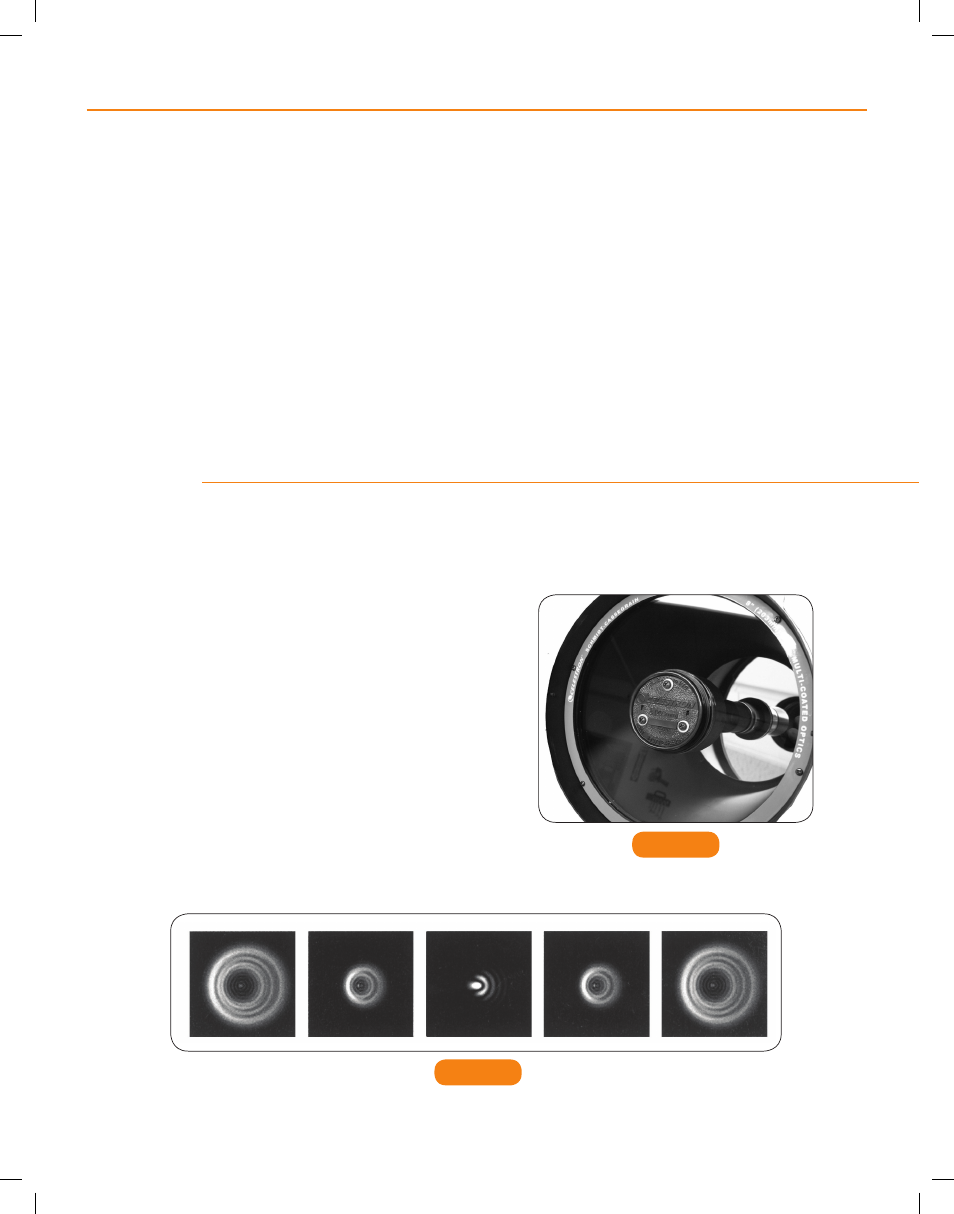
FIGURE 9-2
Even though the star pattern appears the same on both sides of focus, they are asymmetric. The dark
obstruction is skewed off to the left side of the diffraction pattern indicating poor collimation.
Collimation Adjustment Screws
FIGURE 9-1