Celestron CPC Deluxe 1100 HD Computerized Telescope User Manual
Page 13
>>
www
.celestron
.com
11
Note: Once a One-Star Alignment has been done, you can use
the Re-alignment feature (later in this section ) to improve your
telescope’s pointing accuracy.
Solar System Align
Solar System Align is available in alt-az mode (scope mounted directly
on the tripod) and equatorial mode (scope mounted on a wedge) .
Solar System Align is designed to provide excellent tracking and GoTo
performance by using solar system objects (Sun, Moon and planets) to
align the telescope with the sky . Solar System Align is a great way to
align your telescope for daytime viewing as well as a quick way to align
the telescope for night time observing .
Never look directly at the Sun with the naked eye or
with a telescope (unless you have the proper solar filter).
Permanent and irreversible eye damage may result.
1 . Select Solar System Align from the alignment options .
2 . Press ENTER to accept the time/site information displayed on the
display, or wait until the telescope has downloaded the information
from the GPS satellites .
3. The SELECT OBJECT message will appear in the top row of the
display . Use the Up and Down scroll keys (10) to select the daytime
object (planet, Moon or Sun) you wish to align. Press ENTER.
4. The CPC then asks you to center in the eyepiece the alignment object
you selected . Use the direction arrow buttons to slew the telescope to
the alignment object and carefully center it in the finderscope. Press
ENTER when centered .
5. Then, center the object in the eyepiece and press ALIGN.
Once in position, the CPC will model the sky based on this information
and display Alignment Successful .
Tips for Using Solar System Align
• For safety purposes, the Sun will not be displayed in any of the hand
control’s customer object lists unless it is enabled from the Utilities
Menu . To allow the Sun to be displayed on the hand control,
do the following:
1. Press the UNDO button until the display reads “CPC Ready”.
2 . Press the MENU button and use the Up and Down keys to select the
Utilities Menu . Press ENTER .
3 . Use the UP and Down keys to select Sun Menu and press ENTER .
4 . Press ENTER again to allow the Sun to appear on the hand
control display .
The Sun can be removed from the display by using the same procedure
as above .
• To improve the telescope pointing accuracy, you can use the
Re-Align feature as described below .
EQ North / EQ South Alignment
EQ North and EQ South Alignments assist the user in aligning the
telescope when polar aligned on an optional equatorial wedge . Similar
to the Altazimuth alignments described earlier, the EQ alignments gives
you the choice of performing an AutoAlign, Two-Star alignment, One-
Star alignment or Solar System alignment .
EQ AutoAlign
The EQ AutoAlign uses all the same time/site information as the Alt-Az
alignments, however it also requires you to position the tube so that the
altitude index markers are aligned (see figure 4-2), and then rotate the
telescope base until the tube is pointed towards the Meridian (see figure
4-3) . Based on this information the CPC will automatically slew to two
selected alignment stars to be centered and aligned . To use EQ
Auto-Align:
1 . Select EQ North or South Align from the alignment options and
press ENTER
2 . Press ENTER to accept the time/site information displayed on the
display, or wait until the telescope has downloaded the information
from the GPS satellites .
3 . Select EQ AutoAlign method and press ENTER
4 . Use the up and down arrow buttons to move the telescope tube
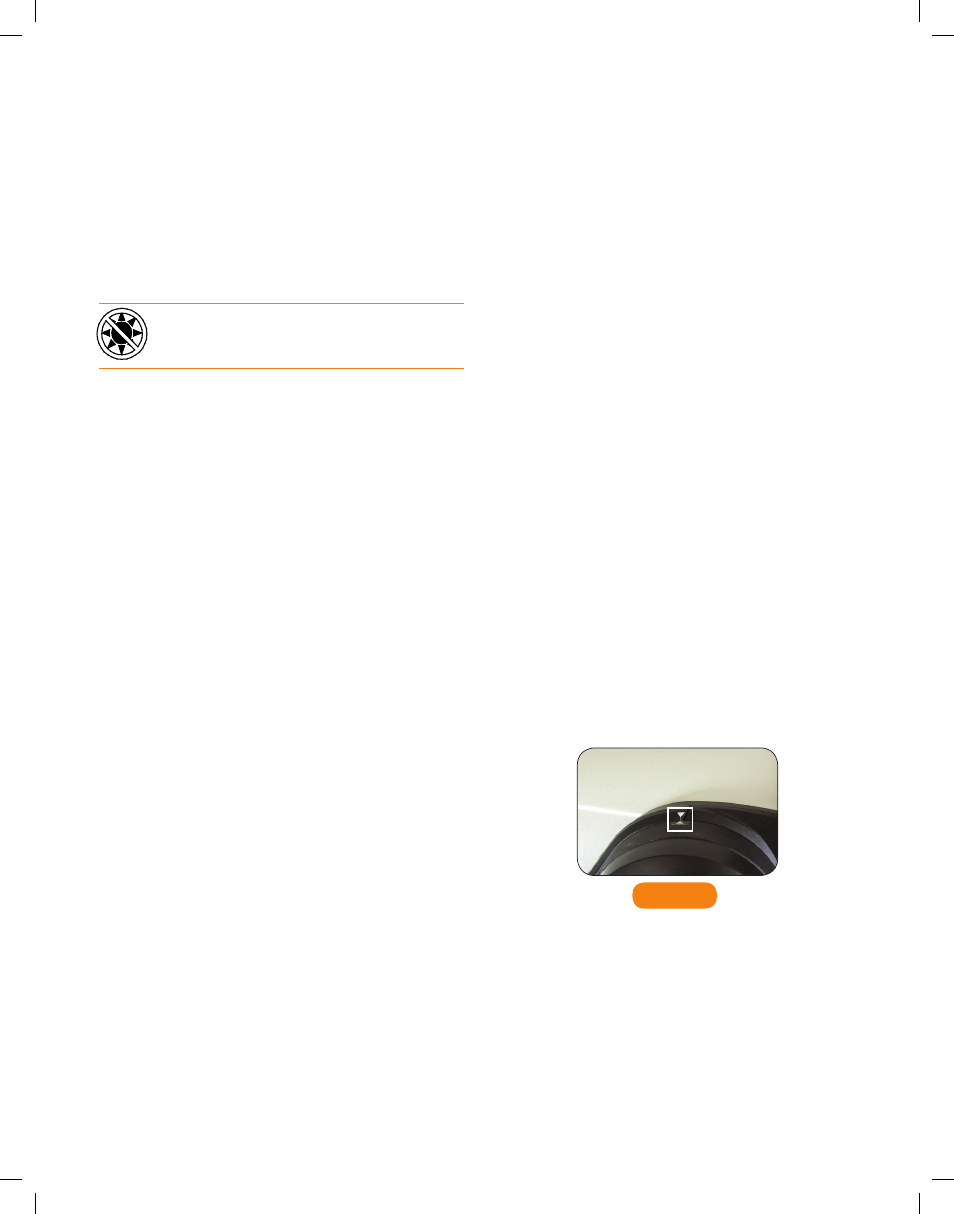
upwards until the altitude index markers are aligned . The altitude
index markers are located at the top of the fork arm. See figure 4-2.
5 . Use the left and right arrow buttons to move the telescope base
until the fork arms are horizontally parallel and the tube is pointing
towards the Meridian .
6. Based on this information, the CPC will automatically display the most
suitable alignment stars that are above the horizon . Press ENTER to
automatically slew the telescope to the displayed star. If for some
reason you do not wish to select one of these stars (perhaps it is
behind a tree or building), you can either:
• Press the UNDO button to display the next most suitable star
for alignment .
• Use the UP and DOWN scroll buttons to manually select any star
you wish from the entire list of available stars .
7. CPC then asks you to center in the eyepiece the alignment object you
selected . Use the direction arrow buttons to slew the telescope to
the alignment object and carefully center it in the finderscope. Press
ENTER when centered .
8. Then, center the object in the eyepiece and press ALIGN.
9. Once you press the ALIGN button, the telescope will automatically
slew to a second alignment star. Repeat steps 6 and 7 to
complete alignment .
Altitude Index Markers
FIGURE 4-2
EQ Two-Star Align
The EQ Two-Star Align follows most of the same steps as the Alt-Az
Two-Star Align . This alignment method does not require the user to align
the altitude index markers or point towards the Meridian, but it does
require the user to locate and align the telescope on two bright stars .
When selecting alignment stars, it is best to choose stars that, a) have a
large separation in azimuth and b) both are either positive or negative in
declination. Following these two guidelines will result in a more accurate
EQ Two-Star alignment .