Print, Install optional programs, Install software – Epson Stylus Photo 820 User Manual
Page 2
8
8
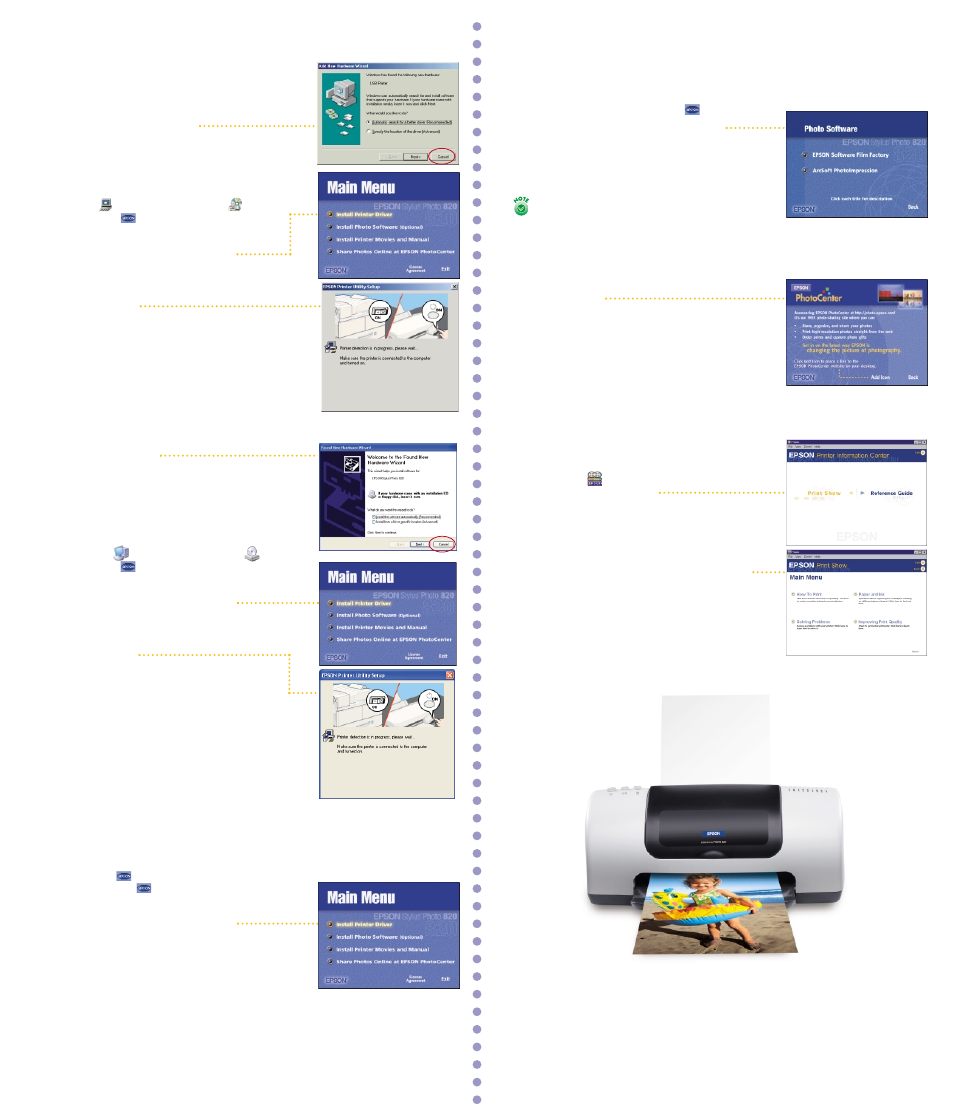
Now that you’ve set up your printer, you’re ready to print.
See your Printer Basics book for instructions.
Or, double-click the EPSON Printer Information Center icon
on your desktop. You see this screen.
Click Reference Guide to view detailed information about
your printer.
Click Print Show to view helpful animations that show you
how to print, load paper and ink, and solve basic problems.
7
7
Install Optional Programs
1
After you register your printer, close any open windows on your screen until
you see the Main Menu. (If you don’t see the Main Menu, open your
CD-ROM window and double-click the EPSON icon.)
2
Click Install Photo Software. You see this screen:
3
Select the software you want, click Install, then follow the
instructions on the screen. When installation is complete,
close any open windows and click Back to return to
the Main Menu.
4
Click Install Printer Movies and Manual and follow the
instructions on the screen. When installation is complete,
click Exit or Quit to return to the Main Menu.
5
Click Share Photos Online at EPSON PhotoCenter.
You see this screen:
6
If you want to place a link to the EPSON PhotoCenter
SM
website on your desktop, click Add Icon. Click OK,
then click Back to return to the Main Menu.
7
Click Exit, then remove the CD-ROM.
EPSON and EPSON Stylus are registered trademarks of SEIKO EPSON CORPORATION.
EPSON PhotoCenter is a service mark and EPSON Software is a trademark of Epson America, Inc.
General Notice: Other product names used herein are for identification purposes only
and may be trademarks of their respective owners. EPSON disclaims any and all rights in those marks.
Copyright © 2001 by Epson America, Inc.
Printed on recycled paper. 12/01
Printed in USA
CPD-12673R2
4014184-01
6
6
Install Software
1
When you see the Windows icons on your monitor, put the
EPSON CD-ROM in your CD-ROM or DVD drive.
2
Double-click My Computer, double-click EPSON,
then double-click EPSON.
3
Read the license agreement and click Agree.
4
At the Main Menu, click Install Printer Driver.
The files are copied to your computer.
5
If you see this screen, make sure the printer is
connected and turned on. Click Retry if necessary.
More files are copied.
6
When the installation is complete, click OK.
The EPSON Product Registration screen appears.
7
Register your printer as instructed.
Now you’re ready to install optional programs.
Go to section 7.
Windows 95, 98, Me, NT, 2000
Make sure the printer is turned on, then turn on your computer.
Macintosh OS 8.5.1 to 9.x
If you’re using Macintosh OS X, see the Read This First booklet for
instructions on installing and using the printer software with OS X.
Make sure the printer is turned on, then turn on your Macintosh
®
.
1
When you see your Macintosh icons, put the
EPSON CD-ROM in your CD-ROM or DVD drive.
2
Double-click the EPSON CD-ROM icon,
then double-click the EPSON icon.
3
Read the license agreement and click Agree.
4
At the Main Menu, click Install Printer Driver.
5
At the installer screen, click Install.
6
Follow the on-screen instructions to complete installation
and restart your Macintosh.
7
After your Macintosh restarts, the EPSON Registration
screen appears. Register your printer as instructed.
8
Open the Chooser, click the SP820 Series icon, click your USB port,
and turn on background printing.
9
Close the Chooser.
Now you’re ready to install optional programs.
Go to section 7.
If you see a screen like this
Click Cancel. Then follow the steps below to install the
printer software:
1
When you see the Windows icons on your monitor, put the
EPSON CD-ROM in your CD-ROM or DVD drive.
2
If you see a screen asking What do you want
Windows to do?, click Cancel.
3
Click Start, click My Computer, double-click EPSON,
then double-click EPSON.
4
Read the license agreement and click Agree.
5
At the Main Menu, click Install Printer Driver.
The printer files install.
6
If you see this screen, make sure the printer is connected
and turned on. Click Retry if necessary.
More files are copied.
7
When you see a message that the printer port has
been set or setup is complete, click OK. The EPSON
Product Registration screen appears.
8
Register your printer as instructed.
Now you’re ready to install optional programs.
Go to section 7.
Windows XP
Make sure the printer is turned on, then turn on your computer.
If you see this screen
Click Cancel. Then follow the steps below to install the
printer software:
EPSON Software
™
Film Factory
™
installs in several stages.
If you install ArcSoft
™
PhotoImpression,
™
select No, I will
restart my computer later at the last screen, if necessary.