Operating instructions cont – Euro-Pro SC620 User Manual
Page 4
OPERATING INSTRUCTIONS cont.
OPERATING INSTRUCTIONS cont.
Preparing Garment
Steamer for Use
Step 2: Assembling Steamer Hose
1.
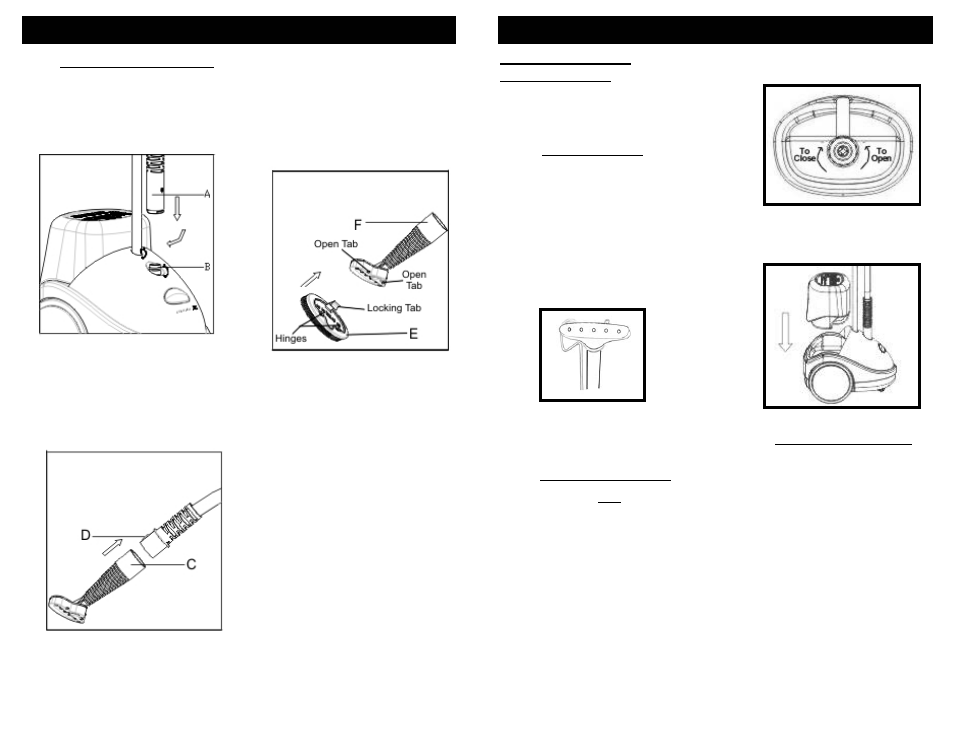
Insert end of steamer hose with the
long tube bushing (marked A) into
the adapter hole (marked B) on the
unit. Rotate hose 90° to lock in place.
(See fig. 4)
3.
To attach the garment brush
(marked E) onto the diffuser
(marked F), place the two hinges
at the back of the garment brush
(see fig. 6) into the two open tabs
that are at the back of the steam
diffuser. Swing the garment brush
up against the bottom of the steam
diffuser until the locking tab engages.
3.
After filling the water bottle, close the
cap clockwise. (See fig. 8)
CAUTION:
Before filling the water
tank, check to make sure that the water
tank sits securely in the unit before
proceeding.
Step 1: Preparing for Use
1.
Unwind the power cord.
2.
Check the wheels to see that they
swivel and roll properly.
3.
Set the unit on the floor and remove
the water tank. Check for sediment or
build-up in the base of the unit reservoir
and water tank. Follow steps for
cleaning and storing the unit if water
was accidentally left in the water tank
during storage of the unit on page 8.
4.
Place the steamer hose with the
nozzle end up on the garment
hook.(See fig. 7)
Fig. 4
2.
To attach the steam diffuser, grasp
steam diffuser in one hand and the hose
in the other. Depress the locking button
on the hose end until the locking button
engages the hole in the steam diffuser.
A slight rotation of the steam diffuser
may help engage the locking button.
(See fig. 5)
Fig. 5
Fig. 6
Fig. 8
4.
Replace the water tank into the unit.
(See fig. 9)
Fig. 7
Fig. 9
5.
Make sure that the hose is and
unencumbered and that the unit rolls
freely.
Step 3: Using Garment Steamer
Note:
It will make pressing easier if
there are few creases in the laundry
that needs pressing. To avoid excess
creasing, shake each item out before
placing in a drier or hanging to dry.
Step 2: Filling the Water Bottle
IMPORTANT:
Do NOT add cleaning
solutions, scented perfumes, oils or any
other chemicals to the water used in this
appliance. Use tap water or
distilled/purified water if the tap water
in your area is very hard.
1. Always check that the On/Off
switch is in the “Off” position.
2. Plug appliance into electrical
outlet.
3. Push the “On/Off” switch to the
“On” position. The power “On”
light (green) will come on.
1.
Always make sure that the
appliance is unplugged before filling
the water bottle.
2.
To open the cap on the water bottle,
turn counterclockwise. Fill the water
bottle with tap water or
distilled/purified water if your tap
water in your are is very hard.
(See fig. 8)
6
7