Technical specifications – Euro-Pro SC620 User Manual
Page 3
OPERATING INSTRUCTIONS
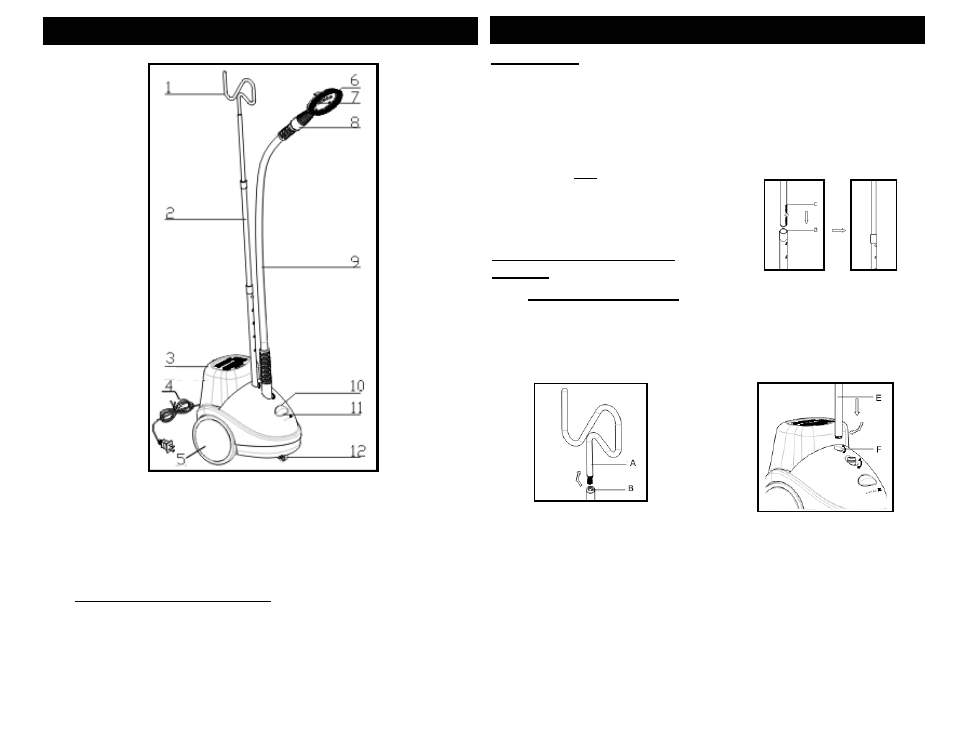
GETTING TO KNOW YOUR GARMENT STEAMER
Components
Power “On” Light (green): This light
will illuminate when the “ON” switch is
depressed and the unit is turned on. It
will remain on until the unit is turned
“OFF” or until the water tank is emptied.
Caution:
Always unplug before re-
filling.
Important:
Do NOT add cleaning
solutions, scented perfumes, oils or any
other chemicals to the water used in this
appliance. Use tap water or
distilled/purified water if the tap water
in your area is very hard.
Assembling Your Garment
Steamer
Step 1: Assembling Garment Rod
1.
First attach the garment hook to
the garment rod by screwing the
garment hook (marked A) into the
garment rod extension (marked B).
(See fig. 1)
Fig. 1
2.
To assemble the garment rod, insert
one of the extensions into the other by
depressing the button on the extension
(marked C) so that you can insert into
the other extension (marked D). Turn
the extension until the button comes
out of the opening and you hear a
click. Repeat procedure for the other
extension. (See fig. 2)
Fig. 2
3.
Once you have assembled the
garment rod, insert the bottom section
of the rod (marked E) into the adapter
hole in the upper housing of the unit
(marked F) and turn 90° until it is
locked in place. (See fig. 3)
Fig. 3
1.
Garment Hook
2.
Garment Rod Extensions (3)
3.
Water Tank
4.
Power Cord
5.
Wheels
6.
Garment Brush
7.
Steamer Head
8.
Steam Diffuser/Handgrip
9.
Steamer Hose
10. On/Off Switch
11. Power On Light (Green)
12. Front Caster Wheel
Technical Specifications
Voltage:
120V~ 60Hz.
Power:
1500 Watts
Water Capacity:
150 US Fl. Oz. (4.5 liters)
Max. Steam Temperature:
220°F
4
5