Versatools, Msw 4v & 4sv, cont’d – Extron Electronics MSW 4V User Manual
Page 7
VersaTools
®
MSW 4V & 4SV • Installation and Connections
VersaTools
®
MSW 4V & 4SV • Installation
VersaTools
®
MSW 4V & 4SV, cont’d
A/V
S
WITCHER
AU
TO
SW
ICH
MOD
E
NORM
AL
AU
TO
1
2
3
4
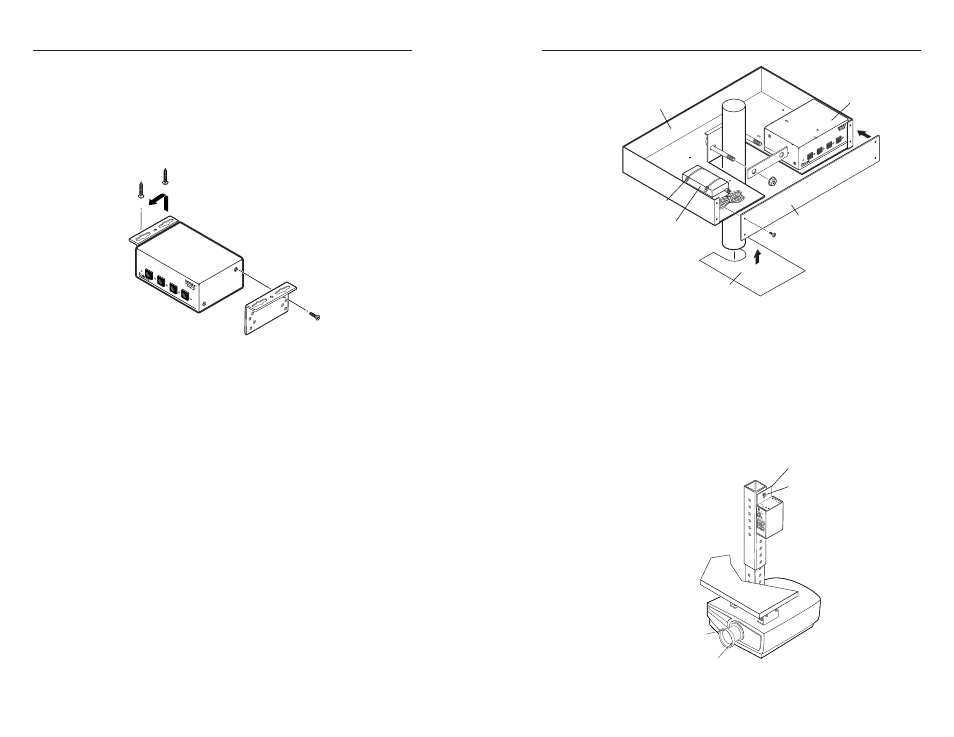
Extron
MSW 4V
Extron
PMK 250
Projector Mount Kit
Extron
Power Supply
Plastic Tie
Cover Sheet
Front Plate
Figure 5 — Projector mounting the MSW with a PMK 250
For the PMK 100, mount the MSW as follows:
1
.
If necessary, remove the feet from the bottom of the MSW.
2
.
Attach the mounting brackets to the MSW with the
machine screws provided (figure 6).
3
.
Secure the MSW to a projector mount or other surface by
inserting the mounting bolt through the bracket’s slotted
hole.
Ceiling
Digital Projector
PMK 100 Projector
Mounting
Bracket
MD
A 4V SD
I
PO
W
ER
1
5
V
.5
A
M
A
X
1
2
3
4
SD
I IN
P
UT
SD
I O
U
TP
U
TS
Mounting
Bolt
Projector Mounting
Figure 6 — Projector mounting the MSW with a PMK 100
VersaTools
®
MSW 4V & 4SV • Installation
Furniture mounting
Furniture mount the MSW using the optional MBU 123
VersaTools
®
under-desk mounting kit (part #70-212-01) as follows:
1
.
If necessary, remove the feet from the bottom of the MSW.
2
.
Attach the mounting brackets to the MSW with the
machine screws provided (figure 4).
A/V SWITCHER
MODE
NORMAL
AU
TO
AU
TO
SWITCH
1
2
3
4
Figure 4 — Furniture mounting the MSW
3
.
Hold the MSW with the attached brackets against the
underside of the table or other furniture. Mark the
location of the screw holes of the bracket on the mounting
surface.
4
.
Drill 3/32" (2 mm) diameter pilot holes, 1/4" (6.3 mm)
deep in the mounting surface at the marked screw
locations.
5
.
Insert #8 wood screws into the four pilot holes. Tighten
each screw into the mounting surface until just less than
1/4" of the screw head protrudes.
6
.
Align the mounting screws with the slots in the brackets
and place the MSW against the surface, with the screws
through the bracket slots.
7
.
Slide the switcher slightly forward or back, then tighten all
four screws to secure the MSW in place.
Projector mounting
Projector mount the MSW using the optional PMK 100
(part #70-217-01), PMK 250 (part #70-562-02), or PMK 350
(part #70-563-02) under desk mounting kit.
For the PMK 250 or PMK 350, follow the instructions included
with the kit (figure 5).
5
4
VersaTools
®
MSW 4V & 4SV • Installation