Emerson EM529 User Manual
Page 2
NOTE: When the [Power] switch is set to the ON position for
the first time, the headset will be in Pairing Mode (the
indicator light will be flashing RED and BLUE alternately),
please refer to “Easy Pairing”.
Powering ON/OFF
• To turn ON, set the [Power] switch to the ON position (green).
The blue indicator light will flash intermittently.
• To turn OFF, slide the [Power] switch to the OFF position (red).
The indicator light will flash RED before the headset shuts
off.
Answering / Ending a call
• To answer a call, press and release the [Call] button or press
the answer key on your mobile phone.
• To end a call, press and release the [Call] button or press the
end key on your mobile phone.
Rejecting a call
During an incoming call press and HOLD the [Call] button
for 3 seconds or until you hear a confirmation beep.
Making a call
Dial the number and press the send button on your mobile
phone, the call is automatically transferred to the headset.
Redialing the last number called
(Dependent on your phone supporting this feature)
Press the [Call] button twice. The last number called will be
redialed.
Volume
To adjust the in-call volume, press the [Volume Up] or [Volume
Down] button.
NOTE: You may also adjust the volume from your mobile phone’s
volume control.
Mute
Press the [Volume Up] and the [Volume Down] button
simultaneously until you hear a beep, repeat to unmute the call.
For added comfort and noise suppression, 3 silicone cushions
are included with the headset. Choose the silicone cushion (S)
(M) (L) which fits most comfortably in your ear and insert it on
the headset as shown in the diagram below.
You may wear the headset with or without the provided earhook.
If you choose to use the earhook, connect it to the headset as
shown in the diagram below.
NOTE: For the best audio quality, always wear the headset on
the same side of your body as your mobile phone.
Pairing the headset with the SONY PlayStation®3
(PS3™)
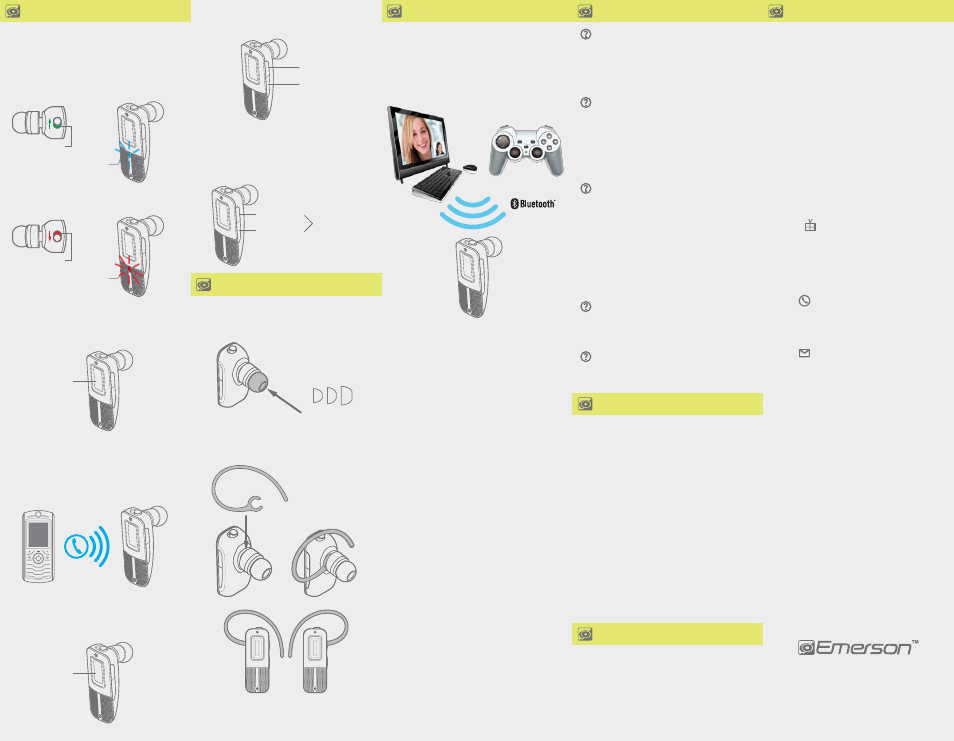
Set accessory to Bluetooth on PS3
1. Go to the PS3 main menu, scroll to and select “Settings”.
2. Scroll to and select “Accessory Settings”.
3. Scroll to and select “Manage Bluetooth Devices”.
4. The menu will ask: “The Bluetooth device has not been
registered. Do you want to register it?”, then select “YES”.
Registering the headset to PS3
1. Put the headset into pairing mode. (See “Manual Pairing”)
2. Select “Start Scanning” from the PS3 menu.
3. Once the PS3 has discovered the headset, the screen will read
“Select the Bluetooth device to register”, then select “EM529”
4. The PS3 will ask for a passkey. Enter “0000” then select “OK”. Now
press [O] (the PS3 circle button) to get back to the previous menu.
5. Scroll to and select “Audio Device Settings” to change the
“Input Device” to “EM529”.
NOTE: “Input Device” is the microphone, and determines the
method of how others will hear you speak. By default,
the “Output Device” will now switch to “EM529”.
“Output Device” is the audio, and determines how you
will hear the PS3 audio and others speaking.
To test the connection, speak into the headset and you will see
the bars above the “Microphone Level” moving, if not, repeat the
pairing process.
Press “OK” to confirm the new settings. You are now ready to use
the headset with your PS3 Entertainment System. If you would like
to hear the PS3 audio through your TV or Audio System, scroll to
“Output Device” and switch to “System Default Device”.
For further assistance with Bluetooth settings on your PS3 please
refer to your PS3 instruction manual.
www.emersonphones.com
Distributed by Southern Telecom Inc. Brooklyn, NY 11232
© 2011 Southern Telecom Inc. All rights reserved.
Emerson and the G-Clef logo are registered trademarks of
Emerson Radio Corp. Parsippany, New Jersey USA.
The Bluetooth® word mark and logos are owned by the Bluetooth SIG, Inc.
SONY PlayStatiion® & PS3™ are either trademarks or registered
trademarks of SONY.
All other trademarks are trademarks of their respective owners.
Limited Warranty
In the unlikely event that this product is defective, or does
not perform properly, you may within one (1) year from your
original date of purchase return it to the authorized service
center for repair or exchange.
TO OBTAIN WARRANTY SERVICE:
• Provide proof of the date of purchase within the package
(Dated bill of sale).
• Prepay all shipping costs to the authorized service center,
and remember to insure your return.
• Include a return shipping address (no P.O. Boxes),
a telephone contact number, and the defective unit within
the package.
• Describe the defect or reason you are returning the product.
Your product will be repaired or replaced, at our option, for the same
or similar model of equal value if examination by the service center
determines this product is defective. Products received damaged
as a result of shipping will require you to file a claim with the carrier.
Warranty service not provided
This warranty does not cover damage resulting from accident,
misuse, abuse, improper installation or operation, lack of reasonable
care, and unauthorized modification. This warranty is voided in
the event any unauthorized person opens, alters or repairs this
product. All products being returned to the authorized service
center for repair must be suitably packaged.
Limitation of Warranty:
• THE WARRANTY STATED ABOVE IS THE ONLY WARRANTY
APPLICABLE TO THIS PRODUCT. ALL OTHER WARRANTIES,
EXPRESS OR IMPLIED (INCLUDING ALL IMPLIED WARRANTIES OF
MERCHANTABILITY OR FITNESS FOR A PARTICULAR PURPOSE) ARE
HEREBY DISCLAIMED. NO VERBAL OR WRITTEN INFORMATION
GIVEN BY SOUTHERN TELECOM INC. IT’S AGENTS, OR EMPLOYEES
SHALL CREATE A GUARANTY OR IN ANY WAY INCREASE THE
SCOPE OF THIS WARRANTY.
• REPAIR OR REPLACEMENT AS PROVIDED UNDER THIS WARRANTY
IS THE EXCLUSIVE REMEDY OF THE CONSUMER. SOUTHERN
TELECOM INC. SHALL NOT BE LIABLE FOR INCIDENTAL OR
CONSEQUENTIAL DAMAGES RESULTING FROM THE USE OF THIS
PRODUCT OR ARISING OUT OF ANY BREACH OF ANY EXPRESS
OR IMPLIED WARRANTY ON THIS PRODUCT. THIS DISCLAIMER
OF WARRANTIES AND LIMITED WARRANTY ARE GOVERNED
BY THE LAWS OF THE STATE OF NEW YORK. EXCEPT TO THE
EXTENT PROHIBITED BY APPLICABLE LAW, ANY IMPLIED
WARRANTY OF MERCHANTABILITY OR FITNESS FOR A
PARTICULAR PURPOSE ON THIS PRODUCT IS LIMITED TO
THE APPLICABLE WARRANTY PERIOD SET FORTH ABOVE.
Some states do not allow the exclusion nor limitation of incidental
or consequential damages, or limitations on how long an implied
warranty lasts so the above limitations or exclusions may not apply
to you. This warranty gives you specific legal rights, and you
also may have other rights that vary from state to state.
Should you have any questions or problems concerning this
product, please contact our customer service department at:
1-877-768-8483 (Toll Free)
Monday - Thursday: 9AM - 5PM (EST)
Friday: 9AM - 3PM (EST)
or
via e-mail at
Southern Telecom, Inc.
ATTN: Customer Service - 2nd Floor
14-C 53rd Street
Brooklyn, NY 11232
The shipping address of the authorized service center is:
FCC Part 15
This equipment has been tested and found to comply with the
requirements for a Class B digital device under Part 15 of the
Federal Communications Commission (FCC) rules. These
requirements are intended to provide reasonable protection
against harmful interference in a residential installation. This
equipment generates, uses and can radiate radio frequency energy
and, if not installed and used in accordance with the instructions,
may cause harmful interference to radio communications. However,
there is no guarantee that interference will not occur in a particular
installation. If this equipment does cause harmful interference to
radio or television reception, which can be determined by turning
the equipment off and on, the user is encouraged to try to correct
the interference by one or more of the following measures:
• Re-orient or relocate the receiving antenna.
• Increase the separation between the equipment and receiver.
• Connect the equipment into an outlet on a circuit different
from that to which the receiver is connected.
• Consult the dealer or an experienced radio/TV technician for help.
Do not attempt to repair or modify this equipment.
Warning: Changes or modifications to this equipment not
expressly approved by the party responsible for compliance
could void the user’s authority to operate the equipment.
Operation is subject to the following two conditions: (1) This
device may not cause interference and (2) This device must
accept any interference, including interference that may
cause undesired operation of the device.
The term “IC:” before the certification/registration number
only signifies that registration was performed based on a
Declaration of Conformity indicating that Industry Canada
technical specifications were met. It does not imply that
Industry Canada approved the equipment.
• Try adjusting the volume by using the [Volume Up] or
[Volume Down] button on the headset; make sure the
volume on your mobile phone is turned up as well.
• For the best audio quality, always wear the headset on the same
side of the body as your mobile phone.
• Check that the battery is charged enough.
• Try turning the headset OFF, and then turning it ON again.
• Many mobile phones have an auto reconnect option when first
attempting to reconnect to a newly paired Bluetooth device.
Make sure you accept this option, so that the headset
automatically reconnects to your mobile phone; check the user
guide of your mobile phone for more information regarding
this option.
• Try unpairing the headset from your phone, and repeat the
pairing procedure.
• Make sure that you fully charged the headset before pairing.
• Keep the headset and mobile phone within 3 feet of each
other during the pairing process.
• Check that your phone’s Bluetooth feature is turned ON.
• Try removing the battery from your mobile phone for 5 minutes.
Place the battery back in the phone, power it on, and retry the
pairing process (see “Manual Pairing”).
• Try repeating the pairing process, see “Manual pairing.”
• Make sure the headset is turned on before beginning the
pairing process (the headset is in pairing mode when you
turn it on for the first time).
• If you are not pairing for the first time or for manual pairing,
press and HOLD the [Call] button until the indicator light
flashes RED and BLUE alternately.
I cannot get the headset into Pairing Mode
My mobile phone cannot pair with the headset
After successfully pairing my mobile phone
and headset, when I shut the phone and
turn it on again, the headset did not
automatically reconnect
I hear distortion, and the sound quality is
poor
The sound is very low
Silicone cushions
S M L
Earhook
Although most people associate Bluetooth headsets with
mobile phones, there are many other products today which
include Bluetooth® wireless technology.
In most cases the pairing process is similar to pairing with a
mobile phone which is explained in detail in the "Manual
Pairing" section.
Below, the pairing procedure with the SONY Playsation3 is
explained, to pair with other devices it is best to refer to the
device's Owner's Manual.
Power Switch
Power ON
(Green)
Power Switch
Power OFF
(Red)
Indicator light
Right ear
Left ear
Using the headset
Using the headset
Wearing your Bluetooth Headset
Wearing your Bluetooth Headset
Connecting to other devices
Connecting to other devices
Troubleshooting tips
Troubleshooting tips
FCC and telephone company information
FCC and telephone company information
Industry Canada
Industry Canada
Warranty information
Warranty information
Call button
Answer/end a call
Call button
Press twice to redial
Indicator light
Volume Down
Volume Up
Press simultaneously
to mute and unmute
Volume Up
Volume Down