0 prepare unit for use, 0 grounding instructions – Sandia 24-Gallon Portable Flood Pumper User Manual
Page 6
(6) 24-Gallon Flood Pumper
3.0 Prepare Unit for Use
Carefully unpack and inspect the Flood Pumper for any shipping damage. Every machine
is tested and inspected prior to shipping. Damages occurred from shipping are the
responsibility of the freight carrier. Notify them immediately if any damage to the box,
machine or parts are discovered.
• All flood pumpers, no matter what the time of year, are shipped with antifreeze in the
solution lines. Prior to first use, fill the tank with one quart of warm water. Attach the
hose and using the hand tool, flush out the system by spraying the one quart of water
through the pump.
• Attach the 1-1/2 inch vacuum hose and the brass quick disconnect.
• Fill the base unit (the recovery tank must be removed) with warm water (less than
100 degrees Fahrenheit). Fill to approximately 4 inches from the top. Use a liquid
detergent made for carpet cleaning or upholstery. Read and mix to the dilution ratios
as directed.
• Always use a defoamer when foaming occurs to prevent motor damage.
• Keep machine away from rain, snow and extreme temperature.
• Never use the machine without a mesh filter bag.
Electrical
Plug the power cord into a 20 AMP grounded wall outlet. 20 AMP circuits are normally
found in kitchens and bathrooms. Never remove ground prong from the plug. If a circuit
breaker trips during operation, turn machine off, reset the breaker and move the electrical
cord to a different outlet to resume operation.
Vacuum System
The Flood Pumper uses a two vacuum motor system that provides outstanding water lift
and air flow. Automatic Vacuum Shut-Off: The float assembly shut-off, located in the
recovery tank on the stand pipe, prevents the waste tank from overflowing into the stand
pipe and damaging the vacuum motors. The float assembly will cut-off vacuum to the
waste tank. When this happens, immediately turn off the vacuum motors and empty the
waste tank.
It is also necessary to use low foaming chemicals or defoamer to eliminate foam buildup
in the recovery tank and damage to the vacuum motors. If moisture does enter the
vacuum motors, it is necessary to WD-40 the motors. Remove the float assembly from
the stand pipe and turn on both vacuum motors. Spray a five second burst of WD-40 into
the stand pipe and continue to let the vacuum motors run for three minutes.
24-Gallon Flood Pumper (7)
2.0 Grounding Instructions
DANGER: IMPROPER GROUNDING METHOD CAN RESULT IN A RISK OF
ELECTRIC SHOCK.
Electrical equipment must be grounded. If the machine should malfunction or breakdown,
grounding provides a path of least resistance for electrical current to reduce the risk
of electric shock. The Flood Pumper is equipped with a cord containing a grounding
conductor and grounding plug. The plug must be inserted into an appropriate outlet that is
properly installed and grounded in accordance with all local codes and ordinances.
If repair or replacement of the cord or plug is necessary, DO NOT connect the grounded
wire to a flat bed terminal. The grounding wire is the wire with insulation and an outer
green surface, with or without yellow stripes.
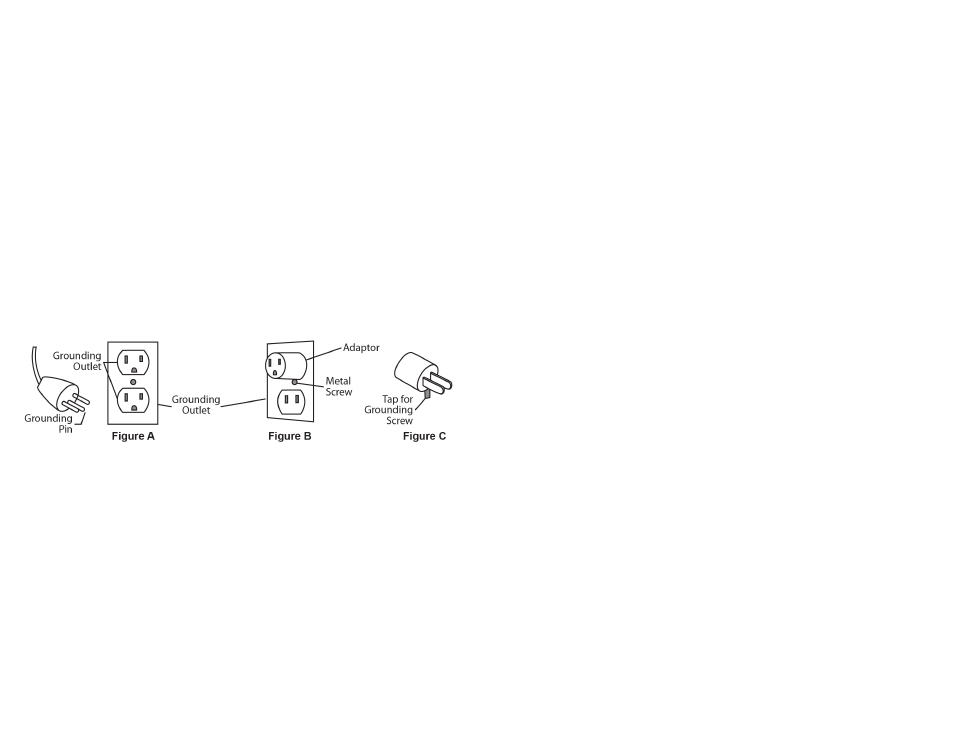
Grounding Method
The equipment is for use on a normal 120 Volt circuit. It includes a grounded plug (plug
shown in Figure A). A temporary adapter (Figure B and C) may be used to connect this
plug into a 2-pole receptacle (Figure B) if a properly grounded outlet is not available.
The temporary adapter should be used only until a properly grounded outlet
(Figure A) can be installed by a qualified electrician. The green colored rigid ear lug or
the like extending from the adapter must be connected to a permanent ground, such as a
properly grounded outlet box cover. Whenever an adapter is used, it must be held in place
by a metal screw.
WARNING:
Improper connection of the equipment grounding conductor can result in a risk of
electric shock. Check with a qualified electrician or service person if you are in doubt
as to whether the outlet is properly grounded. DO NOT modify the plug provided with
the equipment. If the plug will not fit into the outlet, have a proper outlet installed by a
qualified electrician.
NOTE: In Canada, the use of a temporary adapter is not permitted by the Canadian
Electrical Code.