Option no.1 – RISCO Group Orbit RP200VC User Manual
Page 2
RISCO Group Limited Warranty
RISCO Group and its subsidiaries and affiliates ("Seller") warrants its products to be free from
defects in
materials and workmanship under normal use for 24 months from the date of production. Because Seller
does not install or connect the product and because the product may be used in conjunction with products
not manufactured by the Seller, Seller cannot guarantee the performance of the security system which uses
this product. Seller's obligation and liability under this warranty is expressly limited to repairing and replacing,
at Seller's option, within a reasonable time after the date of delivery, any product not meeting the specifica-
tions. Seller makes no other warranty, expressed or implied, and makes no warranty of merchantability or of
fitness for any particular purpose.
In no case shall seller be liable for any consequential or incidental damages for breach of this or any other
warranty, expressed or implied, or upon any other basis of liability whatsoever.
Seller's obligation under this warranty shall not include any transportation charges or costs of installation or
any liability for direct, indirect, or consequential damages or delay.
Seller does not represent that its product may not be compromised or circumvented; that the product will
prevent any personal injury or property loss by burglary, robbery, fire or otherwise; or that the product will in all
cases provide adequate warning or protection. Buyer understands that a properly installed and maintained
alarm may only reduce the risk of burglary, robbery or fire without warning, but is not insurance or a guaranty
that such event will not occur or that there will be no personal injury or property loss as a result thereof.
Consequently seller shall have no liability for any personal injury, property damage or loss based on a claim
that the product fails to give warning. However, if seller is held liable, whether directly or indirectly, for any loss
or damage arising under this limited warranty or otherwise, regardless of cause or origin, seller's maximum
liability shall not exceed the purchase price of the product, which shall be complete and exclusive remedy
against seller.
No employee or representative of Seller is authorized to change this warranty in any way or grant any other
warranty.
WARNING: This product should be tested at least once a week.
NOTE:
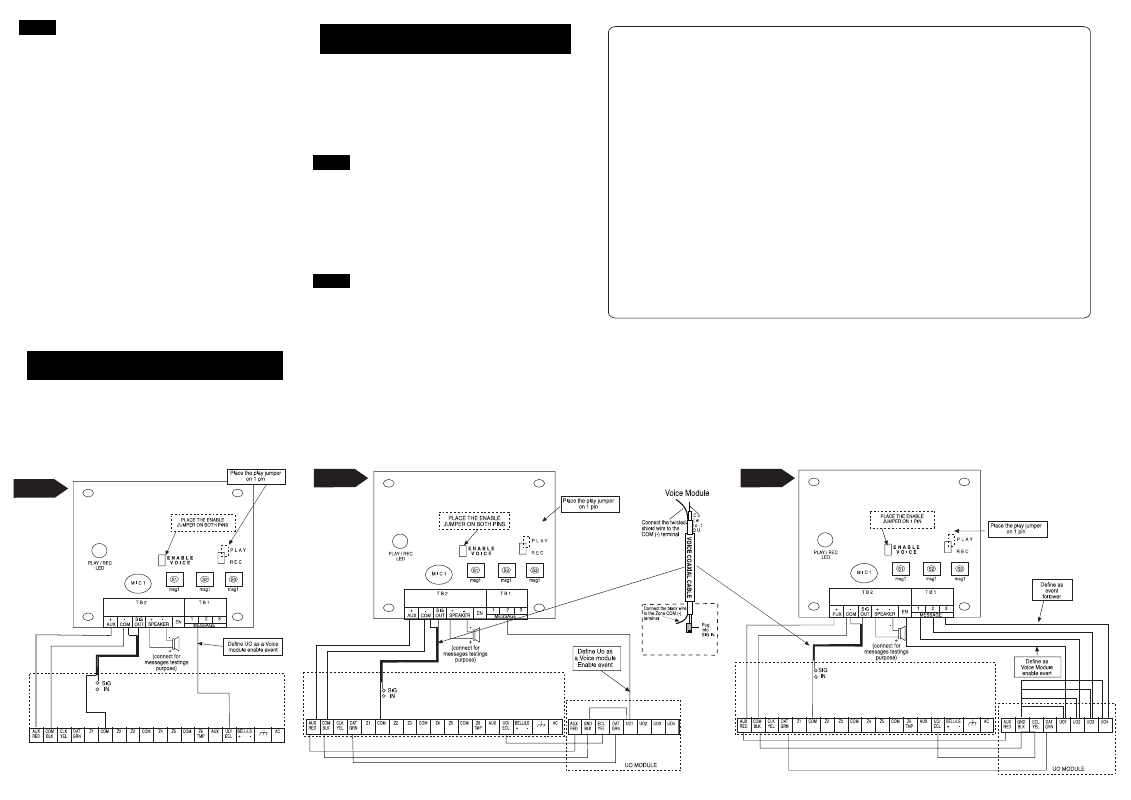
Define the UO as a Voice Module enable event.
Orbit-6: UO Selection No.23 (Voice).
Orbit-Pro: Installer's menu �UTILITY OUTPUT (”3”)
SYSTEM ("1") VOICE MODULE (”9”)
Don’t forget to enter a Follow-Me number.
The voice message is sent only after a Follow-Me
number has been defined.
OPTION NO.1:
Using more than 1 message (UO module
required):
The Voice Module allows the use of up to 3 different voice
messages. This allows for the assigning of each alarm with
the right message (See figure 3).
Wiring instructions:
1. Place the ENABLE jumper on one pin.
2. Place the PLAY / REC jumper on one pin after recording
the messages.
3. Connect the first 2 terminals, marked as AUX (+) and
COM (-) to the corresponding terminals on the main
board of the Orbit-Pro and Orbit-6.
4. Voice Module coaxial cable wiring: Please refer to the
wiring explanation of the “Voice Coaxial Cable” section.
Remember: The SIN IN pins are located only on the
Orbit-Pro new version panel and the Orbit-6.
5. Optional: Connect the speaker to the speaker’s
terminals. Pay attenton to the polarity. (Remove when
done).
6. Connect the EN terminal of the Voice Module to one
terminal of UO.
Remember to define the chosen UO as a Voice
Module enable event.
7. Connect the second terminal of the chosen UO to the
COM (-) if using a relay driven UO module.
8. Connect the message 1 terminal (MSG1), on the Voice
Module panel, to one of the desired utility output
terminal and be sure to program the UO as a Latched
Event Follower (”Burglary”, “Panic”, “Special” or “Fire”).
9. Connect the second terminal of the chosen UO to
COM (-) if using a relay driven UO module.
NOTE:
When using a 4 channel relay UO module, either with
Orbit-Pro or with Orit-6, connect the second terminal of
chosen UO to the COM (-), as described above, in order
to switch the (-) through. When using 8 channel
transisitor UO module for the Orbit-Pro, a negative trip
is provided.
10. Repeat stages 8,9 to connect the other 2 voice
messages.
NOTE:
Don’t forget to enter a Follow-Me number.
The voice message is sent only after a Follow-Me
number has been defined.
You can connect more than one UO to a single voice
message.
Technical Data / Specifications:
Input power: 12 Volts DC Weight; 28,44 mg.
Current consumption: 6 mA, typical / 26 mA, maximum
(without speaker)
Dimensions: 6.6cm x 6.6cm x 1.8cm
(2.6 in x 2.6 in x 0.7 in)
RISCO Group 2011
Figure 1
ORBiT 6 Panel
RISCO Group 2011
RISCO Group 2011
Figure 2
Figure 3
ORBiT 6 Panel
ORBiT 6 Panel