Fig. 3a fig. 3, Fig. 3b, Fig.3 – Medal Sports WMUS1344120 User Manual
Page 8
www.themdsports.com
1344120
7
(Continúe en la siguiente página.)
(Continued on the next page.)
Español
English
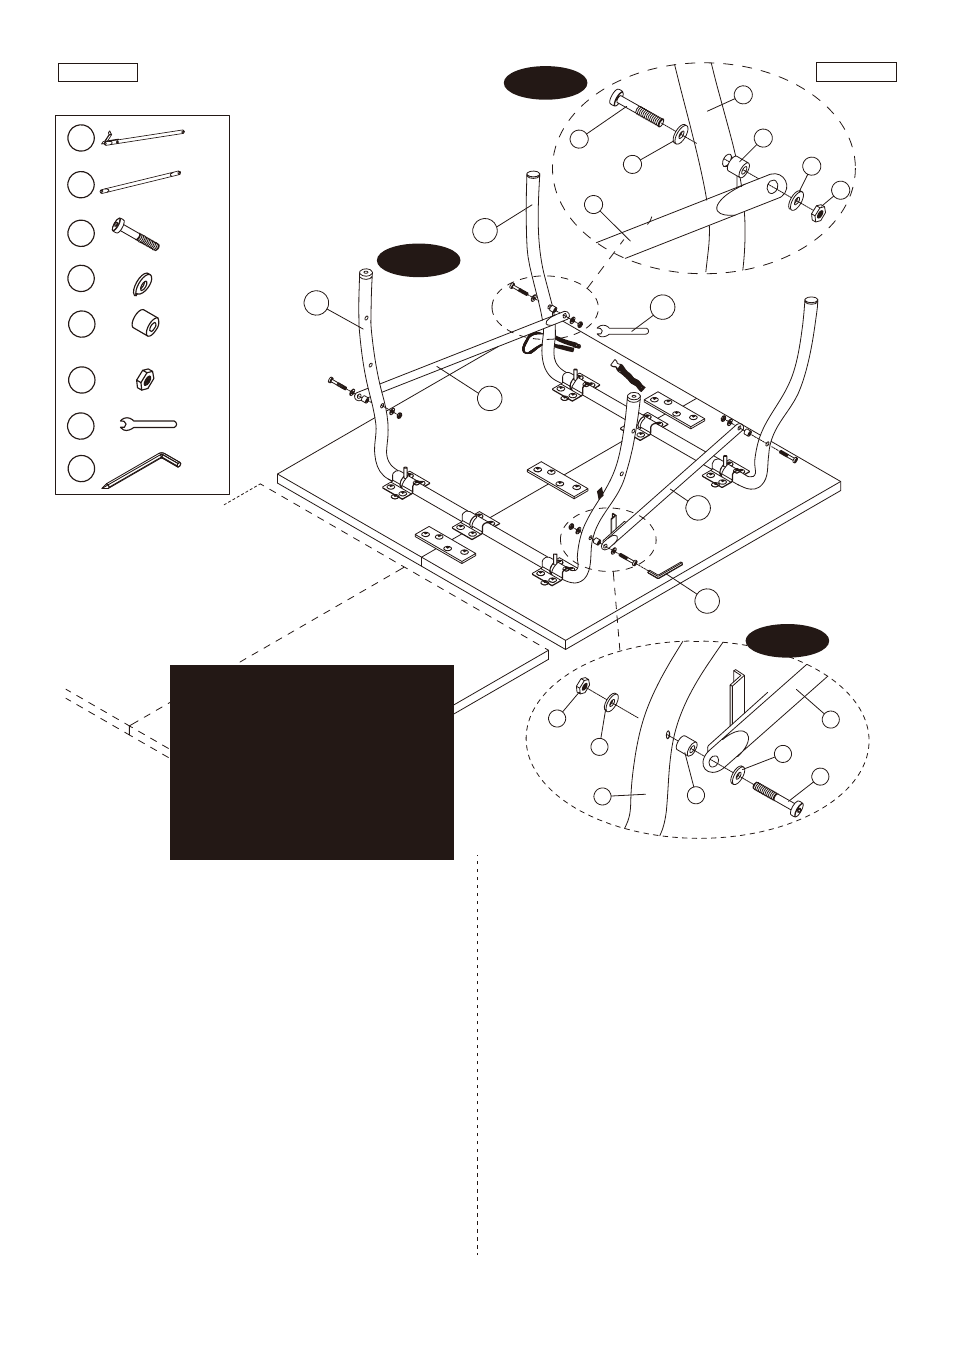
FIG.3
9. Attach one end of the Linkage Tube (#8) to the inside of
the Curved Outer Leg (#5) using one Bolt (#A2), two
Washers (#A4), one Spacer (#A5) and one Nut (#A6).
See FIG. 3A.
10. Repeat the same for the other end of this Linkage
Tube, only attaching it to the outside of the Curved
Inner Leg (#6).
11. Attach one end of the Linkage Tube with Stop Bracket
(#7) to the inside of the Curved Outer Leg (#5) using
one Bolt (#A2), two Washers (#A4), one Spacer (#A5)
and one Nut (#A6).
12. Repeat the same for the other end of this Linkage
Tube, only attaching it to the outside of the Curved
Inner Leg (#6). See FIG. 3B.
13. Repeat the above steps for the other table half.
FIG.3
9. Adjunte una final del Tubo de Conexión (#8) a la parte
interna de la Pierna Exterior Curvado (#5) usando 1
Cerrojo (#A2), 2 Arandelas (#A4), 1 Espacio (#A5) y 1
Tuerca (#A6). Vea la FIG. 3A.
10. Repita el paso para la otra final del mismo Tubo de
Conexión, lo adjunte solamente a la parte externa de
la Pierna Interior Curvado (#6).
11. Adjunte una final del Tubo de Conexión con Corchete
de Parada (#7) a la parte interna de la Pierna Exterior
Curvado (#5) usando 1 Cerrojo (#A2), 2 Arandelas
(#A4), 1 Espacio (#A5) y 1 Tuerca (#A6).
12. Repita el paso para la otra final del mismo Tubo de
Conexión, lo adjunte solamente a la parte externa de
la Pierna Interior Curvao (#6). Vea la FIG. 3B.
13. Repita dichos pasos para la otra mitad de mesa.
X 8
X 2
X 2
7
8
A8
X 1
A6
X 1
A9
A2
X 16
X 8
A4
X 8
A5
Player
/ Jugador
Player
/ Jugador
Center / Centro
FIG. 3A
FIG. 3
7
8
A8
A9
5
6
FIG. 3B
A2
7
A6
A5
A4
A4
6
A2
8
A6
A5
A4
5
A4
Note: Be careful of the assembly
direction on pictures when you
assemble the Linkage Tube #7 and
#8 in order to fit the folding function.
Nota: Que tenga cuidado sobre la
dirección de montaje de cuadros
cuando ud. está montando el Tubo de
Conexión #7 & #8 para encajar la
función plegable.