Medal Sports AM1351500 User Manual
Page 5
1
2
www.themdsports.com
1351500
4
(Continúe en la siguiente página.)
(Continued on the next page.)
Español
English
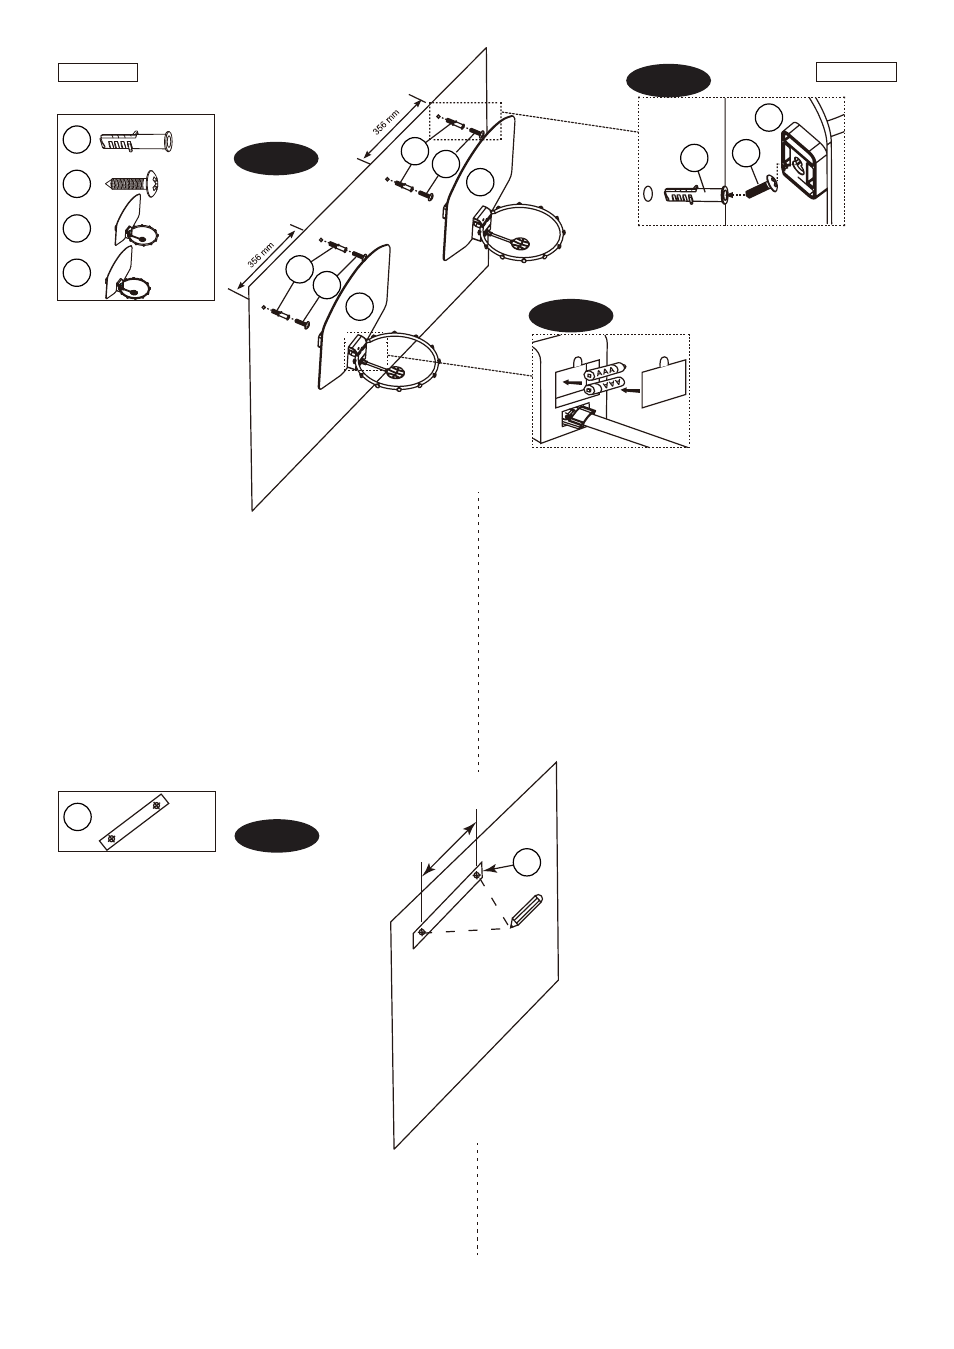
FIG.2
3. Drilling holes on the marks, then insert the Plastic
Screw Anchors (#1) into the holes as shown
in FIG. 2 & 2A.
Note: Please do not drill holes on a cement wall or a
wall made with metal studs.
4. Insert the Screws (#2) into the Screw Anchors and place
the Backboards (#4 & #5) onto the Screws as shown in
Fig. 2 & 2A.
Note: The Screws must partially stick out in order to
hang the Backboards.
5. Insert 2 AAA batteries (not included) into each basketball
unit. Batteries must be installed according to the correct
polarization required as shown in Fig. 2B.
FIG.2
3. Perfora agujeros sobre las marcas, luego inserte los
Sostén de Tornillo Plástico(#1) a los agujeros como
mostrado en la FIG. 2 & 2A.
Nota:Que no perfores agujeros sobre pared de cemento
o pared hecho con tachones metálicos.
4. Inserte los Tornillos (#2) a Sostén de Tornillo y coloque los
Tableros (#4 & #5) sobre los Tornillos como mostrado
en la Fig. 2 & 2A.
Nota:Los Tornillos deben sobresalir parcialmente para
colgar Tableros.
5. Inserte 2 baterías AAA (no incluido) a cada unidad de
baloncesto. Las baterías deben ser instalado a su correcta
polarización como mostrado en la Fig. 2B.
X 4
X 4
4
5
X 1
X 1
FIG. 2
Rear View/Vista Trasera
Wall/Pared
FIG.2A
FIG.2B
W
ALL\P
ARED
7
7
X 1
FIG. 3
FIG.3
6. Please note that the Wireless Scoreboard (#3) may be
mounted up to 50 feet away the backboards. And then,
please draw two marks on the wall using a pencil
according to the holes on the Short Paper Sheet (#7) in
the desired location for the Wireless Scoreboard (#3) as
shown in FIG. 3.
FIG.3
6. Que tenga atención que el Marcador Inalámbrico(#3)
podría ser montado a 50 pies lejos de los tableros. Y
luego dibuje dos marcas sobre la pared usando el lápiz
conforme con los agujeros sobre la Hoja de Papel
Corta (#7) a la ubicación que quiera para el Marcador
Inalámbrico (#3) como mostrado en la FIG. 3.
144mm
W
ALL\P
ARED
1
2
4
1
1
2
2
5
5