After use, Storage, Troubleshooting – Sealey SS60 User Manual
Page 6: Spray calibration
9. AFTER USE
9.1
Drain Tank
9.1.1 Disconnect the power supply and relieve the system
pressure by squeezing the spray gun trigger.
9.1.2 Use a suitable container to drain excess agent into, place it
beneath the drain hole.
9.1.3 Remove the drain cap to drain into container. Ensure all
personal protective equipment is used.
9.1.4 When the tank is fully drained, replace drain cap and tighten.
9.2
Unused Chemicals
9.2.1 If unused agents are to be kept for future use store in the
original container or a similarly suitable one. Also ensure
such container is suitably labelled.
9.2.2 When remaining agents need to be disposed of, refer to the
manufactures label and local authority guidelines.
9.3
Flush Sprayer
9.3.1 Refer to agents manufacturer for flushing procedure and
recommendation on a cleaning solution.
9.4 Decontaminate
9.4.1 After handling chemicals and other agents, remove all
clothing and wash separate to other clothing.
9.4.2 Wash all exposed skin thoroughly with soap and water.
10. STORAGE
10.1 Preparing for Storage
10.1.1 Add an antifreeze (not automotive) into the tank.
10.1.2 Turn on the pump and squeeze the gun trigger until the
antifreeze sprays briefly. Store the gun in the lance clips and
disconnect the power.
10.2 Removing form Storage
10.2.1 Drain the antifreeze into a suitable container.
10.2.2 Fill the sprayer tank with fresh clean water, connect the
power, use the spray gun and flush the system. Be sure to
have a container to collect the flushed antifreeze.
10.2.3 Dispose of antifreeze along with local authority guidelines.
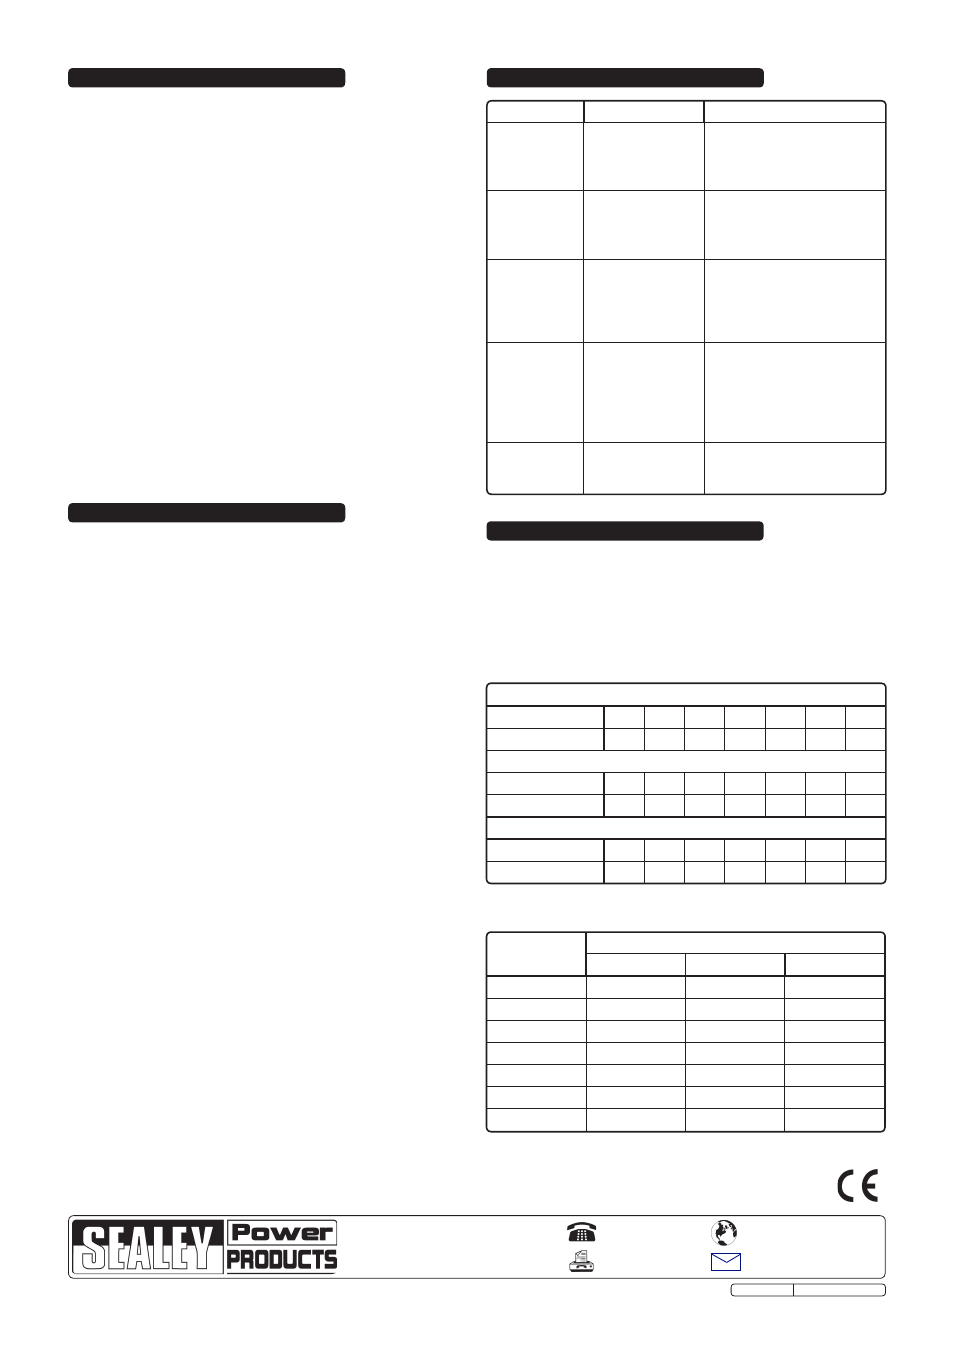
SYMPTOMS
REASON
REMEDY
Pump will not
start.
1. Poor electrical
connection.
2. Short in wires
3. Low voltage
.
1. Ensure good connections.
2. Check conditions of wires.
3. Check the battery voltage.
Low pressure. 1. Worn spray gun
nozzle.
2. Worn boom
nozzle.
1. Replace spray gun nozzle.
2. Replace boom nozzle.
Low flow.
1. Clogged intake
tube.
2. Clogged suction
strainer.
3. Low voltage.
1. Remove obstruction to
intake tube.
2. Clean suction strainer.
3. Check the battery voltage.
Poor spray
distribution.
1. Clogged intake
tube.
2. Clogged suction
strainer.
3. Worn spray gun
nozzle
1. Remove obstruction to
intake tube.
2. Clean suction strainer.
3. Replace spray gun nozzle.
Pump
operates while
not spraying.
1. Leak in the
system
1. Find leak and tighten hose
clamps or fittings.
Replace spray gun.
11. TROUBLESHOOTING
NOTE: It is our policy to continually improve products and as such we reserve the right to alter data, specifications and component parts without prior notice.
IMPORTANT: No liability is accepted for incorrect use of this product.
WARRANTY: Guarantee is 12 months from purchase date, proof of which will be required for any claim.
INFORMATION: For a copy of our latest catalogue and promotions call us on 01284 757525 and leave your full name and address, including postcode.
01284 757500
01284 703534
Sole UK Distributor, Sealey Group,
Kempson Way, Suffolk Business Park
,
Bury St. Edmunds, Suffolk,
IP32 7AR
www.sealey.co.uk
Web
Original Language Version
SS60, SS98 Issue:2(P) -18/07/13
Follow the below tables to determine the correct speed that the ATV
should travel.
12.1 Table 1
12.1.1 Use the table that corresponds with the agents
manufacturer’s suggested application rate (litres per hectare,
litres per 100 sq.m or litres per 10 sq.m).
12.1.2 Find the application rate that is closest to the agents
manufacturer’s recommendations.
Litres per Hectare
Application Rate
800
400
267
200
160
133
144
Speed (km/h)
1
2
3
4
5
6
7
Litres per 100Sq.m.
Application Rate
8.0
4.0
2.6
2.0
1.6
1.3
1.1
Speed (km/h)
1
2
3
4
5
6
7
Litres per 10Sq.m.
Application Rate
0.80 0.40 0.26 0.20 0.16 0.13 0.11
Speed (km/h)
1
2
3
4
5
6
7
Speed (km/h)
Time Required in Seconds to Travel a Distance of:
10m
50m
100m
1
36
180
360
2
18
90
180
3
12
60
120
4
9
45
90
5
7
35
70
6
6
30
60
7
5
25
50
12. SPRAY CALIBRATION
12.2 Table 2
12.2.1 Use this table to set the speed of the ATV.