Fig.8, Fig.9 fig.10, Preparation – Sealey SS60 User Manual
Page 4: Use - spot sprayer
6. PREPARATION
fig.8
5.9
Connect the Remote Switch to Battery
5.9.1 Disconnect the vehicle's earth cable from the negative
battery terminal.
5.9.2 Connect the red positive clamp to the positive (+) terminal on
the battery.
5.9.3 Connect the black negative clamp to the negative (-) terminal
on the battery.
5.9.4 Reconnect the vehicle earth cable.
5.10 Connect the remote switch the pump
5.10.1 Ensure the remote switch is in the OFF position (O).
5.10.2 Connect the remote switch to the power cable leading from
the rear of the pump.
NOTE: The power cables will only connect one way.
5.11 Testing
5.11.1 Check that the gun clip screws are tight, hose clamps are
secure, and tank straps are properly fastened.
5.11.2 While it is unlikely that factory-assembled components
become loose, they should also be checked to make sure
they are tight.
5.11.3 Fill the tank with water test the system for leaks with water.
5.11.4 Connect the remote switch to the pump power cord and turn
the remote switch ON. The pump is an “on demand” pump.
When turned on, the pump will prime itself, then turn off.
When the gun trigger is squeezed, the pump will
automatically start.
5.11.5 Operate the spray gun by squeezing the gun trigger.
5.11.6 Check for leaks throughout the system. If a leak is detected,
fix the leak and re-test the system with water until no leaks
are detected.
6.1 Preparation
6.1.1 Ensure the sprayer is securely attached to the vehicle.
6.1.2 Ensure the sprayer has been thoroughly flushed and drained
of all residual agents from prior uses.
6.1.3 Clean the suction strainer of any agents residue.
It is important to clean the suction strainer before each use
to ensure it is not clogged and to prevent residual agents
from contaminating sprayer contents.
6.2
Environment Considerations
6.2.1 The sprayer should not be used when wind is in excess of
4mph.
6.2.2 Consideration should be given to members of the public and/
or colleagues when spraying, ensure the area to be sprayed
is well ventilated and cordoned off.
6.3
Filling the sprayer
6.3.1 Choose a safe pesticide mixing and loading area.
Choose an outdoor, well-ventilated area away from
unprotected people, animals, food, and other items that
might become contaminated.
6.3.2 Wear personal protective equipment.
6.3.3 Turn off power to the sprayer before filling. The vehicle
should also be off, with wheels chocked to prevent
unintended movement.
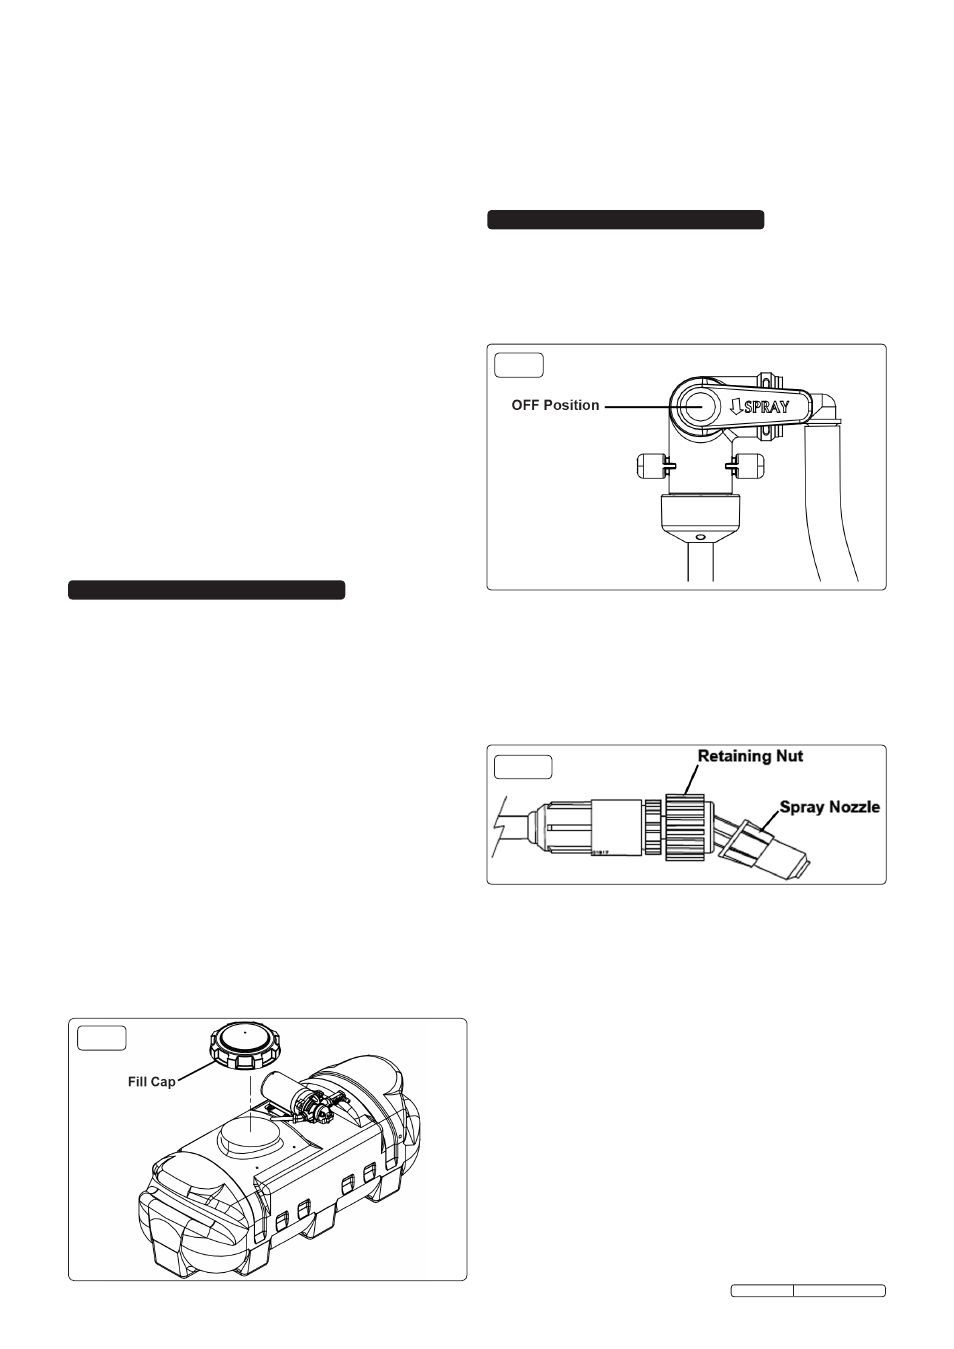
6.3.4 Remove the fill cap located on top of the sprayer. (fig.8).
6.3.5 Before filling ensure drain cap is securely tightened.
6.3.6 Mix agents as instructed on that particular product. Do not
mix more than needed, to reduce wastage and the need to
store excess agents mix.
6.3.7 Pour agent through the filler cap. When done replace filler
cap and tighten.
fig.9
fig.10
7. USE - SPOT SPRAYER
7.1
Personal Protective Equipment
7.1.1 Ensure personal protective equipment is used. i.e gloves,
goggles, coverall and breathing mask.
7.2
Broadcast Lance Valve
7.2.1 Turn the broadcast lance to the OFF position (fig.9).
7.3
Turn On Power
7.3.1 Turn the remote switch to the ON (I) position.
7.4
Use Spot Spray Gun
7.4.1 To spray squeeze the gun trigger.
7.4.2 Twist the spray nozzle to change from a straight stream to a
cone spray pattern. Check with the type of agent which is
best to use.
Original Language Version
SS60, SS98 Issue:2(P) -18/07/13