Electro-Voice Wall/Ceiling Mounting Bracket MB3 User Manual
Page 2
Item C
(x4)
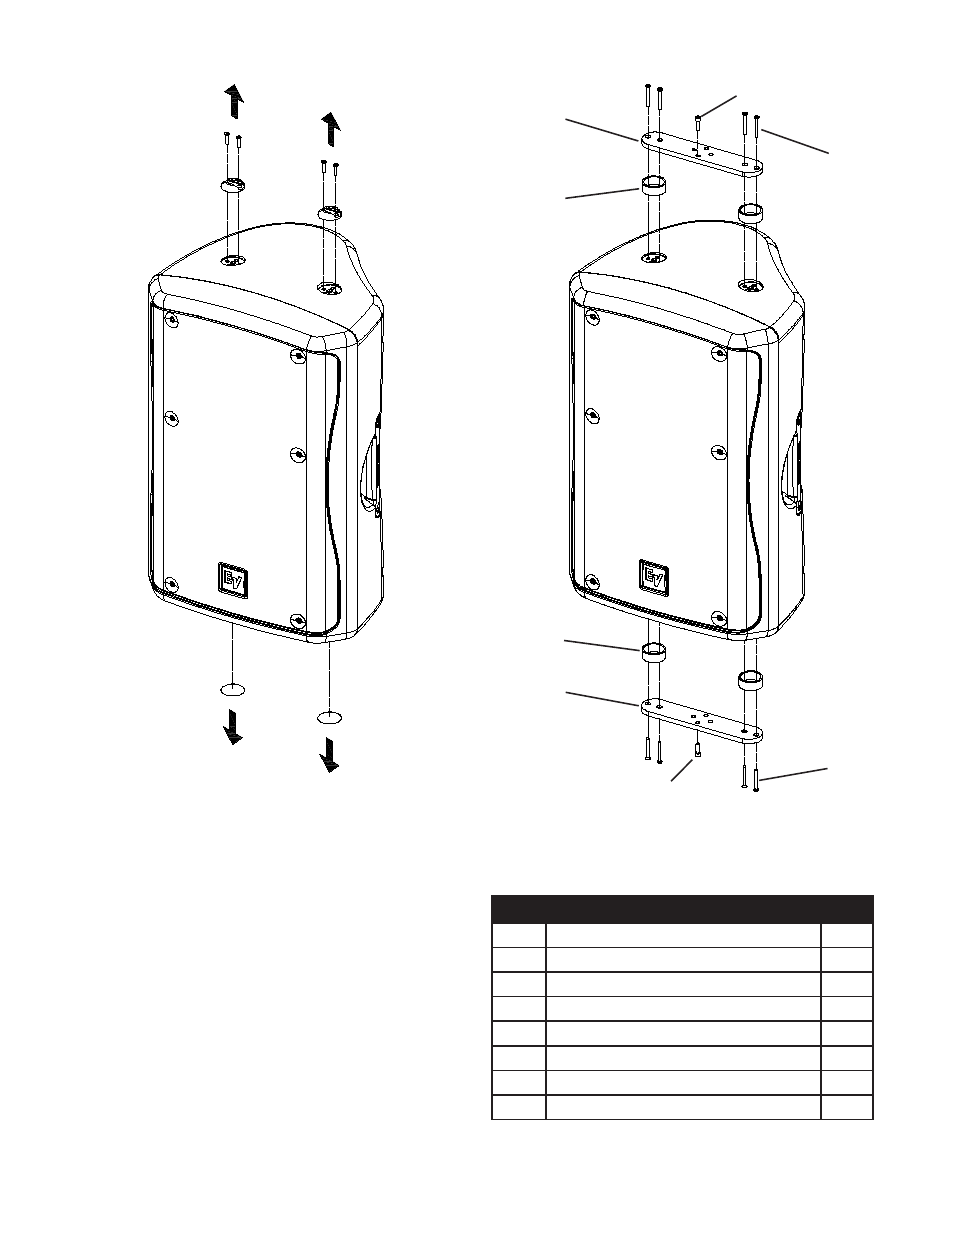
Step 1: Attach Spanning Brackets
Remove the single-stud fittings on the top of
the enclosure by removing the four screws, and
remove the two decals on the bottom of the en-
closure by using a knife or razor blade (Figure 3).
Install the four spacers (Item D) and two spanning
brackets (Item B), using the eight flat head screws
(Item C). Thread two M8 cap screws (Item E) into
the front threaded hole of each spanning bracket,
until they are flush with the bottom of the spanning
bracket (Figure 4).
MB3 Mounting Bracket Includes
Item Description
Qty.
A
U-Bracket
1
B
Spanning Bracket
2
C
Screw, 10-32 x 1-3/4”, Flat Head
8
D
Spacer
4
E
Socket Head Cap Screw, M8x20mm
4
F
Washer, M8
2
G
Lock Washer, M8
2
Item D
(x2)
Item B
Figure 3: Removing hardware on the Zx3
Figure 4: Installing the Spanning Brackets
Item E
Item C
(x4)
Item D
(x2)
Item B
Item E
- 3-Inch High Frequency Neodymium Transducer ND6-8 (2 pages)
- Sx500+ (8 pages)
- XLC (32 pages)
- 12-InchTwo-Way Full-Range Force i Monitor (2 pages)
- Constant-Directivity Horn HP420 (2 pages)
- Speaker System (56 pages)
- TX1152FM (2 pages)
- Loudspeaker System XiA-Series (1 page)
- Fri+122/64 (4 pages)
- EVID C12.2 (2 pages)
- ZX5-60 (4 pages)
- Phoenix (20 pages)
- EVA-2082S/920 (4 pages)
- 600W Loudspeaker System ZX3-60 (2 pages)
- Zx1i-100T (12 pages)
- Force i (2 pages)
- Two-Way High-Output Stage System Eliminator ii (2 pages)
- Sound Reinforcement System Xi-1123A/106F (4 pages)
- HPT64 (2 pages)
- FRX+660 (4 pages)
- FRi-2082 (2 pages)
- EVID FM6.2 (2 pages)
- EVID FM4.2 (2 pages)
- TX1152 (2 pages)
- EVF-1122S/66 (4 pages)
- FRX+181 (2 pages)
- Sx600 (16 pages)
- 12" Powered Subwoofer System EVID 12.1P (2 pages)
- XI-1152A/64F (4 pages)
- ZX4 (2 pages)
- Sx300 (2 pages)
- DH2T-16 (2 pages)
- Compact Powered Sound Reinforcement Speaker SxA250 (2 pages)
- Compact Full-Range Speaker EVID 4.2 (2 pages)
- EVF-1152D/64-FG (4 pages)
- Theatre Stage System TS940D (4 pages)
- Constant-Directivity Horn HP1240 (2 pages)
- Xi-1122MHA (1 page)
- EVID 6.2 (2 pages)
- DC-One (8 pages)
- SX300PIX (8 pages)
- XI-1122MHA/64F (4 pages)
- Plasma Series (16 pages)
- Dual 15-InchTwo-Way Full-Range Speaker System Force i25 (2 pages)
- ZXA590 (4 pages)