Electrolux EKM 90410 X User Manual
Page 5
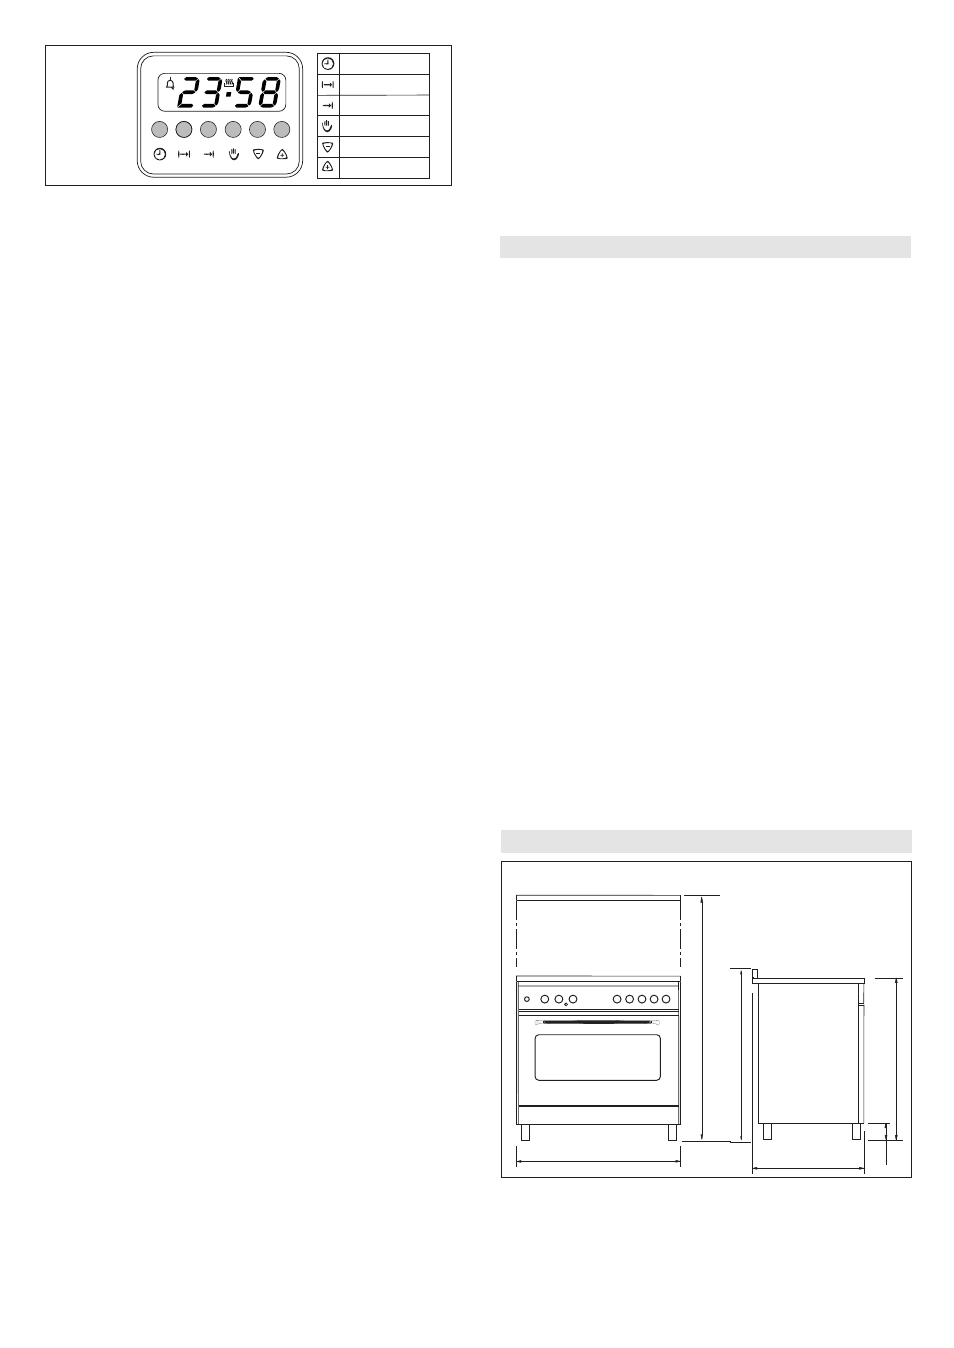
Setting
To set, press and release the desired function, and within 5 seconds
set the time
using the
+ and - buttons.
+ and - buttons.
The + and - buttons increase
and
decrease the time
respectively
the
speed depending on how long the button is pressed.
Setting the time
Press any two buttons
manual
at the same time, and + or - button to
set the desired time. This deletes any previously set programme. The
contacts are switched off and the AUTO symbol flashes.
5
it when it shows any sign of
wear
. Do not
under any
cincumstances
attempt to repair the gas hose.
ENAMELLED SURFACES
Clean with a damp sponge using soap and water.
Grease can be easily removed using hot water or a specific cleansing
agent for enamelled surfaces. Do not use abrasive cleansers.
Do not leave any acid or alkaline substances (lemon juice, vinegar,
salt, etc.) on the enamel.
Clean the parts in stainless steel with specific cleansers for stainless
steel surfaces.
These detergents must be applied using a soft cloth.
GRIDS AND BURNERS
To clean the
cooktop
burners,
remove by
pulling upwards and soak
them for
approximately
10 minutes in hot water with a little detergent.
After
cleaning
and
washing
them,
dry
them carefully.
Make sure that burner holes
are not
clogged.
Clean the burners once a week or more frequently if necessary.
MAKE SURE YOU HAVE ASSEMBLED THE BURNERS
CORRECTLY
.
OVEN
Clean
enamelled
parts with a damp sponge using soap and water.
Grease can be easily removed using hot water or a specific cleansing
agent for enamelled surfaces.
Do not use abrasive cleansers.
Install shelves by locating them in the horizontal guide rails
on the oven walls.
Manual use
When
the manual button
is pressed
the relay contacts switch on, the
AUTO symbol switches off and the saucepan symbol lights up.
Manual operation can only be enabled after the automatic programme
is over it has been cancelled.
Automatic
function
Press the cooking time or end time button to switch automatically from
the manual to the automatic function.
Before cleaning the appliance,
turn off the mains
gas tap and
unplug the appliance or disconnect power at the main circuit
breaker of the electrical system.
Do not
clean appliance
surfaces when still hot.
Do not use steam cleaners to clean the oven.
IMPORTANT
Periodically check the external gas connection hole and replace
WARNINGS
Do not use the oven door handle to move the appliance,
for
example
to remove it from the packaging.
The appliance is in class 1 or class 2 subclass 1.
IMPORTANT:
Any adjacent
furniture must be able to withstand high
temperatures (min. 90°C).
If the appliance is to be installed near units, leave the minimum gaps
specified in the table below.
Setting error
A setting error is made if the time of day on the clock falls within the
cooking start and end times.
To correct the setting error, change the cooking time or cooking end
time.
The relays switch off when a setting error is made.
Cancelling a setting
To cancel a setting, press the cooking time button and then press
the - button until 00 00 appears on the display.
A set programme will automatically cancel on completion.
The relay switches on.
When
the
cooking end time button
is pressed
the next cooking end time
is shown
on the display. Set the cooking
end time with + button. The relay and the cooking time symbol switch
off.
The symbol lights up again when the cooking start time
is reached
.
When the cooking time is
finished
, the AUTO symbol flashes, the
acoustic signal sounds and both
the cooking time symbol and the
relay switch off.
Minutes
minder
Press the minute minder button and set the cooking time with + or -
button.
The bell symbol lights up when the minutes
minder
is operating
When the set time is
finished
, the
acoustic signal sounds
and the bell
symbol switches off.
Semi-automatic use
to set
cooking time
Press the cooking time button and set the desired time with + or -.
The AUTO and cooking time symbols light up continuously. The relay
switches on immediately. When the cooking end time
is reached
, the
relay and cooking time symbol switch off, the
acoustic signal sounds
and the AUTO symbol flashes.
Semi-automatic use
to set
end time
Press the end time button. The time of day appears on the display.
Set the cooking end time with + button. The AUTO and cooking time
symbols light up continuously. The relay contacts switch on. When
the cooking end time
is reached
, the relay and the cooking time
symbol switch off. When the cooking time is
finished
, the AUTO
symbol flashes, the
acoustic signal sounds
and both the relay and
the cooking time button switch off.
Automatic use
to set
cooking time and end time
Press the cooking time button and select the
duration
of the cooking
time with + or - button. The AUTO and cooking time symbols light up
continuously.
GB
Acoustic
signal
The
acoustic signal sounds
at the end of a programme or of the
minutes
minder
function and it lasts for a
maximum of
15 minutes.
To stop it, push any one of the functions buttons.
Start programme and check
The programme starts 4 seconds after it has been set.
The programme can be
verified
at any time by pressing the
corresponding button.
Fig. 4A
CARE AND MAINTENANCE
INSTRUCTIONS
FOR
THE USER
OVERALL DIMENSIONS
895
1450/1500
600
100
850/900
910/960
A
U
T
O
Minute
minder
Cooking time
Cooking end
Manual
Decrease
time
Increase
time