Electrolux EKM 90410 X User Manual
Page 4
ATTENTION:
The temperature shown on the control panel corresponds to the
temperature in the
centre of the oven
only when the functions selected
are or
.
When you turn the control knob to this position, the light will be on for
all the following operations.
4
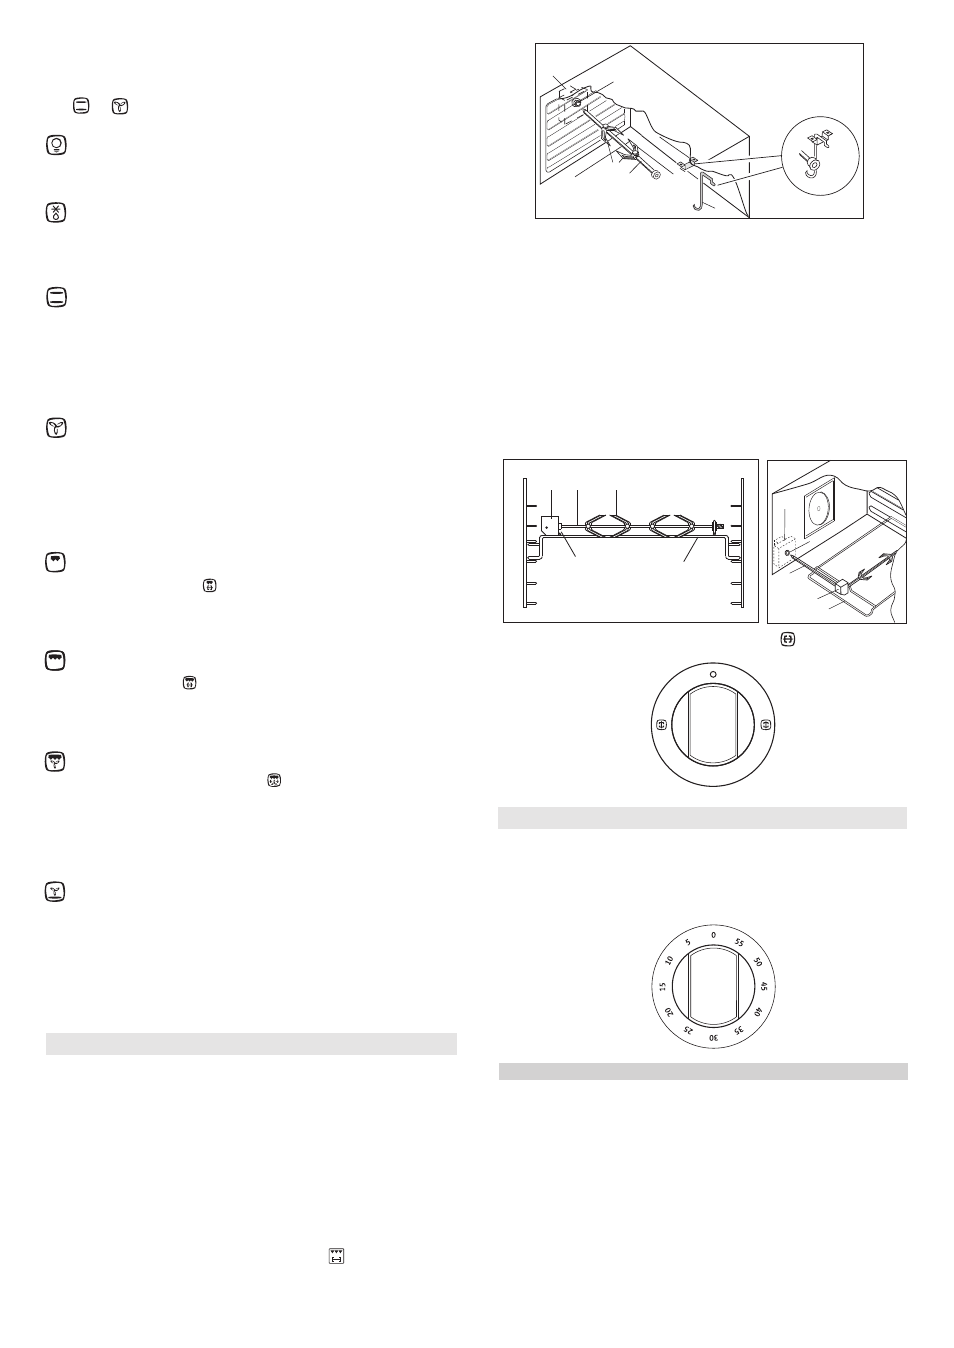
To operate
the turnspit, turn the knob to position .
To use
the turnspit follow the instructions
below
.
-
Thread the chicken or cubes of meat for roasting on the spit
L
.
Ensur
e
that it is
secured properly
between the two forks
F
and
balanc
e
it
correctly
to avoid unnecessary strain on the tra
n
smission
R
(fig 3A).
-
Rest
the spit on the support
G
, after having
fitted
the
opposite
end
into
socket
P
of the transmission
R
(fig 3A)
-
Place
the support
G
in
the oven so that the bar
I
goes into the
socket
H
of the turnspit motor
M
(fig 3B).
-
Place the drip-tray with some water under the turnspit, on the
lowest level
-
Wear oven gloves to remove the spit
and pull out support
G
.
To operate
the turnspit, turn the knob to position (fig 3C).
TURNSPIT
(mod. EKM 90310 X)
TURNSPIT
(mod. EKM 90410 X)
Fig. 3
Defrosting with fan
Ambient temperature
air is distributed inside the oven,
allowing you
to defrost
food very quickly and without
loss of
protein.
Natural convection
Both the lower and upper heating elements operate together.
This is the traditional cooking
function
,
which is ideal
for roasting
joints,
baking
biscuits,
making
baked apples and crisping food.
This function gives excellent
results when cooking on
one
shelf,
with
the
temperature
set
between 60 and MAX°C.
Fan oven
Both the fan and the circular heating element operate together.
The hot air
, which can be set
between 60 and MAX°C
,
is
uniformly
distributed inside the oven. This
function
is ideal for cooking several
types of food (meat, fish)
,
without affecting taste and smell.
It is
also perfect
for delicate pastries.
Display
4-
digit
, 7-
section
di
s
play for cooking times and
clock
.
Cooking time and manual function
=
saucepan symbol
Automatic function
=
AUTO
Minutes
minder
=
bell symbol
The symbols light up when the corresponding functions are selected.
“LED” PROGRAMMER (Fig. 4A)
Features
24 hours clock with automatic
timer
and minute
minder
.
Functions
Cooking time, cooking end time, manual position, clock,
minute
minder
,
maximum programmable
time
23 hours 59 minutes.
GB
Medium grill (+ turnspit according to the models)
This
function
is
ideal
for grilling small quantities of traditional food
and
cooking au gratin dishes
.
The thermostat knob must be
set to
the maximum
temperature
.
Total grill (+ turnspit according to the models)
This
function
is
ideal
for grilling traditional food
and cooking au gratin
dishes
.
Set
the thermostat control knob to 200°C.
Fan assisted total grill (+ turnspit according to the models)
The air is heated by the grill heating element
and
circulated by
means
of
the fan
,
which distributes the heat
over
the food.
The fan assisted grill
is a perfect alternative
to
the turnspit.
It also
gives excellent
results also
for
large quantities of poultry, sausage
and
red meat. Turn the thermostat control knob to 200°C.
Fan assisted
lower heating element
The air is heated by the lower heating element
and
circulated by
means of
the fan, which distributes the heat
over
the food.
This function can be used to sterilize food.
Set the thermostat contol
knob
between 60 and MAX°C
To use
the turnspit follow the instructions
below
.
- Thread the chicken or cubes of meat for roasting on the spit
L
.
Ensur
e
that it is
secured properly
between the two forks
F
and
balanc
e
it
correctly
to avoid unnecessary strain on the tra
n
smission
R
(fig 3).
-
Rest
the spit on the support
G
, after having
fitted
the
opposite
end
into
socket
P
of the transmission
R
(fig 3)
- Place the drip-tray with some water under the turnspit, on the
lowest level.
-
Wear oven gloves to remove the spit
.
R
L
F
P
G
Fig. 3A
Fig. 3B
I
R
G
M
H
Fig. 3C
MINUTES COUNTERS (Fig.4)
Turn the knob clockwise to set the desired cooking time.
The minutes minder can be adjusted from 1 to 60 minutes.
A sound signal will inform you that the chosen time is up.
Fig. 4
INSTRUCTIONS FOR
USING
THE
CONTROL DEVICE
USING
THE TURNSPIT (according to the models)
L
F
R
P
G