Kd c, Eh . b k d c, Eh . b – Casio LK-50 MIDI User Manual
Page 2
E-36
Changing MIDI Settings
You can use this keyboard in combination with an external sequenc-
er, synthesizer, or other MIDI device to play along with commercial-
ly available General MIDI software. This section tells you how to make
the MIDI settings required when connecting to an external device.
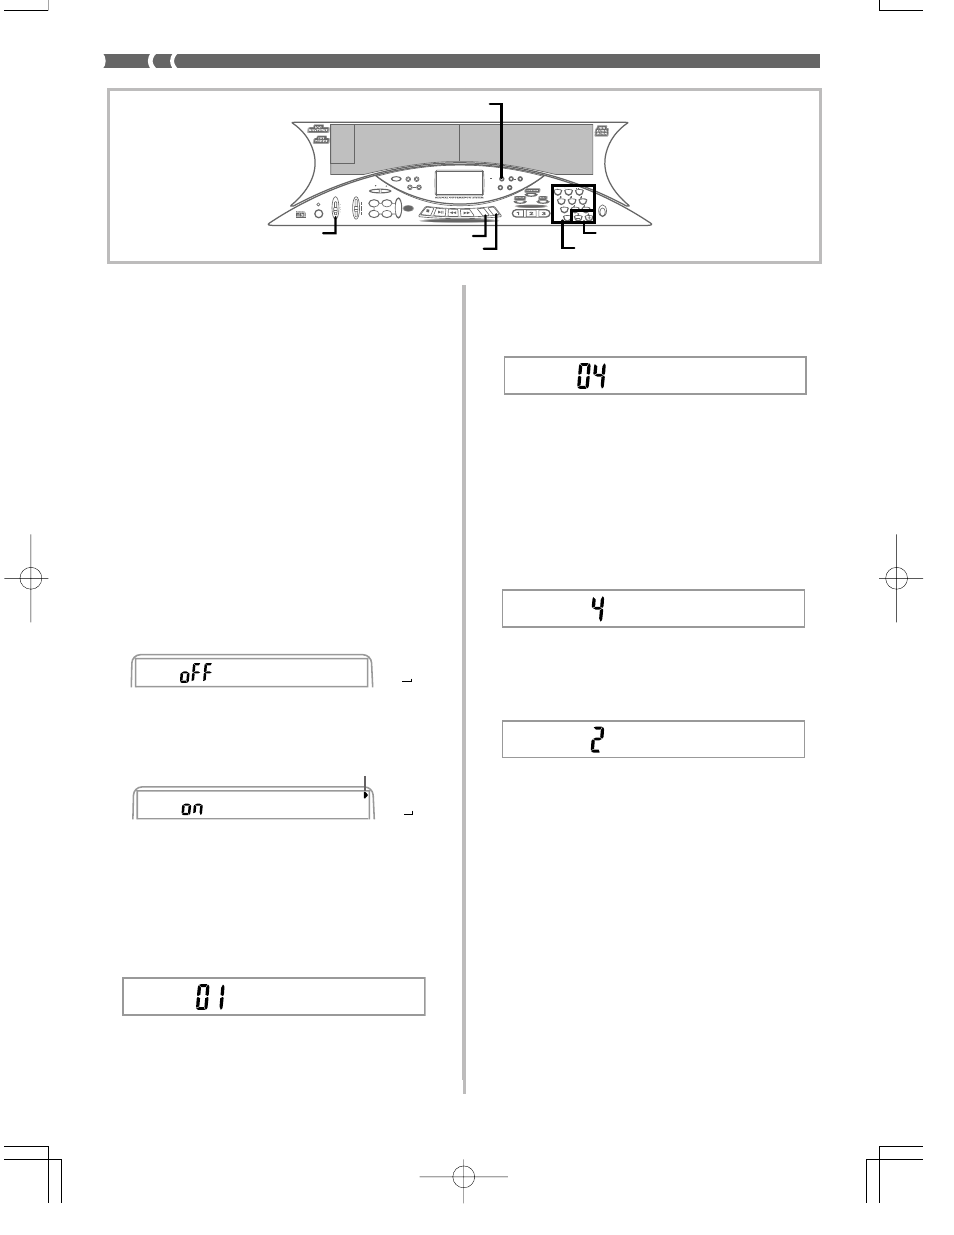
TRANSPOSE/TUNE/MIDI Button
Each press of the TRANSPOSE/TUNE/MIDI button cycles through
a total of 12 setting screens: the transpose screen, the tuning screen,
and 10 MIDI setting screens. If you accidentally pass the screen you
want to use, keep pressing the TRANSPOSE/TUNE/MIDI button
until the screen appears again. Also note that leaving a setting screen
is automatically cleared from the display if you do not perform any
operation for about five seconds.
GM MODE (Default: Off)
on:
This keyboard plays General MIDI data from a computer or oth-
er external device. MIDI IN CHORD JUDGE cannot be used when
GM MODE is turned on.
oFF:
MIDI IN CHORD JUDGE can be used.
1.
Press the TRANSPOSE/TUNE/MIDI button until the
GM MODE screen appears.
Example: When GM MODE is turned off
2.
Use the [+] and [–] or [0] and [1] buttons to turn the
setting on and off.
Example: To turn GM MODE on
KEYBOARD CHANNEL
The keyboard channel is the channel used to send MIDI messages
from this keyboard to an external device. You can specify one chan-
nel from 1 to 16 as the keyboard channel.
1.
Press the TRANSPOSE/TUNE/MIDI button until the
KEYBOARD CHANNEL screen appears.
K
d C
y
e
h
.
b
K
d C
y
e
h
.
b
NAVIGATE CHANNEL (Default: 4)
When MIDI messages are received from an external device for play
on this keyboard, the navigate channel is the channel whose note data
appears on the display and is used to light keyboard keys. You can
select one channel from 1 to 8 as the navigate channel. Since this set-
ting lets you use the data on any channel of commercially available
MIDI software to light the keyboard keys, you can analyze how dif-
ferent parts of an arrangement are played.
1.
Press the TRANSPOSE/TUNE/MIDI button until the
NAVIGATE CHANNEL screen appears.
2.
Use the [+], [–], and the number buttons [1] through
[8] to change the channel number.
Example: To specify channel 2
❚ NOTE ❚
The navigate channel automatically changes to 1 whenever you turn MIDI
IN CHORD JUDGE.
To turn off specific sounds before playing back MIDI data
that is being received
<
While playing MIDI data, press the RIGHT/TRACK 2 button.
• This cuts the sound of the navigate channel, but keyboard keys
continue to light in accordance with the channel’s data as it is re-
ceived. Press RIGHT/TRACK 2 button again to turn the channel
back on.
<
While playing MIDI data, press the LEFT/TRACK 1 button.
• This cuts the sound of the channel whose number is one less than
the navigate channel, but keyboard keys continue to light in accor-
dance with the channel’s data as it is received. Press LEFT/TRACK
1 button again to turn the channel back on.
Example: If the navigate channel is channel 4, the above operation
turns off channel 3. If the navigate channel is channel 1 or 2,
the above operation turns off channel 8.
474A-E-038A
2.
Use the [+], [–], and the number buttons to change
the channel number.
Example: To specify channel 4
7
8
9
4
5
6
1
0
2
3
POWER
MODE
VOLUME
MAX
TEMPO
INTRO
STEP 1
STEP 2
STEP 3
DEMO
NORMAL/
FILL-IN
VARIATION/
FILL-IN
SYNCHRO/
ENDING
FULL RANGE
KEY LIGHT
KEY LIGHT
TOUCH
RESPONSE
METRONOME BEAT
TOUCH
TRANSPOSE/
TUNE/MIDI
MEMORY
STEP
SPLIT
LAYER
GM
MEMORY
STEP
RESPONSE
ACCOMP
VOLUME
CHORD
FINGERED
CASIO CHORD
NORMAL
MIN
START/
STOP
STOP
PLAY/PAUSE
REW
FF
LEFT/TRACK1 R
IGHT/TR
ACK2
SONG BANK CONTROLLER
3-STEP LESSON
REST
(TIE)
RIGHT/TRACK 2
LEFT/TRACK 1
MODE
TRANSPOSE/TUNE/MIDI
Number buttons
[+]/[–]
GM
u
o d e
h
M
GM
MEMORY
STEP
GM
u
o d e
h
M
GM
MEMORY
STEP
Lit
N
. C
v
a
h
.
i
N
. C
v
a
h
.
i