Quick refernce sheet, Prima ip kvm switch operation – Linkskey LKV-9208 User Manual
Page 4
Quick Installation Guide Applicable models: LKV-9208IP / LKV-9216IP 8/16-port IP KVM Switch
Page 4 of 4
Rev. 1.22 Copyright© All rights reserved. 2006
QUICK REFERNCE SHEET
Prima IP KVM Switch Operation
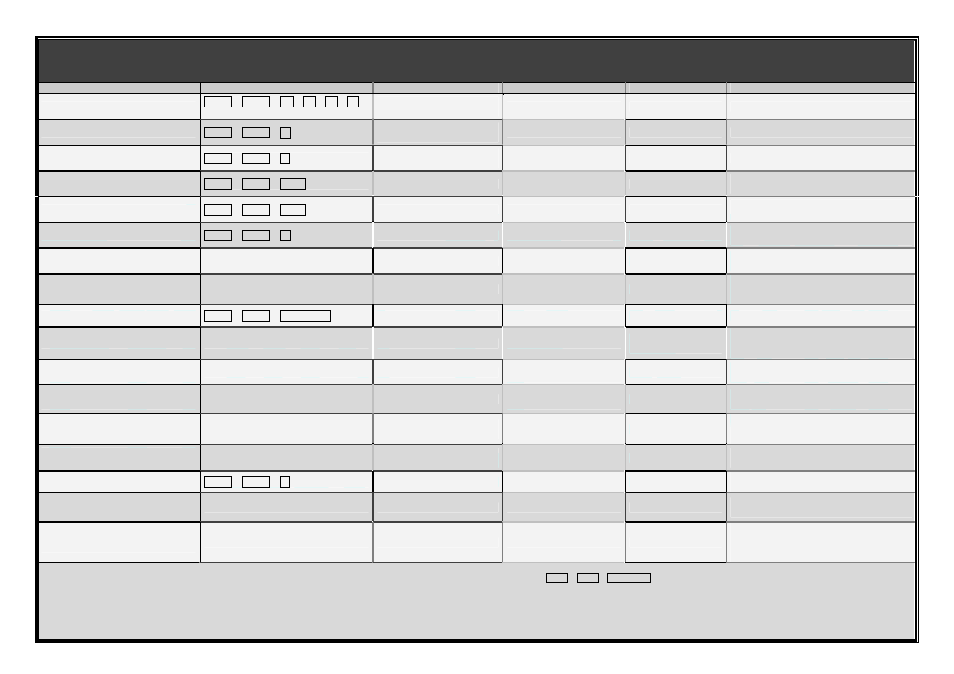
Commands Hotkeys / OSD Menu / Web Management Viewer Menu
Command
Hotkeys
OSD control
1
Prima IP Web
Prima IP Viewer
Description
Select Computer
ScrLk + ScrLk + (a) + (b) + (y) + (z)
(ab = bank no. ; xy = channel no.)
2
Cursor keys to navigate
Enter to select
--
--
Select the active bank (switch) and channel
Next lower channel
ScrLk + ScrLk + ↑ (arrow up)
Cursor keys to navigate
Enter to select
--
--
Select the next lower connected channel
Next higher channel
ScrLk + ScrLk + ↓ (arrow down)
Cursor keys to navigate
Enter to select
--
--
Select the next higher connected channel
Next lower bank
ScrLk + ScrLk + PgUp
PgUp (w/ OSD Menu)
--
--
Select the next lower bank (switch) when with
multiple daisy-chained units
Next higher bank
ScrLk + ScrLk + PgDn
PgDn (w/ OSD Menu)
--
--
Select the next higher bank (switch ) when
with multiple daisy-chained units
Autoscan Beep Sound On/Off
ScrLk + ScrLk + B
--
--
--
Toggle on/off the beep sound for switching
confirmation
Change Computer Name
--
--
Computers page
--
Change the computer name
[max. length = 8 alphanumeric characters]
Local Console Authentication
Local Console page
--
Enable/Disable password authentication on
local console [When enabled, port switching
on local console will be restricted]
Show OSD Menu
ScrLk + ScrLk + (Space Bar)
--
--
--
Activate the OSD Menu on the console screen
Autoscan
--
--
--
Viewer Quick Menu /
Scanning
Enable/Disable autoscan through every
connected channel for quick screen browsing
of each channel.
Autoscan Period
[Default = 10 seconds]
--
--
Video Server page /
Scanning Period
--
Specify the scanning period [default scanning
period = 10 sec ]
Autoscan Delay
[Default = 30 seconds]
--
--
Video Server page /
Scanning Delay
--
Specify the scanning delay [default scanning
delay = 30 sec. ]
Auto Logout Timeout Enable/Disable
[00 ~ 99 min; default = 00 min =
disabled ]
--
Main Menu / Setup / Auto
Logout
--
--
Specify the time out for auto logout -- screen
/keyboard/mouse locked after timeout period
(default = 0 = Disable)
OSD Menu Timeout
[0 ~ 60 ~ 95 seconds]
--
Main Menu / Setup / OSD
Timeout
--
--
Specify the timeout for OSD menu
[default = 20 seconds; 0 = disable]
OSD Title Bar On/Off
[ON/OFF]
ScrLk + ScrLk + T
--
--
--
Toggle ON/OFF the OSD Title Bar
[default = OFF]
OSD Title Bar Position
[Disabled/Left/Right]
--
Main Menu / Setup / Title Bar
--
--
Enable/Disable and select the OSD title bar
position on your screen
User account and password
3
--
--
User management Page
--
Manage the accounts and passwords for local
console. [local console accepts only accounts
and passwords in upper case; while viewer
login accepts both upper case and lower case]
Notes:
1. OSD Menu control is only available when the OSD menu is activated on the screen. To activate the OSD menu, use the hotkey sequence ScrLk + ScrLk + (Space Bar). For detailed OSD operation reference, please refer to the User Guide.
When OSD Menu is active, the mouse will be locked until the OSD Menu is off.
2. Note that a, b, y and z each denotes a number key. (ab) = 01 ~ 16 ; (yz) = 01 ~ 08. For example, ScrLk + ScrLk + 03 + 06 is for bank 3 port 6. When using a single KVM Switch configuration, the default bank no. is 01, therefore hit ScrLk +
ScrLk + 01 + 12 for port 12 for a single KVM Switch configuration.
3. The password is up to 8-character length. You should remember the password since it is required for access to your KVM switch once you enable the password protection for your KVM switch. However, if you forget the password and thus
are blocked from KVM access, you should contact LINKSKEY for technical support.