Edelbrock 17934 User Manual
Page 3
Catalog #17934
Brochure #63-0224
Page 3 of 5
©2004 Edelbrock Corporation
Rev. 2/04 - RS/mc
FUEL TANK REMOVAL (continuation)
4. Disconnect the electrical connector at the fuel tank to
main harness connector. Disconnect the fuel lines
leading to the tank. Support and partially lower the
tank, if needed.
5. Remove the fuel filler neck, if necessary.
6. Support the fuel tank and remove the retaining straps to
allow the tank to be removed from the vehicle. Remove
the fuel tank being careful not to spill any remaining
fuel.
7. Note the condition and position of all fuel tank mounting
pads and insulators used to isolate the fuel tank from
the vehicle body. Mislocated, deteriorated, or incorrect
pads and/or insulators can cause objectionable
transmission of fuel pump noise into the vehicle.
BRACKET REMOVAL
1. Thoroughly clean all dirt and debris from the top of the
tank. Clean out any dirt from around the locking ring
and retainer. This must be done to prevent dirt or
foreign material from falling into the fuel tank while
removing the bracket.
2. Lubricate the locking ring with penetrating oil to assist
in its removal, and remove the locking ring using the
proper tool, as specified in the
factory service
manual, or use another suitable method that CANNOT
potentially cause sparks resulting in fire or explosion.
Rotate the locking ring in a counter-clockwise direction
to remove it.
3. Carefully remove the bracket from the fuel tank. Use
care not to damage the float or float arm, if the float
assembly is part of the bracket
(See Fig. 2).
PUMP REMOVAL
•
Note: See Fig. 2 and 3 for reference during the
removal and installation procedure.
1. Remove the filter. The filter may be attached with a
clamp. If so, cut and discard the clamp. If not, remove
the filter by grasping and pulling it away from the
assembly. Discard the filter.
2. Disconnect the electrical connections to the pump. Be
sure to note the polarity of the connections.
(Note: On
some applications the connectors will be
soldered to the pump’s terminals. To remove, cut
the wires as close as possible to the terminals on
the pump).
3. Remove the hose clamps, cut the rubber hose, and
remove any pump mounting hardware.
4. Invert the bracket assembly, and pull down on the fuel
pump until the inlet end clears the pump support.
Swing it to the side, and remove the pump from the
bracket’s fuel outlet tube. Save the fuel pump rubber
grommet(s) for use in mounting the new pump. Also
remove the fuel pump isolator at this time. (Note: Some
applications will require a metal band to be cut, which
retains the pump.)
5. Remove the cut hose piece from the bracket tube and
discard along with the used hose clamps. Remove the
pump to filter adapter by pressing on the retaining tabs
and discard it.
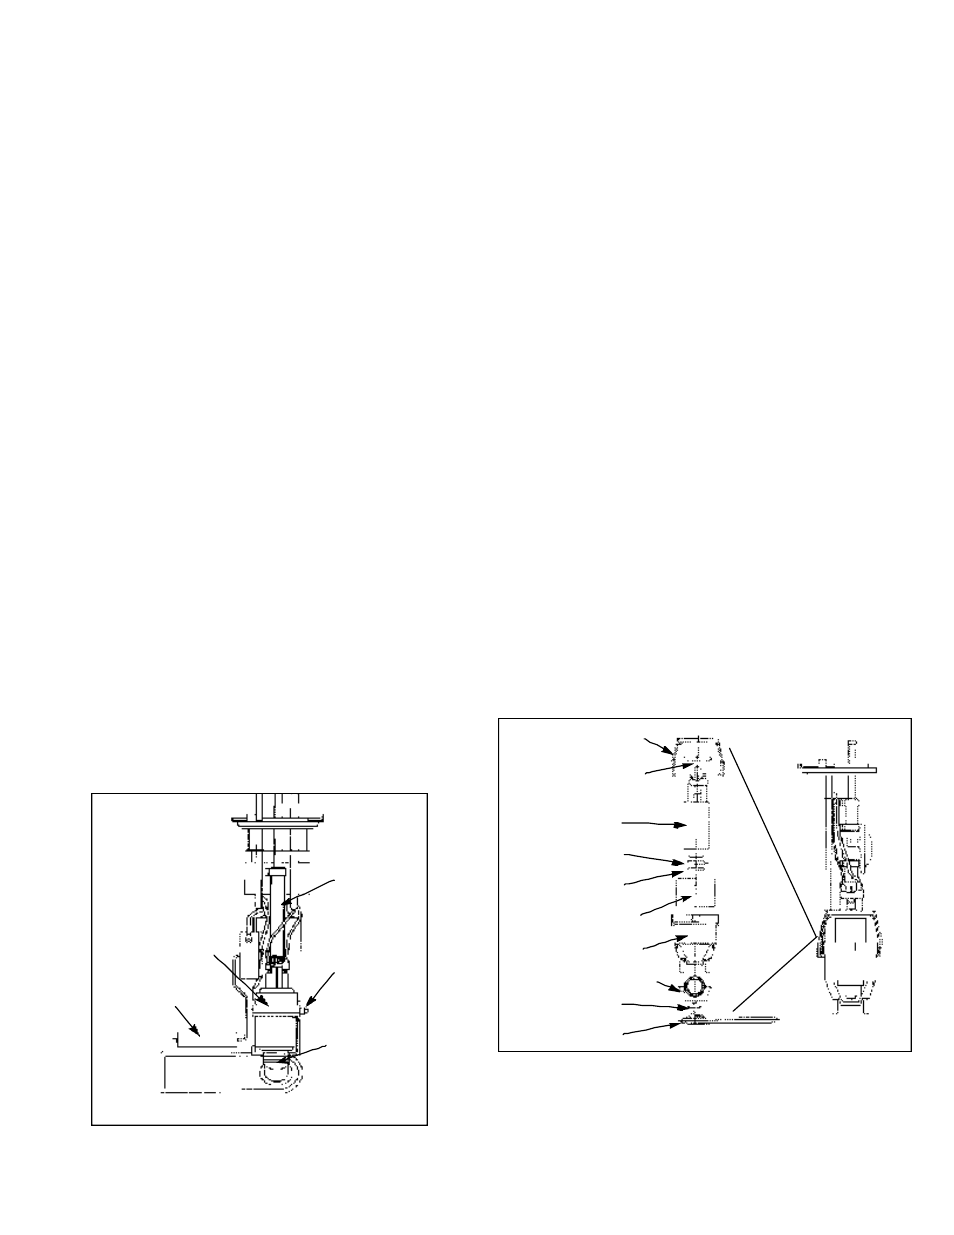
Fig. 2
Fuel Hose
Cable Tie
(Supplied)
Float Arm
Filter Retaining
Clamp (Not on
All Models)
Stock Fuel Pump
Retaining Clamp
(Dotted Line)
Fig. 3
Mounting O-Ring
(Not on All Models)
Inlet O-Ring
Inlet Spacer
Fuel Pump
Pump to Filter Adapter
Filter Seal
Fuel Pump Carrier
Fuel Filter
Fuel Pump Isolator
Fuel Pump Carrier