Grass Valley Indigo HD Expansion Solution User Manual
Page 3
INDGO1-HR-8 Install Guide
Page 3
Indigo Setup Menus
Ethernet Address – Indigo
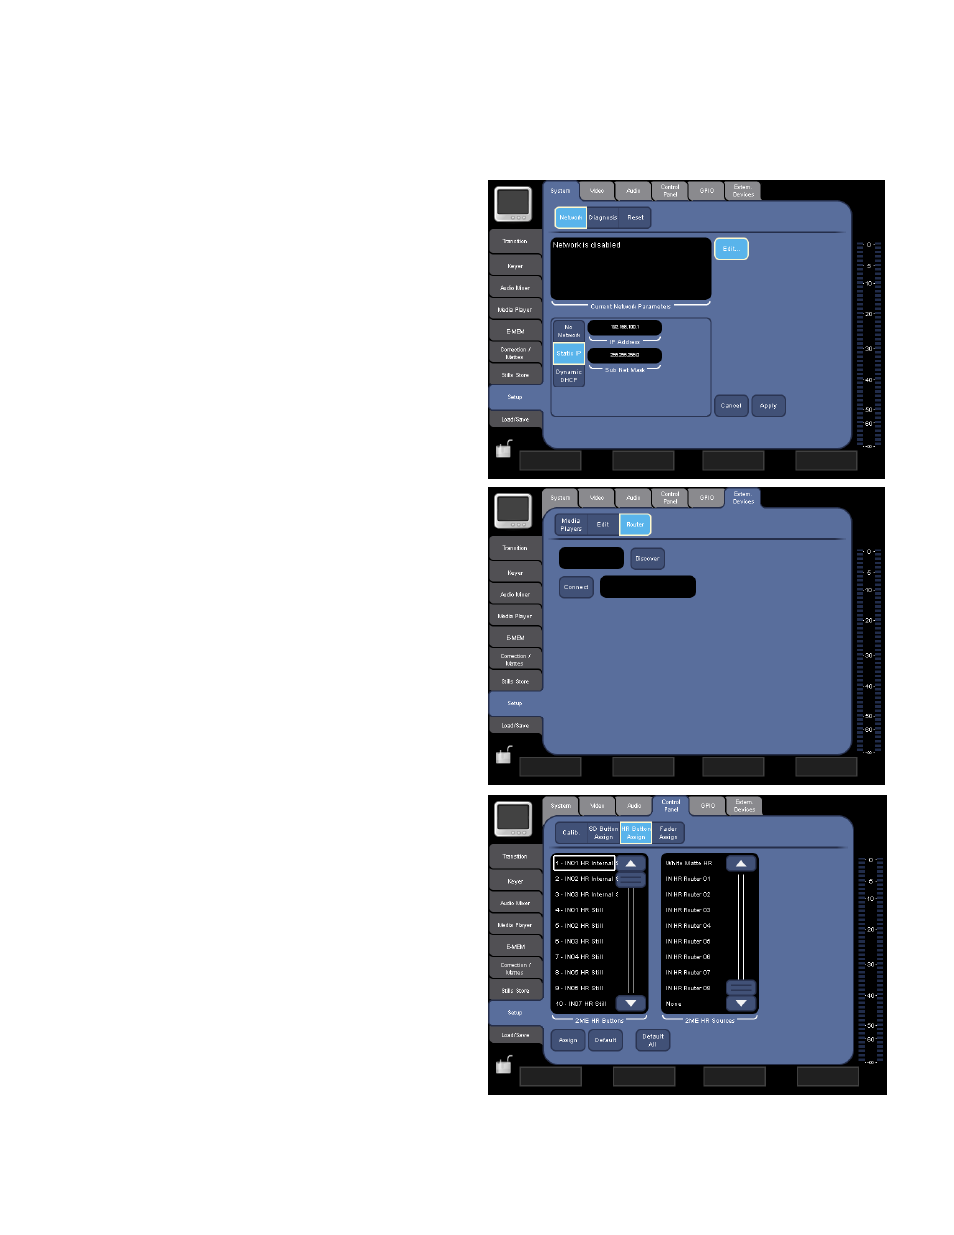
To setup the Ethernet address for Indigo without
NetConfig, go to the Setup>System>Network menu.
Select Edit and enter the Ethernet address by touching
the black box above IP Address. A dialog box will open
that allows you to enter the new address. Select Apply to
save the new IP address.
Ethernet Address – Acappella
To setup the Ethernet address for Acappella, go to the
Setup>External Devices>Router menu. If you have used
NetConfig to set up the router within the same domain,
select Discover. The IP address of the Acappella will
appear in the black box beside Discover. Select Connect.
If you have not used NetConfig to set up Acappella,
touch the black box beside Discover and manually enter
the IP address of Acappella using the dialog box that
appears.
Note: The IP address must be entered exactly as it is set
up in Acappella. Otherwise, the system cannot connect.
Manually entering an address forces the system to
appear connected, even if the connection is faulty. It is
best to use NetConfig to set up the address in Acappella
and let Indigo discover it automatically.
Inputs
Once the system is connected both for video (via BNC
video cables) and control (via Ethernet), the sources can
be assigned to the Indigo ME buttons.
In the Setup>Video>Input menu check to see that Hi-Res
inputs 1 and 2 are set up as SDI HD. If you are using an
upscaled source from SD, set Hi-Res input 3 as the
upscaled source. Once this is confirmed, go to the
Setup>Control Panel>HR Button Assign menu.
Control Panel
In the HR Button Assign menu, you may remap the
inputs as you wish. In the 2ME HR Buttons box select
input 1, which by default will be IN01 HR. In the 2ME HR
Sources box select IN HR Router 01. Select Assign.
Continuing to select Assign will cause Indigo to advance
down the list, reassigning the remaining default settings to router inputs.