Step 6: install the camera – ACTi Indoor PTZ on Dropped Ceiling with Flush Mount User Manual
Page 7
Installation Guide
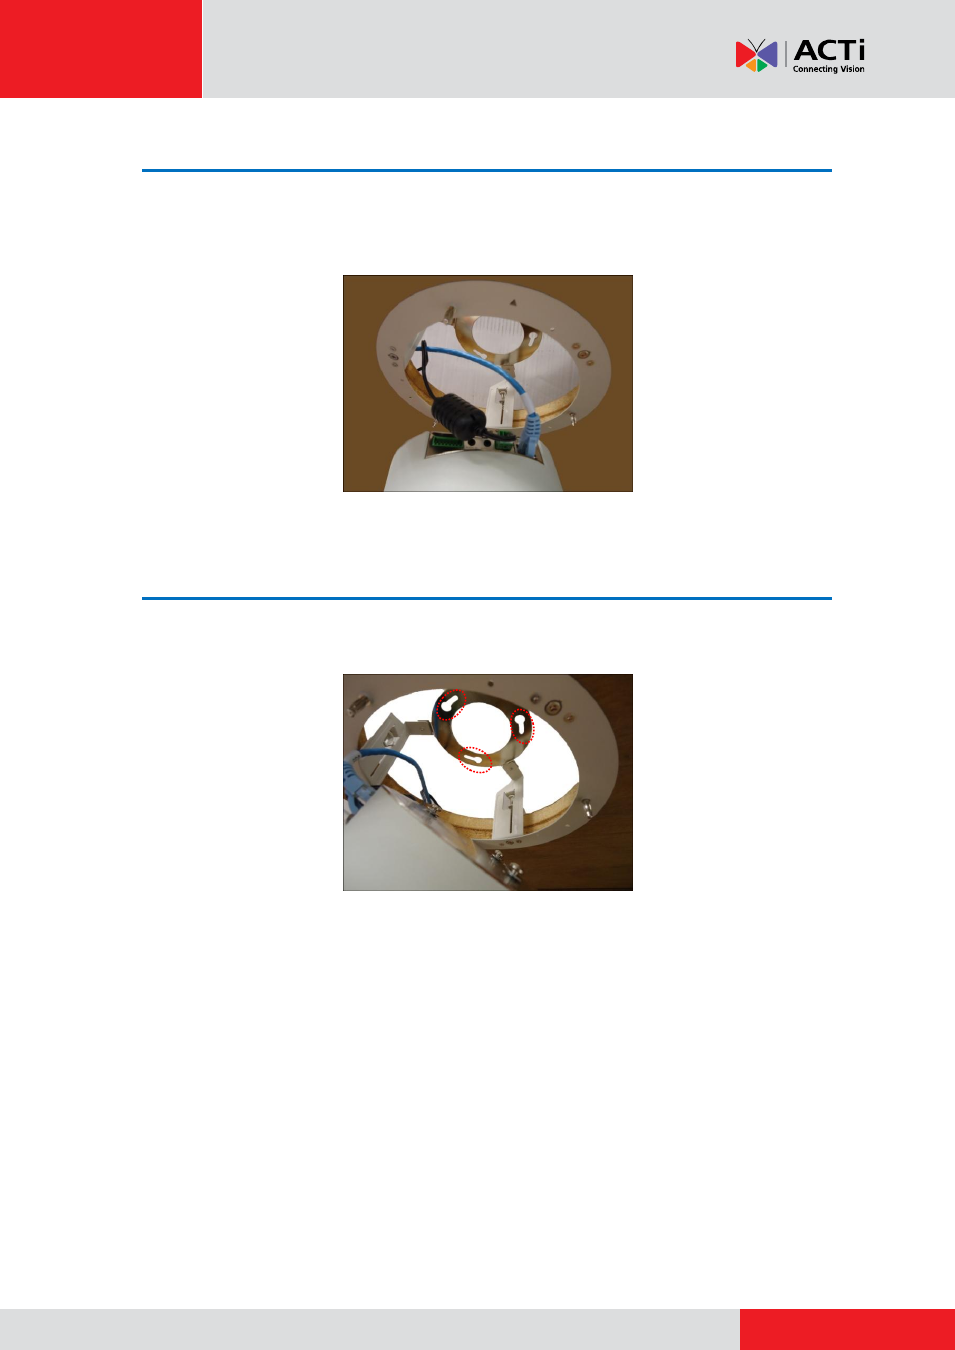
Step 5: Connect the Cables and Optional Accessories
1.
Insert a memory card into the camera card slot (if necessary).
2.
Connect the network cable, power adaptor, and other cables, such as DI/DO, etc. (if any) to
the camera.
Step 6: Install the Camera
1.
Align the camera base hooks to the holes on the bracket and then insert the camera through
the bracket.
NOTE:
Take note that the network cable must be bent to insert the camera into the mount. If
the network cable you are using is not flexible or too rough to be bent, it is
recommended to use the bundled network extension cable (included in the camera
package). The bundled network extension cable is flexible enough to be bent and
makes it easy to insert the camera through the mount.
Or, if you can access the inside of the ceiling, you may mount the camera first and
then connect the cables.
- ECD-1000 V.1.02.09 (135 pages)
- ECD-1000 (2 pages)
- Outdoor Mini Dome and Mini Fisheye Dome on Tilted Wall (40 pages)
- I912 (43 pages)
- PMON-2000 (2 pages)
- Indoor Box (B2xI2x) on Tilted Wall By Bracket (33 pages)
- Bullet Camera (B4xI4x) on Dropped Ceiling with Ceiling Bracket (52 pages)
- KCM-8211 (53 pages)
- V32 (91 pages)
- V11 (20 pages)
- V11 (2 pages)
- V24 (2 pages)
- V24 (32 pages)
- B87 (47 pages)
- E86 (47 pages)
- E223 (32 pages)
- V32 (2 pages)
- V32 (31 pages)
- B910 (48 pages)
- E913 (36 pages)
- Indoor PTZ on Dropped Ceiling (9 pages)
- E59 (31 pages)
- Indoor Hemispheric / Fisheye Dome on Dropped Ceiling (26 pages)
- E271 (42 pages)
- Outdoor Dome on Straight Wall with Accessory Sets of PMAX-0314 (65 pages)
- KCM-5211 (18 pages)
- KCM-5611 (27 pages)
- E69 (37 pages)
- Outdoor PTZ / Speed Dome (I9x) on Vertical Pole with Accessory Sets of PMAX-0305 (36 pages)
- Indoor Box Camera on Ceiling with Bracket (31 pages)
- Outdoor Dome (B8xI8x) on Dropped Ceiling with Gang Box Converter (35 pages)
- Indoor Box Camera with Outdoor Housing on Wall (44 pages)
- Outdoor Hemispheric / Fisheye Dome on Tilted Wall (27 pages)
- Outdoor Hemispheric / Fisheye Dome on Corner with Tilted Mount (PMAX-0310) (22 pages)
- KCM-7911 (32 pages)
- Outdoor Dome on Hard Ceiling (31 pages)
- Outdoor Dome on Corner with Accessory Sets (51 pages)
- Outdoor Dome on Hard Ceiling with Pendant Mount (77 pages)
- Outdoor Dome on Straight Wall with L-Bracket Wall Mount (33 pages)
- Outdoor Dome on Hard Ceiling with Flush Mount (34 pages)
- Indoor Mini Dome and Mini Fisheye Dome on Hard Ceiling with Gang Box (21 pages)
- Indoor Mini Dome and Mini Fisheye Dome on Hard Ceiling with Gang Box (21 pages)
- Indoor Mini Dome and Mini Fisheye Dome on Hard Ceiling (19 pages)
- Indoor Dome (B6x) on Hard Ceiling (25 pages)
- Indoor Dome on Dropped Ceiling (22 pages)