Good cable open on pair 1-2, Crossed, Coaxial (”coax”) cable – Triplett CTX200/CTX200P User Manual
Page 2: Using tone to locate a cable end
© 2010 Byte Brothers, Inc.
7003 132nd Place SE, Newcastle, WA 98059 USA
+1.425.917.8380
●
FAX +1.425.917.8379
●
Network T
Network Test and Repair T
est and Repair Tools
ools
Network Test and Repair Tools
1
2
3
6
4
5
7
8
1
2
3
6
4
5
7
8
Orange/White
Orange
Green/White
Green
Blue
Blue/White
Brown/White
Brown
1
2
3
6
4
5
7
8
1
2
3
6
4
5
7
8
Orange/White
Orange
Green/White
Green
Blue
Blue/White
Brown/White
Brown
EIA/TIA 568B
STRAIGHT THRU CABLE
(MOST POPULAR)
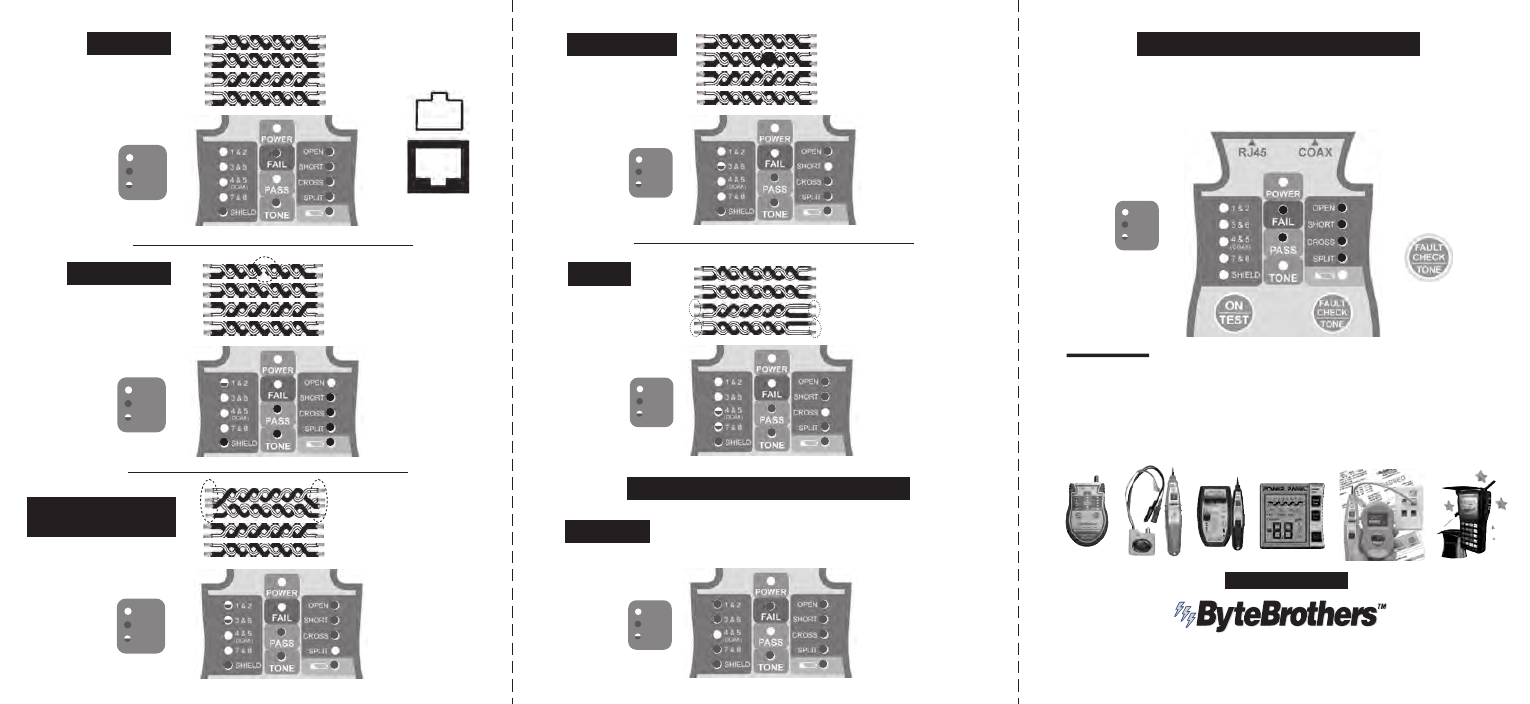
GOOD CABLE
OPEN on PAIR 1-2
ON
OFF
BLINK
1
2
3
6
4
5
7
8
1
2
3
6
4
5
7
8
Orange/White
Orange
Green/White
Green
Blue
Blue/White
Brown/White
Brown
1
2
3
6
4
5
7
8
1
2
3
6
4
5
7
8
Orange/White
Orange
Green/White
Green
Blue
Blue/White
Brown/White
Brown
SPLIT PAIRS
(PAIRS 1,2 AND 3,6 SPLIT)
SHORT on PAIR 3-6
ON
OFF
BLINK
ON
OFF
BLINK
1
2
3
6
4
5
7
8
Orange/White
Orange
Green/White
Green
Blue/White
Blue
Brown/White
Brown
1
2
3
6
4
5
7
8
CROSSED
A WIRE ON BOTH
PAIRS 4-5 AND 7-8
IS FLIPPED (CROSSED)
ON
OFF
BLINK
Limited Warranty
The manufacturer warrants to the original consumer that this product is in good working
order for a period of one year from the date of manufacture or date of purchase.
During this period the product will be repaired or replaced without charge for either
parts or labor. The warranty does not cover damage caused by connection to high
voltage sources such as telephones or Power over Ethernet (PoE). Repair or
replacement as provided under this warranty is the exclusive remedy of the purchaser.
ON
OFF
BLINK
COAXIAL (”COAX”) CABLE
ON
OFF
BLINK
LEDs
LEDs
LEDs
LEDs
LEDs
LEDs
GOOD CABLE
The Pocket CAT uses LED 4&5 to display the status of a coax
cable test. Connect the near end of the cable to the BNC
connector. Connect the far end to the coax terminator (pouch).
WWW.BYTEBROTHERS.COM
Power ON and tone: Hold the TONE button for 7 secs to turn ON
the tone. Press the TONE button repeatedly to select the pair(s) you
wish to tone. Select the setting that gives the loudest tone.
Note: Requires an inductive probe to detect tone (available separately).
ON
OFF
BLINK
LEDs
USING TONE TO LOCATE A CABLE END
TONE “ON”
(ALL PAIRS + SHIELD)
TONE IS COMPATIBLE
WITH MOST POPULAR
PROBES (INCLUDING
BYTE BROTHERS
PROBES).
Hold 7 secs for
tone. Press again
to select pair(s).
1 2 3 4 5 6 7 8
PIN#
PIN#
PIN#
PIN#
PIN#
PIN#
PIN#
PIN#
PIN#
PIN#
RJ45 SOCKET/PLUG
PIN DIAGRAM