Operating heater, Continued – Desa LMFP33NR User Manual
Page 19
111604-01D
For more information, visit www.desatech.com
For more information, visit www.desatech.com
19
19
HAND-HELD
REMOTE OPERATION
NOTICE: You must light the pilot before using the
hand-held remote control unit. See
Lighting Instruc-
tions, pages 17 and 18.
OPERATING HEATER
Continued
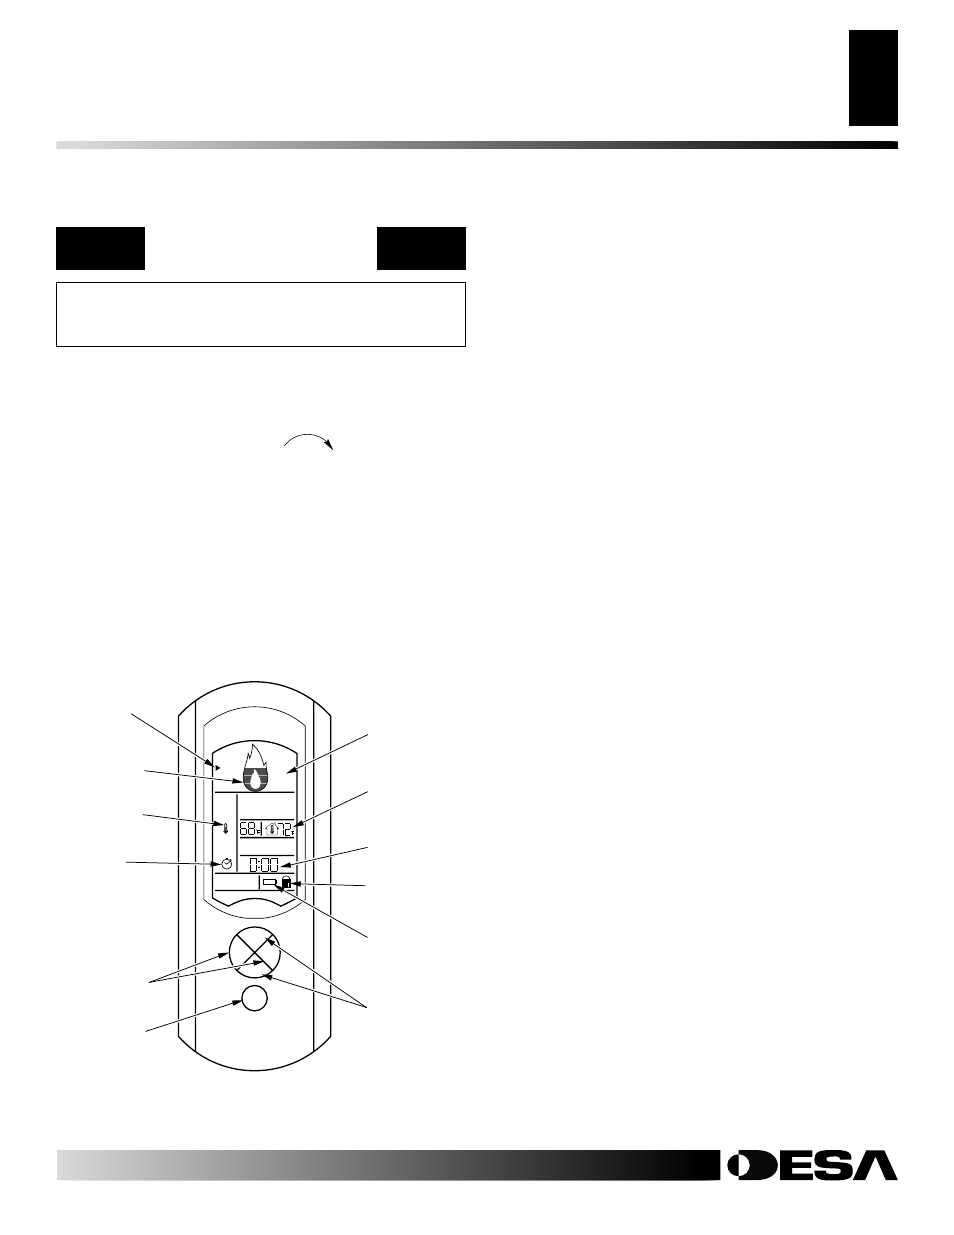
Left and Right
Keys Increase
and Decrease
Set Points
On/Off Button
Flame Height
Indicator
Thermometer
Icon
Clock Icon
Figure 37 - Remote Control
LCD Display
Room
Temperature
Display
Sleep Timer
Display
Lock-Out
Indicator
Low Battery
Indicator
Small Triangle
Icon (Function
Indicator)
When the appliance and the remote control are switched off, the
house icon with the room temperature will be displayed. When
the remote control is turned on, other icons will be visible and
the main burner of the appliance will turn on.
1.
Turn control knob clockwise
to the ON position
(see Figure 34, page 18).
2.
Press the ON button on remote control (see Figure 37). Wait
5 seconds to send a command to appliance.
Note:
An acoustic signal will be heard that confirms the recep-
tion of the command sent from the remote control.
Setting Flame Height
Press the up or down key until the small triangle is to the left of
large flame icon at the top of LCD display (see Figure 37). Press
the left or right key to set the desired flame height. Six flame
levels are available from 1 (minimum) to 6 (maximum).
Setting Room Temperature
Press the up or down key until the small triangle is to the left of
the thermometer icon (see Figure 37). Press the left or right key
to set the desired room temperature.
Setting Timer (Sleep Function)
Press the up or down key until the small triangle is to the left of
the clock icon (see Figure 37). Press the left or right key to set the
desired sleep time. Maximum sleep time is 90 minutes, in 15
minute increments. When desired time is set, press the up or
down key to start the timer. When the desired time has elapsed,
the appliance will automatically switch off.
Child Safety Lock-Out
To lock the remote control keys, press the On/Off key then
immediately press the up key (see Figure 37). The lock-out
function is active when the lock icon is lit. Repeat key sequence
to unlock keys.
Low Battery Detection and Backup
A battery icon will be displayed on the LCD display when
batteries are low in the remote control (see Figure 37).
When the receiver detects a low battery condition;
• Three acoustic "beeps" are generated from the receiver
• Appliance is turned off and will go to the maximum flame height
• Execution of commands is inhibited until batteries are replaced
When batteries are low, it is not possible to turn on the appliance
with the remote control. Appliance can be turned on or off
manually by setting the backup switch of the receiver to MAN
position (see Figure 34, page 18). Remote control and receiver
will restart normal operation after batteries are replaced. See
Installing Batteries for Remote Receiver and Hand Held Remote
Control, page 17.
Timeout
If appliance is turned on and no command is sent to the receiver
for 24 hours, appliance will automatically shut down. Com-
mands sent after shutdown will be executed normally.
OPERATING FIREPLACE
Hand-Held Remote Operation