Installation, Operating heater, Continued – Desa LMFP33NR User Manual
Page 17
111604-01D
For more information, visit www.desatech.com
For more information, visit www.desatech.com
17
17
INSTALLATION
Continued
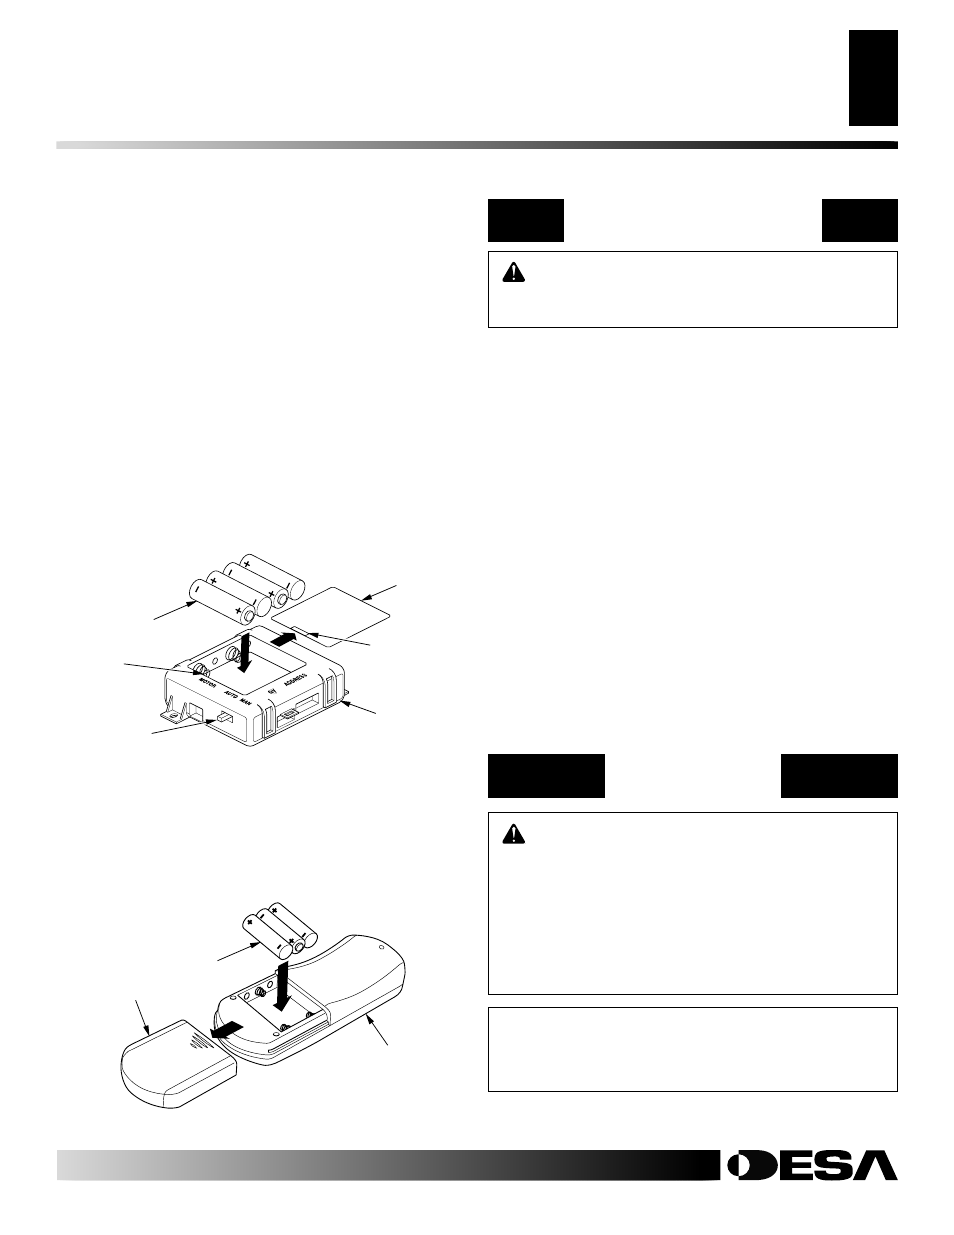
INSTALLING BATTERIES FOR REMOTE
RECEIVER AND HAND HELD REMOTE
CONTROL
Four AA batteries and three AAA batteries are required to operate this
heater with the wireless hand-held remote control set. Four AA
batteries must be installed in the receiver and three AAA batteries in
the hand-held remote control unit.
Note:
Only use alkaline batteries.
Installing Batteries in Receiver
1.
Locate slot on battery cover of receiver (see Figure 32). Firmly
insert tool such as a small screwdriver, butter knife, or dime
into the slot and lift up to remove cover.
2.
Insert 4 AA batterines into receiver. Positive and negative are
marked inside receiver casing.
Note:
Receiver will not func-
tion if batteries are not installed correctly.
3.
Slide tab on cover into receiver housing and snap cover back
into place.
Figure 33 - Installing Batteries in Remote Control
Cover
Remote
Control
3 AAA
Batteries
Installing Battery into Remote
1.
Remove remote cover (see Figure 33).
2.
Insert 3 AAA batteries into remote control (see Figure 33). Posi-
tive and negative are marked inside remote control casing.
Note:
Remote will not function if batteries are not installed correctly.
3.
Slide remote cover back into place.
Figure 32 - Installing Batteries in Receiver
Cover
Receiver
Slot
4 AA
Batteries
Battery
Housing
Backup
Switch
INSTALLATION
Installing Batteries For Remote Receiver and Hand-Held Remote Control
OPERATING HEATER
For Your Safety Read Before Lighting
Lighting Instructions
WARNING: If you do not follow these instructions
exactly, a fire or explosion may result causing prop-
erty damage, personal injury or loss of life.
A. This appliance has a pilot which must be lighted by hand.
When lighting the pilot, follow these instructions exactly.
B. BEFORE LIGHTING smell all around the appliance area
for gas. Be sure to smell next to the floor because some gas
is heavier than air and will settle on the floor.
WHAT TO DO IF YOU SMELL GAS
• Do not try to light any appliance.
• Do not touch any electric switch; do not use any phone in
your building.
• Immediately call your gas supplier from a neighbor’s
phone. Follow the gas supplier’s instructions.
• If you cannot reach your gas supplier, call the fire de-
partment.
C. Use only your hand to push in or turn the gas control knob.
Never use tools. If the knob will not push in or turn by
hand, don’t try to repair it, call a qualified service techni-
cian or gas supplier. Force or attempted repair may result
in a fire or explosion.
D. Do not use this appliance if any part has been under water.
Immediately call a qualified service technician to inspect
the appliance and to replace any part of the control system
and any gas control which has been under water.
FOR YOUR SAFETY
READ BEFORE LIGHTING
LIGHTING
INSTRUCTIONS
WARNING
• If fireplace has glass doors, never operate this
heater with glass doors closed. If you operate
heater with doors closed, heat buildup inside fire-
place will cause glass to burst. Make sure there are
no obstructions across opening of fireplace.
• You must operate this heater with a fireplace screen
in place. Make sure fireplace screen is closed
before running heater.
NOTICE: During initial operation of new heater, burn-
ing logs will give off a paper-burning smell. Orange
flame will also be present. Open damper or window to
vent smell. This will only last a few hours.
OPERATING HEATER