Ooktop, Eatures, Peration – Dacor SGM304 User Manual
Page 6: Sgm464gg g
4
5
C
ooktop
f
eatUres
k
nobs
and
s
pIll
p
roteCtor
r
InGs
The control knobs provided with this cooktop are designed for
ease of use and longevity. The “D” shaped design of the knob
shaft ensures proper orientation when re-installing the knob.
The SGM knobs have a clearly defined chamfer to make setting
the desired heat an easy task. Beneath each knob, a spill
protector ring is inserted into the opening in the cooktop. These
rings prevent liquid spills from entering the chassis beneath the
cooktop and show heat control information. The control knobs and
spill protectors are made of a composite plastic material that is
resistant to staining.
See “Operating the Control Valves” for further information.
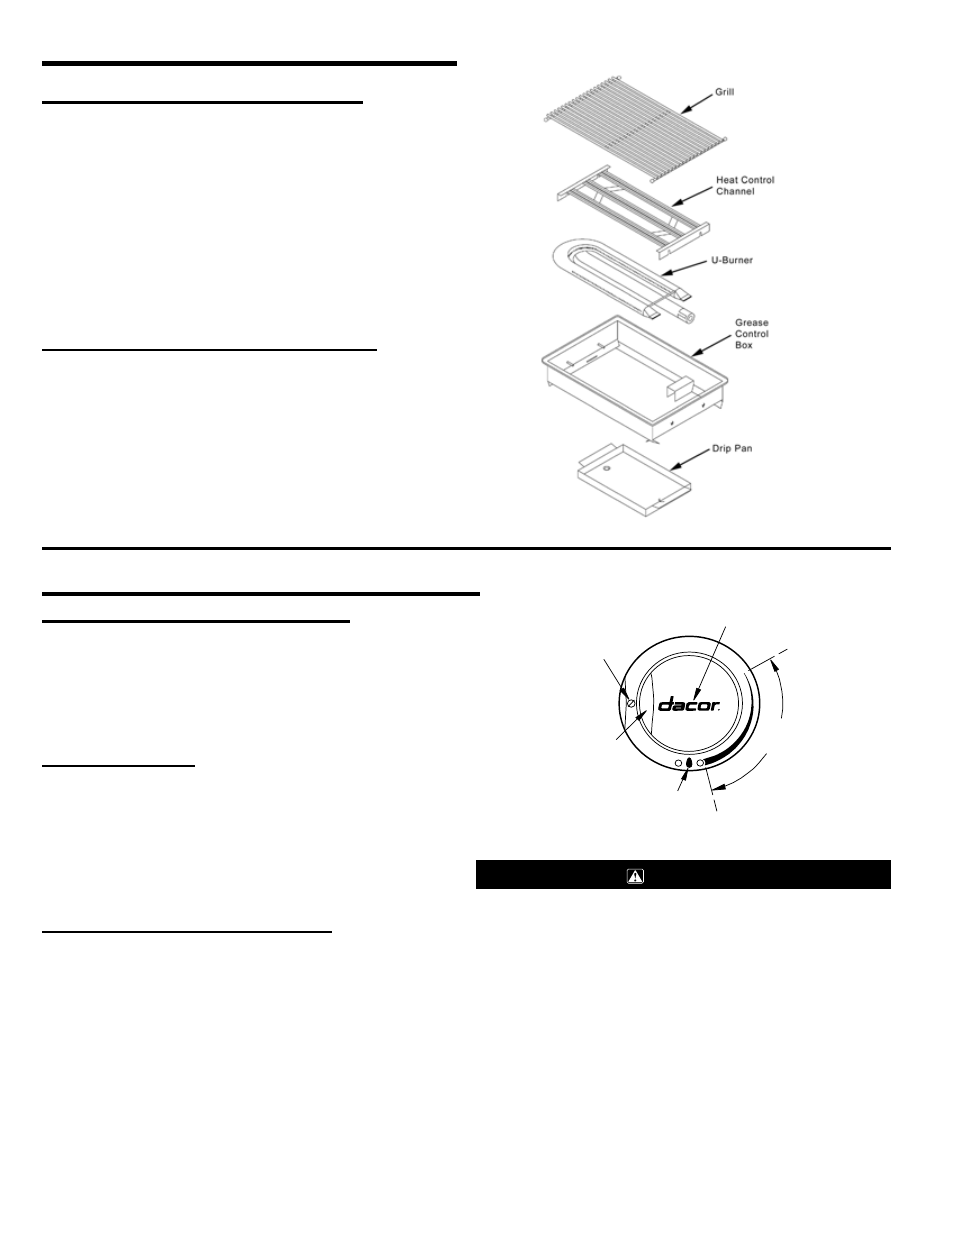
The all gas grill location on the SGM464GG has a 9,300 BTU
burner that is set into the grease control box just above the
removable drip tray. Just above the u-burner is a heat control
channel insert and on top of that sits a porcelain coated grill. The
center control knob operates an automatic perma-flame ignition
system for the single U-shaped burner.
Gas Grill Assembly
sGM464GG G
as
G
rIll
(b
arbeCUe
)
C
ooktop
o
peratIon
s
eleCtInG
the
p
roper
C
ookware
Utensils will affect the overall safety and performance of cooktop
cooking, so it is important to select them carefully. An improperly
selected utensil will not cook efficiently or evenly. For best results,
follow these guidelines:
1. Use medium to heavy gauge metal cookware with flat and smooth
bottoms for greatest efficiency.
. Use utensils with tight fitting lids to retain heat, odors, and steam.
Ensure that the cooktop has been installed by a qualified
individual who has tested the operation of the cooktop in
accordance with the Installation Instructions. The brass burner
rings, burner caps, grates, knobs, and spill protectors must be in
place for the cooktop to operate properly. All cooktop components
must be clean. Be certain that the gas and electrical power
supplies to the cooktop are operational. Read this
Use and Care
Manual in its entirety prior to operating the cooktop.
Indicating marks have been placed on the SGM spill ring below
each control knob to clearly identify the burner controlled by each
knob. The burner being controlled is indicated by a flame icon,
while adjacent burners are illustrated by gray ovals.
To light a particular burner, press down on the corresponding
control knob, then immediately rotate the knob counterclockwise
from the “OFF” (Ø) position to the “HIGH” position (the thickest
part of the flame indicator line).
All ignitors will spark
continuously until the gas ignites on the selected burner.
Once the burner is lit, reduce the flame height if desired by
rotating the control knob further counterclockwise, then place
the utensil on the grate. The flame indicator lines indicate
progressively lower flame height as the lines get thinner.
b
efore
C
ookInG
o
peratInG
the
C
ontrol
V
alVes
Off Position
Knob Position
Indicator
(Polished Surface)
Burner
Designation
Light & High
Position
Area of
Operation
Low
Position
Logo on Front
Knob Only
SGM Burner Control Valve
Do not touch any burner cap, burner base, or ignitor while the
ignitors are sparking, as an electrical shock could result.
IMPORTANT:
1. If the gas does not ignite within four seconds, turn off the valve.
Allow at least two minutes for any gas to dissipate, then repeat
the lighting procedure.
2. Burner ignitors must always be kept clean and dry to function
properly. Due to the Perma-Flame™ reignition feature, dirty or
wet ignitors will result in constant sparking, even if there is a
flame present. Additionally, ignitors will spark automatically
if the flame is distorted by a draft or by a cooktop ventilation
system. Eliminate the draft or reduce the ventilation blower
speed in this case.
4. When the cooktop is cool and/or more than two burners are in
use, the ignitors may continue to spark if the control knob is set
to the “LOW” position. This is normal until the burner warms up.
The tendency to spark under these conditions can be reduced
by operating the burner at a higher flame setting for a short
WARNING