Chapter 3 using the digital prsesnter, 6 operating the digital presenter, 1 control panel – MEGAPOWER MVP-736 User Manual
Page 8
+
-
PC
Notebook
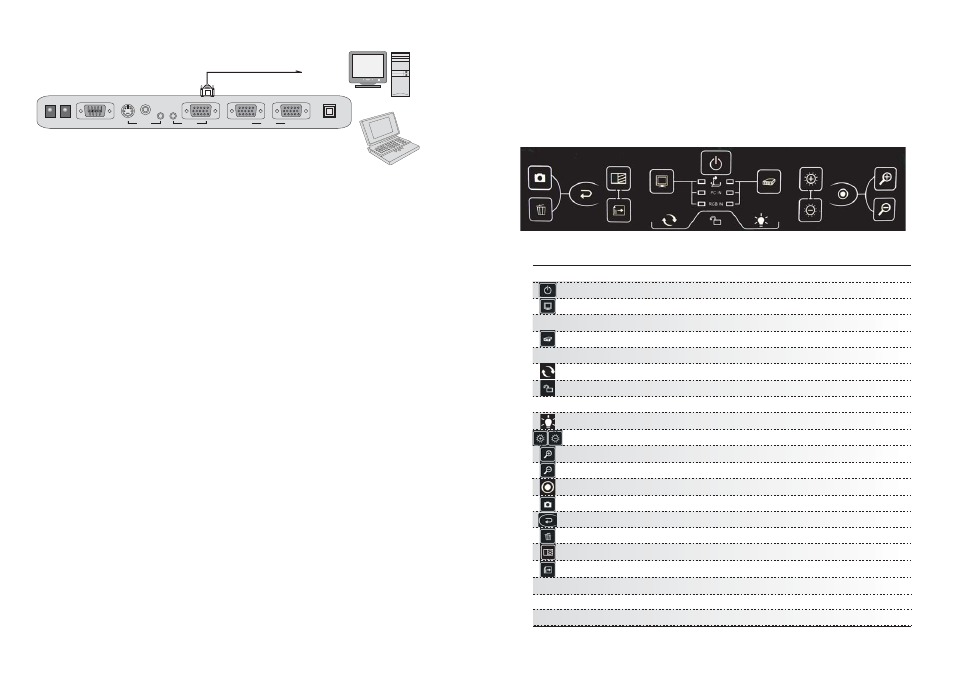
Connecting to External VGA Input
Connect one end of the VGA cable to the PC (or notebook) VGA out put port and the
other end to the VGA IN on the Digital Presenter. The VGA signal from the PC or
notebook can then be selected through the Digital Presenter.
1. Setup the digital presenter on a flat surface and connect it to a proper AC power source.
2. Connect the required external equipment to the digital presenter.
3. Press the Power ON/Off button on the front panel. Switch on the external equipment
such as notebook or multimedia projector.
4. Check to ensure that the cables are properly connected. Press "MONITOR" or
"PROJECTOR" button to select the desired source to be displayed.
The default selection is Body or Internal source.
5. Place the object or document to be displayed on the base platform. Adjust the camera
head so it is directed towards the object.
6. If necessary, remove the close up lens. This depends on the distance of the object from
the camera. If the object is placed on the base platform, then the close up lens must be
used. If the object exceeds this distance, then remove the close up lens from the camera.
7. Light Source Selection: select the light source by pressing "LAMP" button to obtain the best
image. In a dark environment, please select and turn on the upper lights. When displaying
positive or negative film, press "LAMP" button to turn on the base light.
< Off---Upper Light---Base Light---Off >
8. Focus Adjustment: in most cases, the camera will automatically adjust the focus to get a
clear and sharp image. In critical situation when it does not deliver a very sharp image,
press "AF" button to activate the automatic focus function again. If this still does not produce
the best result, use manual focus by pressing "FAR" or "NEAR" to get a sharp image.
9. Freezing of image: press the "FREEZE" button to freeze the current image of the camera.
The image can then be studied and viewed clearly. Press "FREEZE" button to cancel the
freeze function.
10. Selecting External Equipment: selects the external equipment as the source for display
through the RGB OUT port of the Digital Presenter. If no image is displayed, please check
that the cables are properly connected. Press "SIGNAL" button on the remote control to
select the desired source for display.
3.6 Operating the Digital Presenter
9
FUNCTION OF BUTTONS
POWER
MONITOR
PROJECTOR
ROATATE
LOCK
LAMP
BRIT +/-
ZOOM +
ZOOM -
AF
CAPTURE
PLAYBACK
DELETE
DIVISION
NEXT
Power ON/OFF the presenter
Signal output to Monitor:
Selects signal:- internal, PC signal and RGB signal
Signal output to Projector:
Selects signal:- internal, PC signal and RGB signal
Rotate image 180 degree
Lock & Unlock function. Presenter acquieses it will lock
after 20 seconds automatically without any touching
Selects lights:- Upper Light-----Base Light-----Off
Increase or Decrease brightness
Zooms In and Enlarges size of object
Zooms Out and Reduces size of object
Auto Focus
Stores images
Display stored images
Deletes stored images
Compare image
Shown next stored image
Chapter 3
Using the Digital Prsesnter
3.1 Control Panel
The following describes the control button on the control panel of the Digital Presenter.
6
RS-232C
S-VIDEO
AUDIO
VIDEO
DC-IN-12V
PC IN
USB
OUT
OUT