Kleenmaid CH700X User Manual
Page 8
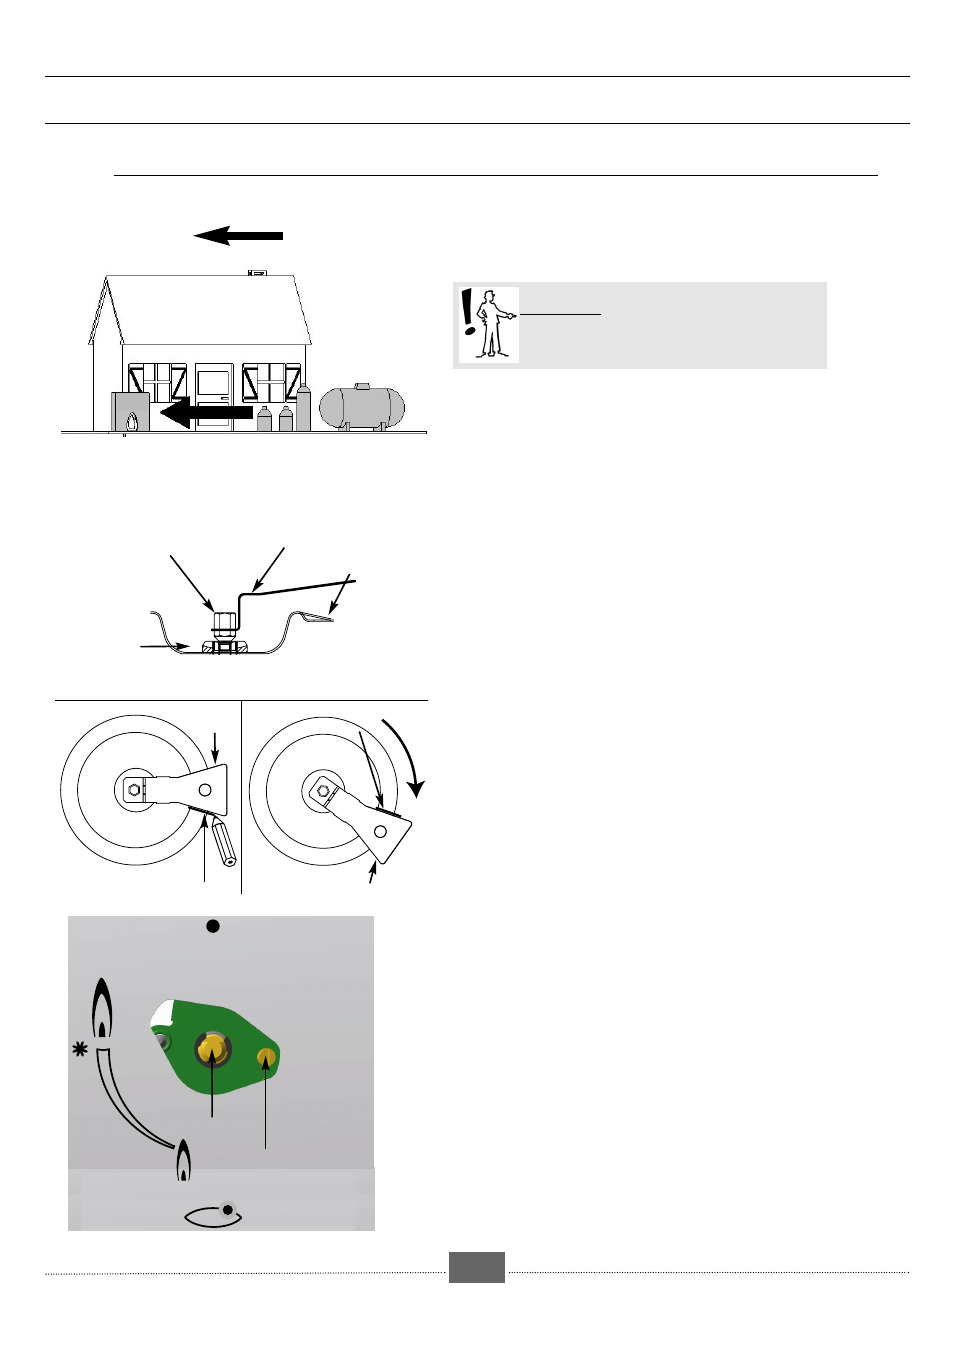
When carrying out this operation, you should
successively:
➊ A
DAPT THE GAS CONNECTION
❷ C
HANGE THE INJECTORS
❸ A
DJUST THE RETARDER ON THE TAPS
➊
adjustment. Refer to the paragraph“Gas connec-
tion”.
❷
C
HANGE THE INJECTORS
in the following way:
• Remove the supports, and all the burner caps and
heads.
• Using the spanner supplied, unscrew the injectors
at the bottom of each dish and remove them (fig. 2).
• Replace these with the injectors supplied in the bag, in
accordance with the gas characteristics table at the
end of this instruction manual. To do this:
➪ First, screw them by hand.
➪ First, screw on the injector tightly by hand.
➪ Screw them up to tightening (not forced).
➪ With a pencil draw a line on the hearth plate as
indicated (fig. 3).
➪ Turn the spanner clockwise until the line appears on
the other side (fig. 4).
• Replace the heads, caps and grids of all the
burners.
❸
A
DJUST THE RETARDER ON THE TAPS
located under
the knobs. Proceed as follows:
• Work on one burner at a time:
- light the burner and turn the knob to maximum
position,
- remove the knob of the corresponding tap,
- using the screwdriver, supplied in the bag, unscrew
the yellow, brass, adjustment screw (fig.5) turning it
round twice, anti-clockwise.
- put back the knob, and turn it to minimum
position,
- remove the knob again then turn the adjustment
screw clockwise as low as possible without
extinguishing the flames,
- put back the knob then turn it several times from
maximum position to minimum position : the flame
must not be extinguished. Otherwise, re-adjust it by
slightly screwing or unscrewing the adjustment screw
so that a stable flame is obtained when the knob is
turned from maximum to minimum position.
P
P
a
a
r
r
t
t
1
1
:
:
F
F
o
o
r
r
t
t
h
h
e
e
I
I
n
n
s
s
t
t
a
a
l
l
l
l
e
e
r
r
-8-
Angle spanner
Hearth plate
Injector
Dish
Spanner
Spanner
Line
Line
CHANGING FROM BUTANE / PROPANE GAS
TO NETWORK GAS (NATURAL GAS) (FIG. 1)
NETWORK GAS
(NATURAL GAS)
Meter
butane propane
BUTANE/PROPANE
Pressure regulator
compulsory
fig.1
fig.2
fig.3
fig.4
HOW TO MAKE THE CHANGE OF GAS TYPE FOR THE COOKING HOB
●
Disconnect the apparatus before intervention
propane
Tap axis
Adjustment
screw
fig. 5
ADAPT THE HOB CONNECTION to the new gas