Kleenmaid CH700X User Manual
Page 7
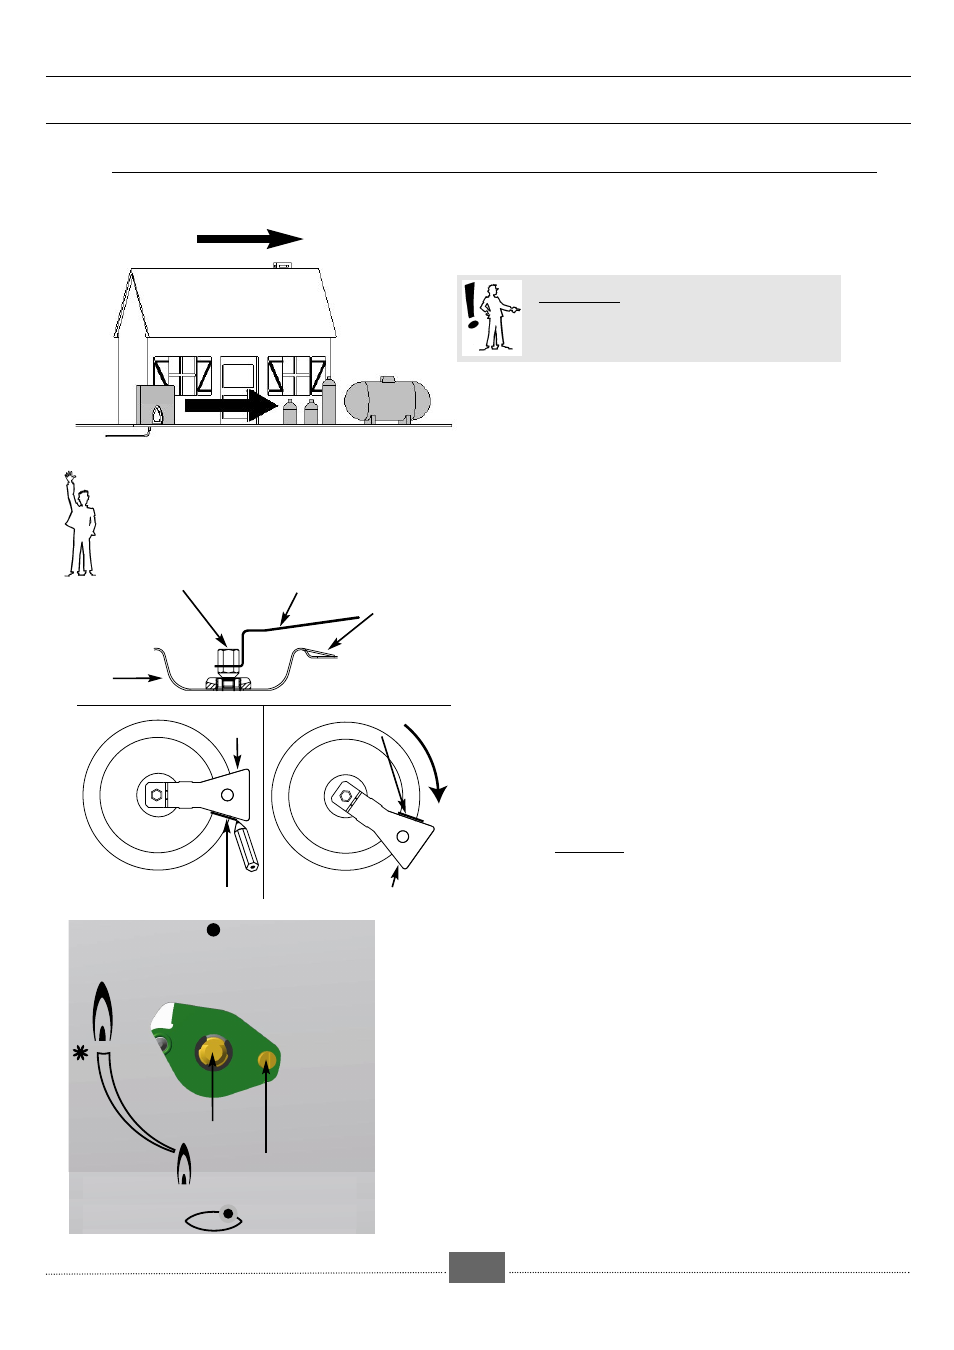
PRELIMINARY REMARKS
•
Your cooking hob is delivered regulated for
network gas (natural gas).
The injectors needed for adaptation to propane /buta-
ne can be found in the wallet containing the
instructions.
When carrying out this operation, you should
successively:
➊ A
DAPT THE GAS CONNECTION
❷ C
HANGE THE INJECTORS
❸ A
DJUST THE RETARDER ON THE TAPS
➊
Refer to the paragraph “Gas Connection”.
❷
C
HANGE THE INJECTORS
in the following way:
• Remove the supports, and all the burner caps and
heads.
• Using the spanner supplied, unscrew the injectors
at the bottom of each dish and remove them (fig. 2).
• Replace these with the injectors supplied in the
bag, in accordance with the gas characteristics
table; To do this:
➪ First, screw them by hand.
➪ Put the spanner well onto the injector.
➪ Screw them up to tightening (not forced).
➪ With a pencil draw a line on the hearth plate as
indicated (fig. 3).
➪ Turn the spanner clockwise until the line appears on
the other side (fig. 4).
• Replace the heads, caps and grids of all the
burners.
❸
A
DJUST THE RETARDER ON THE TAPS
located under the
knobs. Proceed as follows:
• Pull up the knobs and remove them.
• Using the small screwdriver, supplied in the bag,
screw fully the brass, adjustment screw (yellow)
(fig.5) clockwise.
• Work on one tap at a time.
• Put the knobs back in place making sure they are
turned in the right direction.
P
P
a
a
r
r
t
t
1
1
:
:
F
F
o
o
r
r
t
t
h
h
e
e
I
I
n
n
s
s
t
t
a
a
l
l
l
l
e
e
r
r
Angle spanner
Hearthplate
Injector
Dish
NETWORK GAS
(NATURAL GAS)
Meter
butane propane
propane
BUTANE/PROPANE
Pressure regulator
compulsory
Disconnect the apparatus before intervention
CHANGING FROM NETWORK GAS
(NATURAL GAS) TO BUTANE / PROPANE
GAS (FIG. 1)
fig.1
fig.2
HOW TO MAKE THE CHANGE OF GAS TYPE FOR THE COOKING HOB
●
Spanner
Spanner
Line
Line
fig.3
fig.4
Tap axis
Adjustment
screw
fig. 5
-7-
ADAPT THE HOB CONNECTION to the new gas adjustment