Instant hot water dispenser, What you should know before you begin, 3equipment you may need – InSinkErator C1300 User Manual
Page 2: Equipment required
1
2
3
Brass Nut
Ferrule
Brass Insert
Brass Nut
1/4"
copper tube
Ferrule
For Technical Assistance
1-800-845-8345
For Technical Assistance
1-800-845-8345
3
Equipment You May Need:
For your satisfaction and safety, read all instructions, WARNINGS, CAUTIONS and NOTICES before installing or using
this instant hot water dispenser.
Make sure that all electrical wiring and connections conform to local codes.
A standard 115-volt grounded electrical outlet is required for the dispenser’s electrical power.
The wall outlet powering the dispenser must have power supplied to it continuously.
It is recommended that a dedicated control valve be installed on the cold water line supplying water to this system.
If you suspect elevated levels of chlorine in your water, or your water has a rusty appearance before the installation
of this unit, it is recommended to use our water filtration system.
This product contains stainless steel. The manufacturer cannot guarantee against rusty water because of the number
of factors that are involved beyond the manufacturer’s control. However, the sudden appearance of rusty water
discharged from the hot water dispenser may indicate the need for service or replacement of this product.
To prevent damage or unit not operating properly, the water pressure must be between 25 psi - 125 psi (172 kPa -
862 kPa). Ambient (room) temperature between 50ºF and 100ºF.
Moving parts inside the tank causing a rattling noise is normal.
WHAT YOU SHOULD KNOW BEFORE YOU BEGIN
Equipment Required:
Anchors for drywall
Hole saw
Basin wrench
Hole punch
2
IN THIS PACKAGE
C1300
Semi-circular
Mounting Plate
Hex Nut
Hex Tool
Rubber O-Ring
1-1/2" Extension
3/4" Screws (2)
Tank
Foodservice Equipment
Instant Hot Water Dispenser
Installation, Care & Use Manual
n
Drill
n
T-fitting
n
Dedicated control valve
n
Adjustable wrench
n
Phillips and flat blade screwdrivers
n
Pencil
n
Tape measure
n
Level
Do not plug in the hot water tank until step 6B. To avoid permanent damage to the
product, only operate the tank after it is filled with water
NOTICE
These instructions are separated
into main sections, indicated by
numbers, and subsections,
indicated by capital letters. The
manual is set-up this way to
allow you to take a break at any
point after completing a section
or subsection without affecting
the installation process.
Provides a step-by-step narrative describing
the installation step, with tick boxes that can be
marked as you progress through the installation.
Contains simple illustrations that provide visual
instruction to support the narrative.
WARNINGS, CAUTIONS and NOTICES that will
require your attention during the step.
1
2
1
2
3
HOW TO USE THIS INSTRUCTION MANUAL
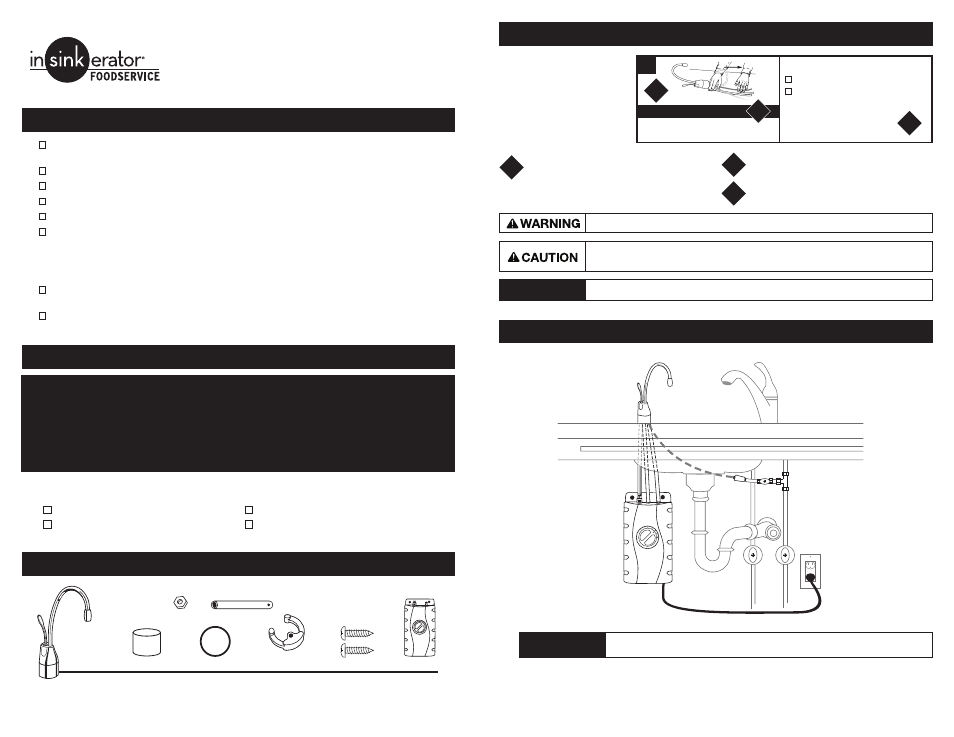
OVERVIEW OF A COMPLETED SETUP
WHAT YOU NEED TO GET STARTED
A potentially hazardous situation, which, if not avoided, could result in death or serious injury.
Potentially hazardous situation which, if not avoided, could result in minor
or moderate injury.
Notice is used to address practices not related to personal injury.
NOTICE
NOTICE
3
A
C1300
Unpack dispenser components.
On a firm, flat surface, carefully
straighten the copper tubing.
Property Damage: Do not pinch or break copper
tubing. Do not distort the last 1 inch of tubing.