Adjust high and low fire settings – Greenheck Furnace PVF 4:1 Modulating Valve (474047) User Manual
Page 2
®
Phone: (715) 359-6171 • Fax: (715) 355-2399 • E-mail: [email protected] • Website: www.greenheck.com
2
474047 • 4:1 Modulating Valve, Rev. 2, May 2011
Copyright 2011 © Greenheck Fan Corporation
Adjust High and Low Fire Settings
High Fire Settings
Natural Gas
3.5 inches WC
LP Gas
10.0 inches WC
Low Fire Settings
Natural Gas
0.3 inches WC
LP Gas
1.0 inches WC
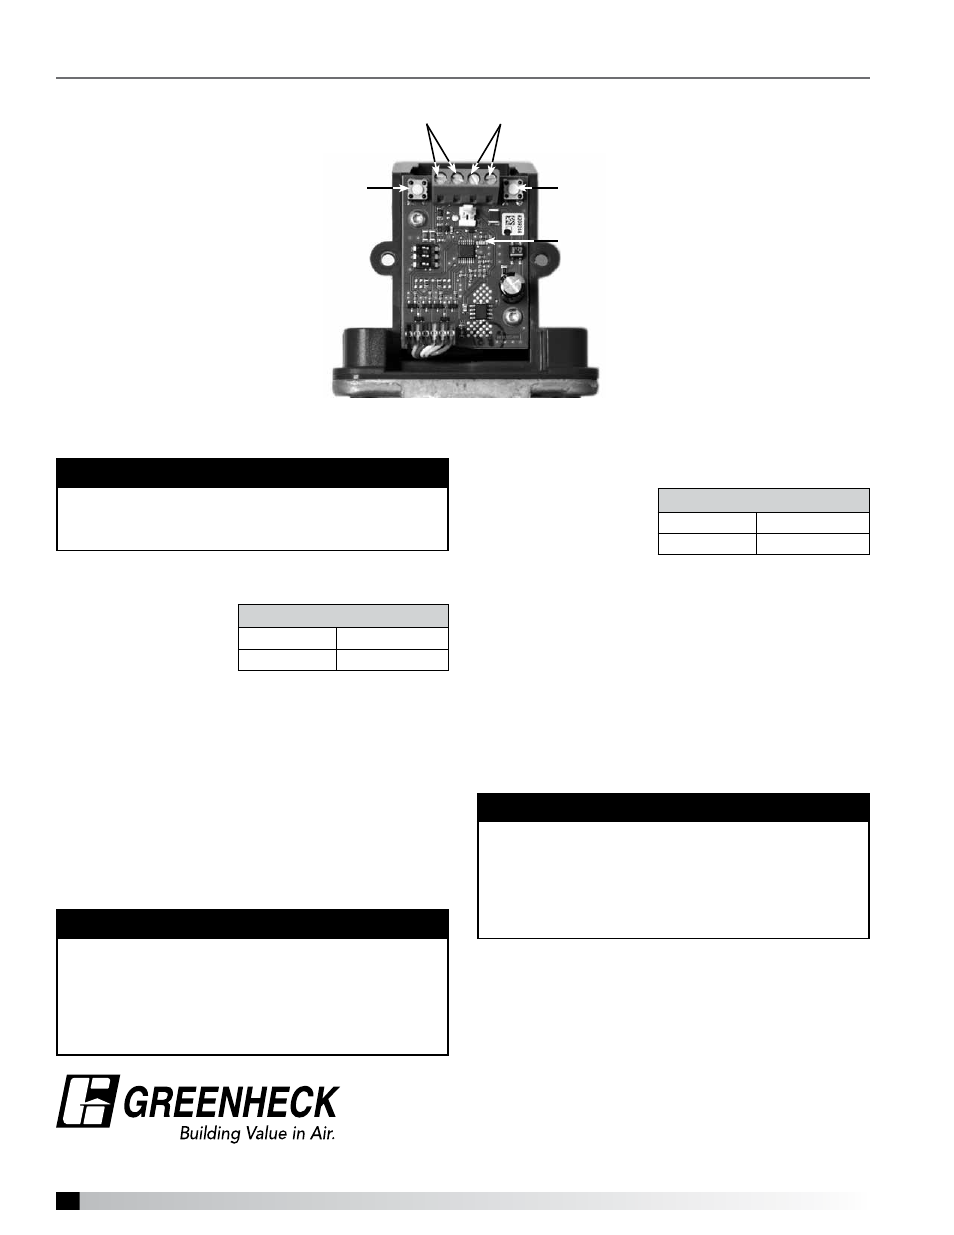
EXA Modulating Gas Valve
(with cover removed)
Terminals 3 & 4
(power)
Button #2
LED Light
Button #1
Terminals 1 & 2
(signal)
EXA Valve Low Fire Setting
The Low Fire setting
on the valve must be
adjusted to maintain
the correct minimum
amount of gas at
the burner manifold. With a manometer installed at
the burner manifold test port, press and hold down
button #2 until the LED blinks red. Release the button.
Observe the gas pressure on the manometer. The Low
Fire setting can now be adjusted by pushing button
#1 to increase the pressure or by pushing button
#2 to decrease the pressure.
Save the Low Fire setting by simultaneously holding
down buttons #1 and #2 until the LED turns off. If the
new setting is not saved within five minutes, the EXA
valve will default back to its last saved setting.
Remove the manometer and reinstall the plug in the
manifold test port.
Follow the instructions in the PVF/PVG Furnace IOM
and unit IOM to complete the rest of the start-up.
EXA Valve High Fire Setting
The High Fire setting
on the valve must
be adjusted to allow
the correct maximum
amount of gas at the
burner manifold. Connect a manometer to the test
port on the burner manifold. Press and hold button #1
until the LED lights solid red. Release the button.
Observe the gas pressure on the manometer. The EXA
valve can now be adjusted by pushing button #1 to
increase the pressure or by pushing button #2 to
decrease the pressure.
Save the High Fire setting by simultaneously holding
down buttons #1 and #2 until the LED turns off. If the
new setting is not saved within five minutes, the EXA
valve will default back to its last saved setting.
NOTE
Before setting the EXA valve, make certain the
Honeywell combination valve is set to the maximum
setting. Turn the regulator screw all the way in.
NOTE
During the adjustment process, each push of either
button will increase or decrease the pressure in
steps. Holding down either button auto-steps and
eliminates the need to repeatedly push the button.
Use this feature to rapidly increase or decrease the
gas flow.
NOTE
During the adjustment process, each push of either
button will increase or decrease the pressure in
steps. Holding down either button auto-steps and
eliminates the need to repeatedly push the button.
Use this feature to rapidly increase or decrease the
gas flow.