Grandstream LinkCom IP Door System with Grandstream Configuration Guide User Manual
Page 9
Grandstream Networks, Inc.
LinkCom IP Door System & Grandstream IP Multimedia Phones
Page 9 of 13
www.grandstream.com
Configuration Guide
Last Update : 03/2013
Please note that this scenario depends on how many Buttons you have in your LinkCom Door System
S
TEP
1: L
INK
C
OM
D
OOR
S
YTEM
C
ONFIGURATION
Please refer to “Step 1: LinkCom Door System Configuration” described in First scenario, the steps are
the same, except for 3
rd
step.
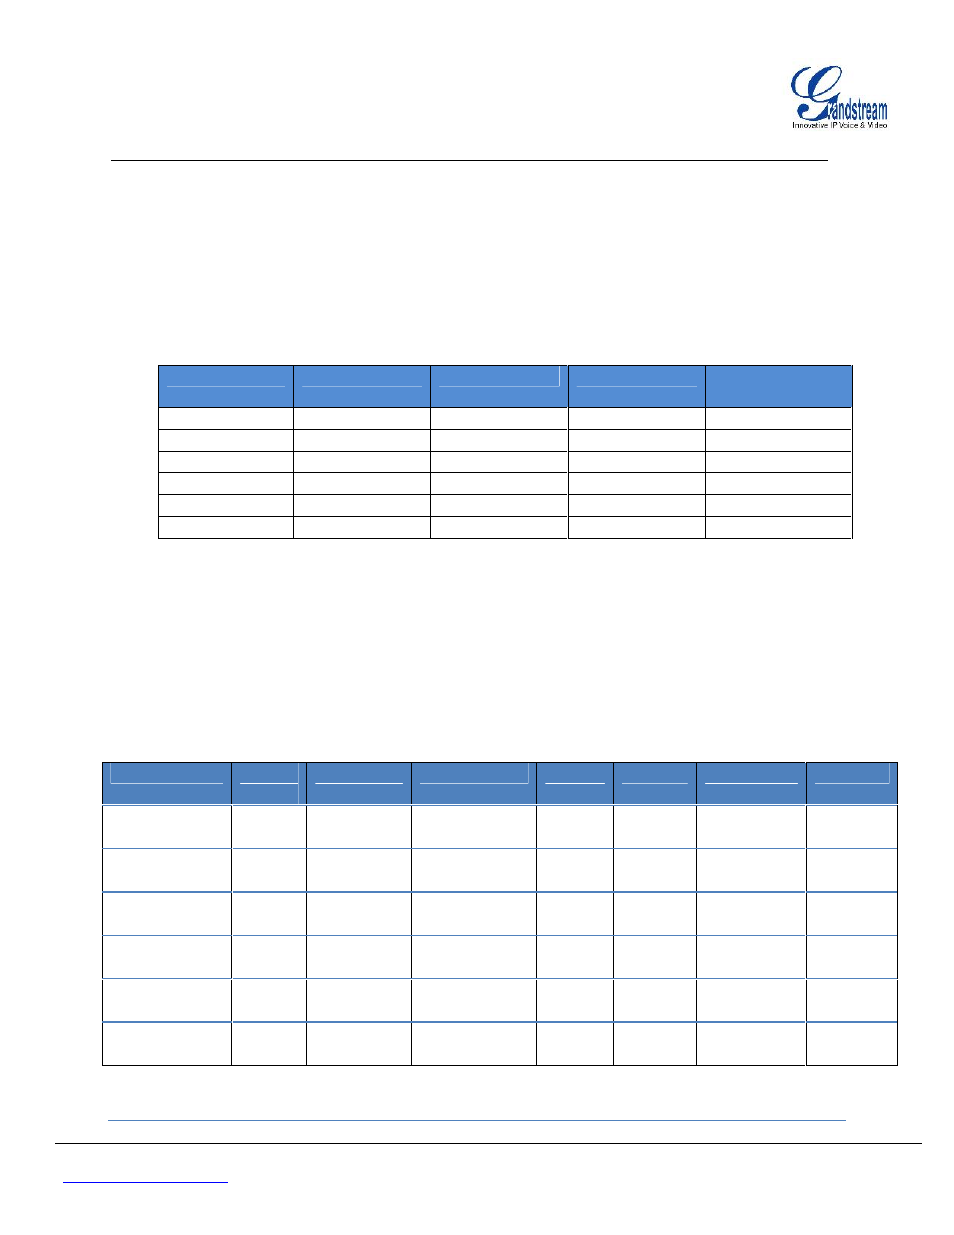
The Button numbers need to be adjusted to match the actual scenario. You can refer to the next table
for an example of configuration.
Phone
Button number
Position enabled
Position Name
Phone Numbers
(Number 1)
Floor1
1
Yes
Floor1
192*168*60*10
Floor2
2
Yes
Floor2
192*168*60*11
Floor3
3
Yes
Floor3
192*168*60*12
Floor4
4
Yes
Floor4
192*168*60*13
Floor5
5
Yes
Floor5
192*168*60*14
Floor6
6
Yes
Floor6
192*168*60*15
S
TEP
2: G
RANDSTREAM
GXV3140/GXV3175
V
1/
V
2 C
ONFIGURATION
Please refer to “Step 2: GXV3140/GXV3175 Configuration” described in First scenario, the steps are the
same and should be done on each phone.
The Account Name / SIP User ID / Authenticate ID / Authenticate Password / Name need to be
different on each phone. You can refer to the next table for an example of configuration.
Phone/IP
Account
Active
Account
Name
SIP Server
SIP User
ID
Auth. ID Authenticate
Password
Name
Phone1
192.168.60.10
Yes
Floor1
192.168.60.203
100
100
100
Floor1
Phone2
192.168.60.11
Yes
Floor2
192.168.60.203
101
101
101
Floor2
Phone3
192.168.60.12
Yes
Floor3
192.168.60.203
102
102
102
Floor3
Phone4
192.168.60.13
Yes
Floor4
192.168.60.203
103
103
103
Floor4
Phone5
192.168.60.14
Yes
Floor5
192.168.60.203
104
104
104
Floor5
Phone6
192.168.60.15
Yes
Floor6
192.168.60.203
105
105
105
Floor6