Unvented (vent-free) logmate™ firebox vanguard, Technical service, Replacement parts installation – Desa FB36NCA User Manual
Page 12: Continued
12
103451
UNVENTED (VENT-FREE) LOGMATE™ FIREBOX
VANGUARD
TECHNICAL
SERVICE
You may have further questions about in-
stallation, operation, or troubleshooting.
If so, contact DESA International’s Techni-
cal Service Department at
1-800-DESA LOG (1-800-337-2564).
Note
: Use only original replacement parts.
This will protect your warranty coverage for
parts replaced under warranty.
Parts Under Warranty
Contact authorized dealers of this product.
If they can’t supply original replacement
part(s), call DESA International’s Techni-
cal Service Department at
1-800-DESA LOG (1-800-337-2564).
When calling DESA International, have
ready
• your name
• your address
• model number of your firebox
• how firebox was malfunctioning
• type of gas used (propane or natural gas)
• purchase date
Usually, we will ask you to return the defec-
tive part to the factory.
Parts Not Under Warranty
Contact authorized dealers of this product.
If they can’t supply original replacement
part(s), call DESA International’s Parts
Department at 1-800-972-7879 for referral
information.
When calling DESA International, have
ready
• model number of your firebox
• the replacement part number
Note
: The firebox identification label (in-
cluding model number, serial number, clear-
ances, etc.) is located behind the left side
firebrick panel. See Figure 15, page 10.
REPLACEMENT
PARTS
INSTALLATION
Continued
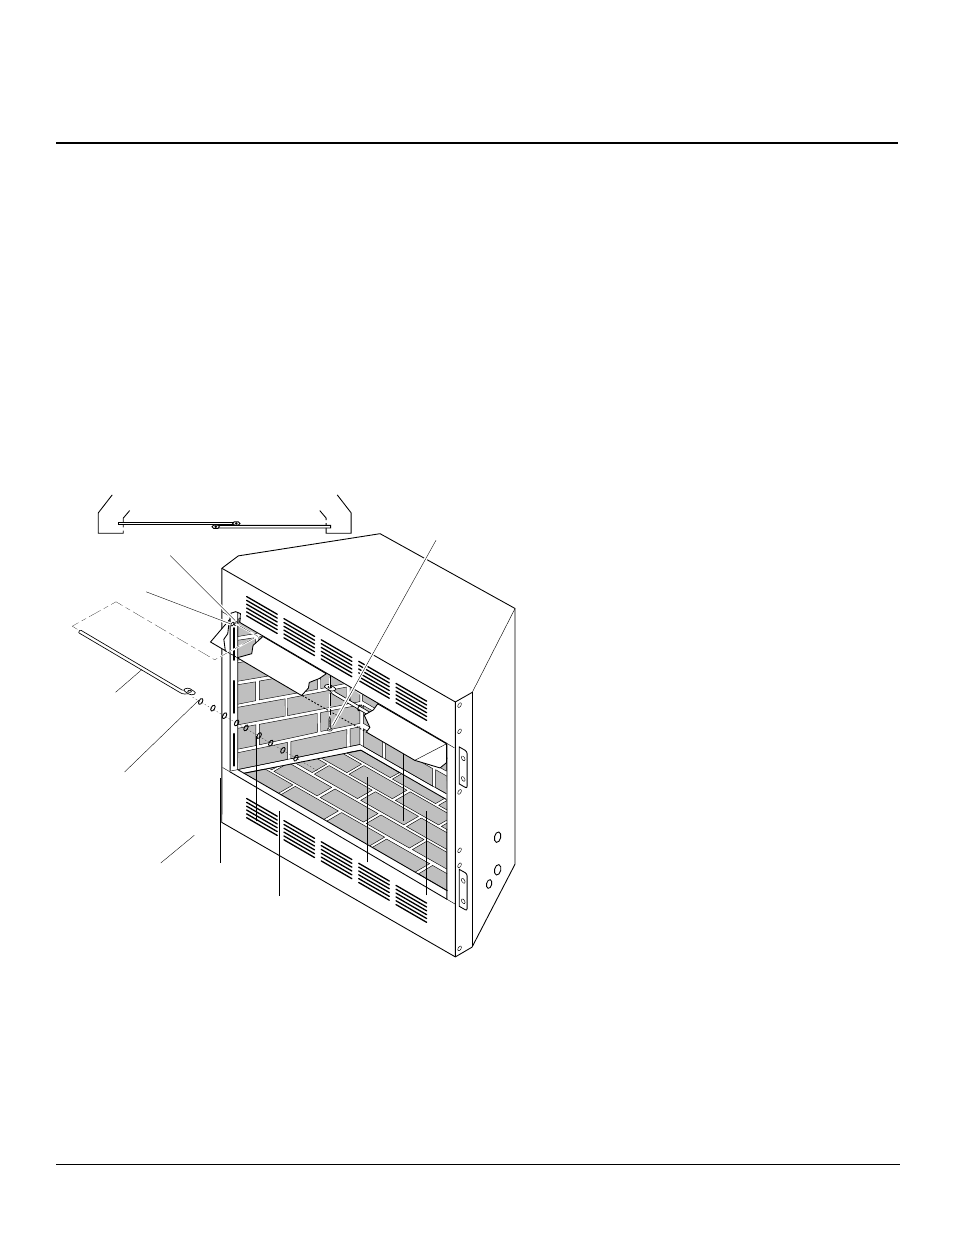
INSTALLING FIREPLACE
SCREEN
1.
Insert each rod through all rings located
at top of screen.
2.
Insert first rod into rear hole in left side
of firebox. Fasten rod to rear hole near
center of firebox using #10 x 3/8"
Phillips screw provided.
3.
Insert other rod into front hole on right
side of firebox and fasten using remain-
ing Phillips screw.
Figure 21 - Installing Fireplace Screen (Models FB36CA and FB42C Shown)
,,,,,,,,,,
,,,,,,,,,,
,,,,,,,,,,
,,,,,,,,,,
,,,,,,,,,,
,,,,,,,,,,
,,,,,,,,,,
,,,,,,,,,,
,,,,,,,,,,
,,,,,,,,,,
,,,,,,,,,,
,,,,,,,,,,
,,,,,,,,,,
,,,,,,,,,,
,,,,,,,,,,
,,,,,,,,,,
,,,,,,,,,,
,,,,,,,,,,
,,,,,,,,,,
,,,,,,,,,,
,,,,,,,,,,
,,,,,,,,,,
,,,,,,,,,,
,,,,,,,,,,
,,,,,,,,,,
,,,,,,,,,,
,,,,,,,,,,
,,,,,,,,,,
,,,,,,,,,,
,,,,,,,,,,
,,,,,,,,,,
,,,,,,,,,,
,,,,,,,,,,
,,,,,,,,,,
,,,,,,,,,,
,,,,,,,,,,
,,,,,,,,,,
,,,,,,,,,,
,,,,,,,,,,
,,,,,,,,,,
,,,,,,,,,,
,,,,,,,,,,
,,,,,,,,,,
,,,,,,,,,,
,,,,,,,,,,
,,,,,,,,,,
,,,,,,,,,,
,,,,,,,,,,
,,,,,,,,,,
,,,,,,,,,,
,,,,,,,,,,
,,,,,,,,,,
,,,,,,,,,,
,,,,,,,,,,
,,,,,,,,,,
,,,,,,,,,,
,,,,,,,,,,
Screw
Rear Hole
Top View of Rod Layout
Rod
Front Hole
Ring
Screen