Vent-free natural gas log heater, Installation, Continued – Desa CGD3924NT EN User Manual
Page 16
16
107123
VENT-FREE NATURAL GAS LOG HEATER
For more information, visit www.desatech.com
Dual Burner Biltmore Split Oak
Models
WARNING: Failure to position
the parts in accordance with these
diagrams or failure to use only
parts specifically approved with
this heater may result in property
damage or personal injury.
INSTALLATION
Continued
CAUTION: After installation and
periodically thereafter, check to en-
sure that no flame comes in contact
with any log. With the heater set to
High, check to see if flames contact
any log. If so, reposition logs ac-
cording to the log installation in-
structions in this manual. Flames
contacting logs will create soot.
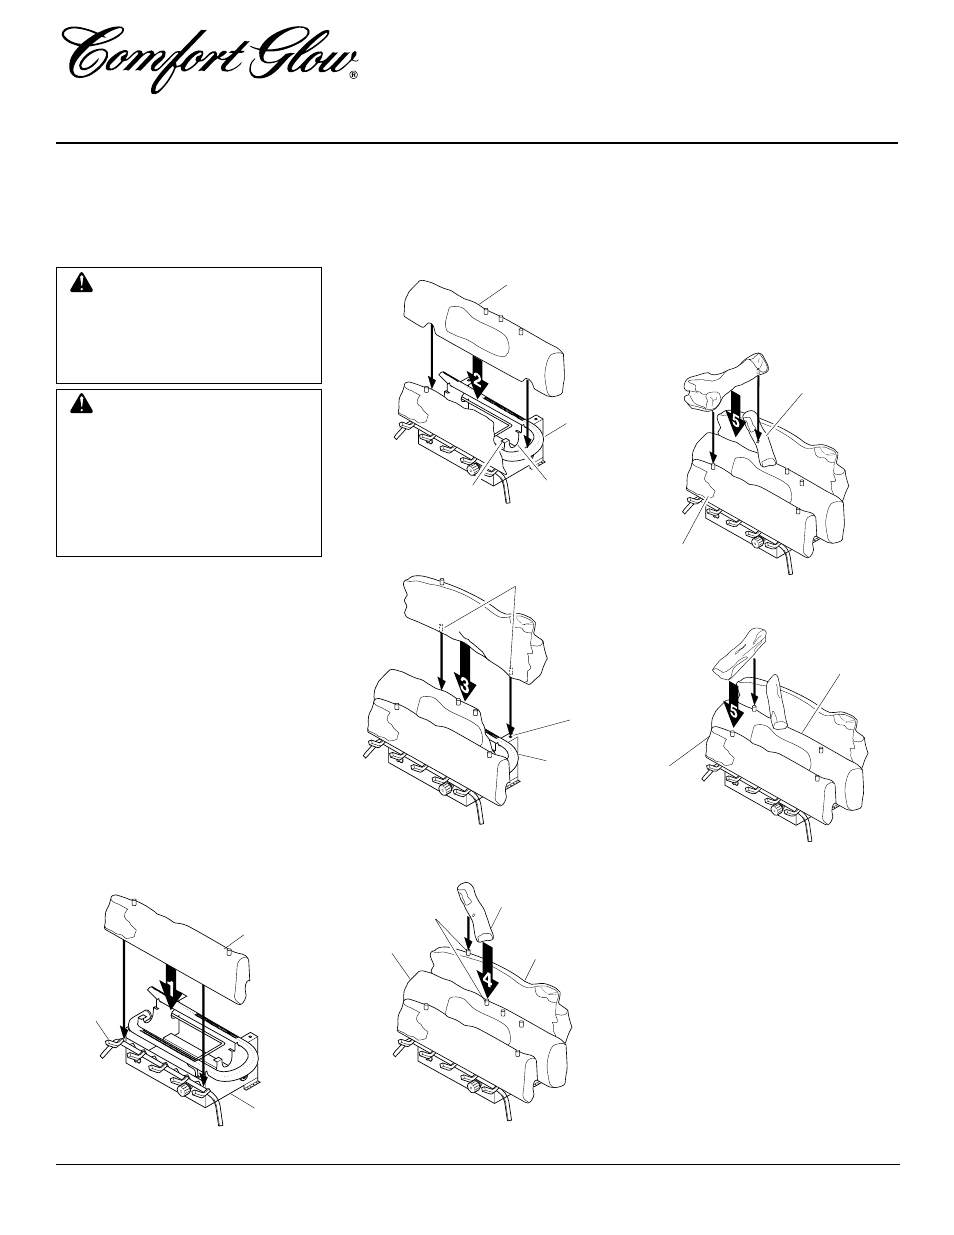
Each log is marked with a number. These
numbers will help you identify the log when
installing. It is very important to install these
logs exactly as instructed. Do not modify
logs. Only use logs supplied with heater.
1.
Place the front log (#1) on the grate fin-
gers. Make sure the front log rests
firmly between the grate fingers and the
grate base (see Figure 27).
2.
Place the base of the middle log (#2) in
the U-shaped slots of the grate base. The
cutout on the right of the middle log
should fit over the burner (see Figure 28).
Make sure the front of the middle log is
resting on the tabs of the grate base.
3.
Locate pegs on the bottom of back log (#3).
Slide these pegs into the holes in the grate
base behind the burner (see Figure 29).
Figure 27 - Installing Front Log (#1)
(CCL3930NTA Shown)
Figure 28 - Installing Middle Log (#2)
(CCL3930NTA Shown)
Figure 29 - Installing Rear Log (#3)
(CCL3930NTA Shown)
Figure 30 - Installing Crossover Log (#4)
(CCL3930NTA Shown)
Figure 31 - Installing Crossover Log (#5)
(CCL3930NTA Shown)
Middle Log (#2)
Tab
Burner
U-Shaped
Slot
Hole in
Grate Base
Front Log (#1)
Grate
Fingers
4.
Locate holes on the bottom of crossover
log (#4). Slide front hole onto the left
peg (CCL3924NT or CCL3930NTA)
or middle peg (CCL3018NT) on the
middle log (#2) and the peg on the back
log (#3). See Figure 30 for placement.
5.
For CCL3924NT and CCL3930NTA
Only:
Locate peg and hole on the bot-
tom of crossover log (#5). Slide the peg
into the hole located in crossover log
(#4). Slide the hole onto the peg on
front log (#1). See Figure 31.
For CCL3018NT Only:
Locate holes on
the bottom of crossover log (#5). Slide
the holes over the left pegs on middle
log (#2) and front log (#1). See Figure
Grate Base
Pegs
Burner
Log #2
Log #3
Pegs
Crossover Log (#4)
Front Log (#1)
Log #4
Crossover
Log (#4)
Front
Log (#1)
Figure 32 - Installing Crossover Log (#5)
(CCL3018NT Only)