Code blue, Cb 2 series, Cb 2-e – Code Blue CB 2-E ECONOMICAL WALL MOUNT HELP POINT User Manual
Page 28: Pole mount instructions
Code Blue
•
259 Hedcor Street
•
Holland, MI 49423 USA
•
800.205.7186
•
www.codeblue.com
GU-149-G
page 28 of 43
CB 2 Series
Administrator Guide
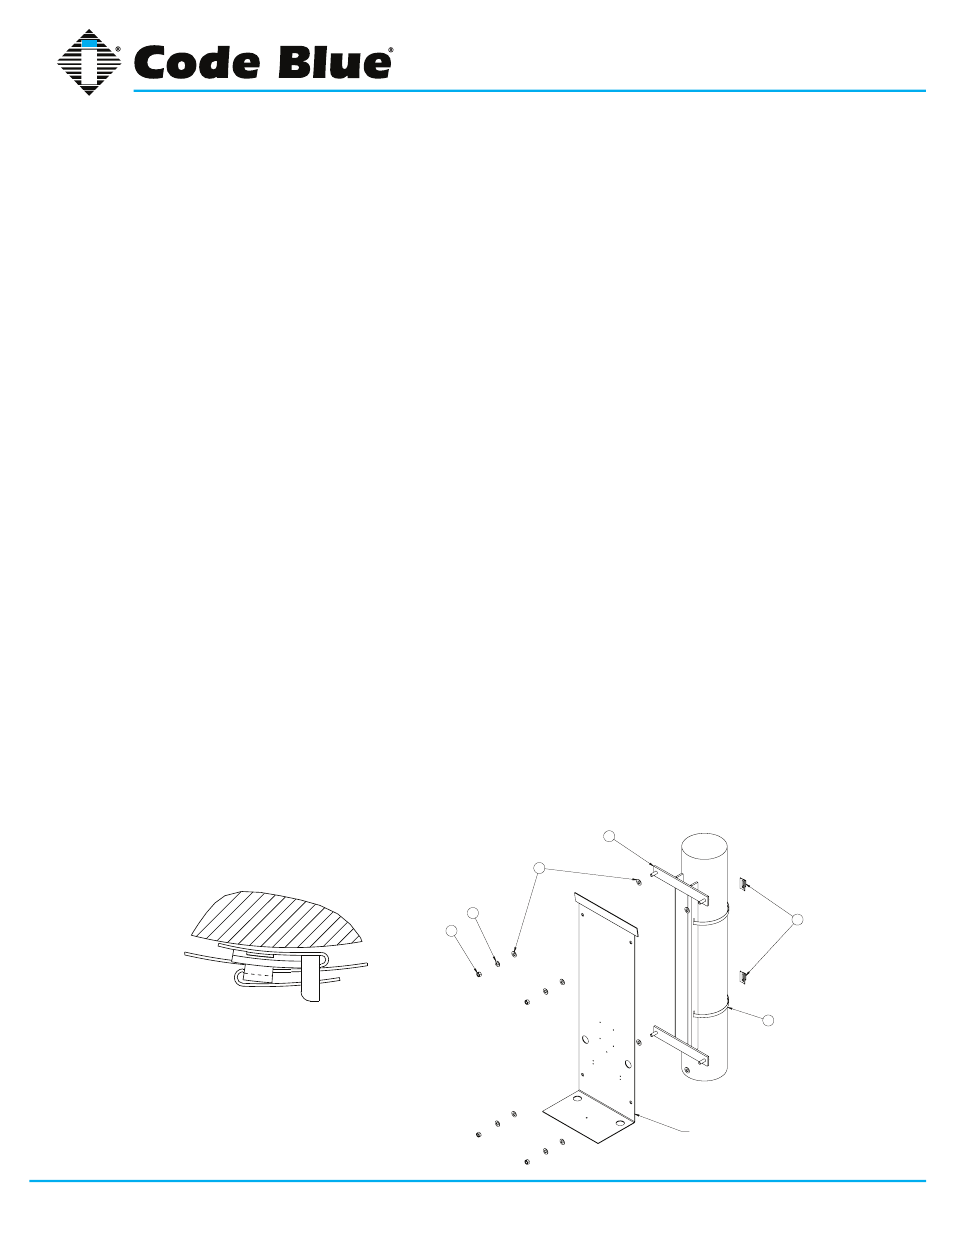
16 Pole Mount Bracket Installation Instructions
1.0 THREAD MOUNTING STRAPS THROUGH SLOTS
1.1 Thread mounting straps through slots for any size poles.
2.0 HOLD BRACKET TO POLE
2.1 Set the height of the bracket (C) so that the speakerphone push button(s) on the unit will be
at desired height (please check with local codes for ADA compliance).
3.0 BAND THE BRACKET TO THE POLE AT DESIRED HEIGHT
3.1 To eliminate waste, pull band (A) from carton as needed. With ears of buckle (B) away from
operator, slide
the buckle on the banding. Lace banding around the object being clamped and again
through buckle.
3.2 Bend end of band under buckle.
3.3 Slide band into banding tool nose slot.
3.4 When maximum tension has been reached, roll tool over buckle. At same time reversing
handle carefully
approximately ¾ turn to avoid breakage. The band that is released will be used in the bend
and therefore
there is no loss of tension.
3.5 Lift cutter lever and band will be cut to correct length.While holding the stub of the band with
your thumb,
hammer flat over bridge of buckle.
3.6 Complete application by hammering the buckle ears over the stub.
4.0 ATTACH ENCLOSURE TO BRACKET
4.1 Place a rubber washer (D) on each of the four studs.
4.2 Align and place the back plate of the unit over the four studs.
4.3 Place a second set of rubber washers on to each of the four studs (inside the unit).
4.4 Place a steel washer (E) on each of the four studs.
4.5 Turn a nut (F) on each of the four studs.
Banding tool sold
separately on the
Parts Order Form,
part #41441.
1.0 THREAD MOUNTING STRAPS THROUGH SLOTS
1.1 Use outside slots for larger poles and inside slots for smaller poles.
2.0 HOLD BRACKET TO POLE
2.1 Set the height of the bracket (C) so that the speakerphone push button(s) on the unit will be at desired height (please
check with local codes for ADA compliance).
3.0 BAND THE BRACKET TO THE POLE AT DESIRED HEIGHT
3.1 To eliminate waste, pull band (A) from carton as needed. With ears of buckle (B) away from operator, slide the buckle on
the banding. Lace banding around the object being clamped and again through buckle.
3.2 Bend end of band under buckle.
3.3 Slide band in tool nose slot. Press down on gripper with thumb and tension clamp by turning the handle. Maximum
tension has been reached when the band stops moving through the buckle.
3.4 When maximum tension has been reached, roll tool over buckle. At same time reversing handle carefully approximately
¾ turn to avoid breakage. The band that is released will be used in the bend and therefore there is no loss of tension.
3.5 Lift cutter lever and band will be cut to correct length.While holding the stub of the band with your thumb, hammer flat
over bridge of buckle.
3.6 Complete application by hammering the buckle ears over the stub.
4.0 ATTACH ENCLOSURE TO BRACKET
4.1 Place a rubber washer (D) on each of the four studs.
4.2 Align and place the back plate of the unit over the four studs.
4.3 Place a second set of rubber washers on to each of the four studs (inside the unit).
4.4 Place a steel washer (E) on each of the four studs.
4.5 Turn a nut (F) on each of the four studs.
Bird Eye View
(banding)
B
A
C
D
E
F
CB-2e BACKPLATE
Code Blue
®
®
Code Blue
•
92 East 64
th
ST.
•
Holland, MI 49423
•
800.205.7186
•
www.codeblue.com
IN-13012-A
Pole Mount Instructions
CB 2-e